
Spring in Colorado Springs usually starts the same way. You crack open the windows for that cool morning air, hear the birds for about ten seconds, and then notice the screen that ripped last season, the corner that never sat right again, or the frame that bends every time you try to pop it back in.
That’s usually when do it yourself screens move from “someday project” to “I guess I’m doing this today.”
A screen repair can be a satisfying home job. It’s small enough to tackle in an afternoon, practical enough to notice right away, and frustrating enough to remind you that simple projects aren’t always easy projects. Around Colorado Springs, there’s another layer to it. Our sun is harsher, our wind is less forgiving, and a screen that works fine somewhere else may not hold up the same way here.
A lot of homeowners start this job because they want fresh air without bugs, cottonwood fluff, and blowing debris. That’s a good reason to fix screens promptly. If pests are part of the bigger concern, this ultimate home defense guide is a useful companion read because screens only do part of the job when gaps around the home are still inviting trouble inside.
Enjoying Fresh Air Without the Pests in Colorado Springs
A torn screen changes how you use your house. Instead of opening the bedroom windows in the evening, you leave them shut. Instead of airing out the kitchen after dinner, you run the fan and hope for the best. On a mild day in the Pikes Peak region, that feels like a waste.
That’s why so many homeowners try the repair themselves first. In many cases, that makes sense. If the frame is still square and the mesh is the only problem, a careful rescreen can work well. The appeal is obvious. Pick up a few tools, clear off the garage bench, and fix it without waiting on anyone else’s schedule.
Why this project is so tempting
Screens look simple. A frame, some mesh, a strip of spline, done.
Then the actual-world version starts. The old spline breaks apart. The frame flexes more than expected. The mesh looks flat until you reinstall the screen and spot a wrinkle from across the room. If you live in Colorado Springs, Manitou Springs, Black Forest, or Monument, you also have to think about local wear that generic tutorials barely mention.
A good screen should disappear when you look through it and hold steady when the wind hits it.
That’s the standard worth aiming for. If the screen catches your eye because it sags, bows, rattles, or reflects damage, the job isn’t really finished.
A local approach matters
Homes here deal with dry air, strong sun, and sudden weather shifts. That combination affects how screen material ages and how frames hold tension over time. A do it yourself screens project that seems straightforward on paper can become a repeat repair if the materials aren’t a good match for the house and location.
Homeowners don’t need a complicated process. They need the right supplies, accurate measurements, and a realistic sense of what’s worth doing themselves and what’s better handled professionally. That’s where local experience helps. The same practical mindset that keeps exterior glass looking clean in Colorado Springs also applies to screens. Materials matter, fit matters, and maintenance matters if you want the repair to last.
Your DIY Screen Project Shopping List
Before you buy anything, slow down and identify what you’re fixing. Some screens need only new mesh. Others need a new frame kit, fresh corners, replacement tabs, or a different spline size. Walking into the hardware store without that clarity is how projects get more expensive and more annoying.
Material selection is the first big decision. According to a paper on screen design and capture performance, perforated filter elements can deliver a 70 to 85 percent baseline effectiveness for standard 6mm configurations, and success depends heavily on installation technique and media quality, which is why material choice comes first for any DIY screen project (screen design and capture performance paper).
Start with measuring
If you’re replacing mesh in an existing frame, measure the frame itself and inspect it closely. You’re looking for bends, loose corners, hairline cracks, and warping. A new mesh won’t solve a frame that’s already failing.
If you’re building a new screen, measure the window opening carefully and write it down immediately. Don’t trust memory. Also note how the existing screen mounts. Spring clips, pull tabs, plungers, and corner latches all affect what parts you need.
A solid measuring kit is simple:
- Tape measure: Use one with clear markings and lock it in place while checking width and height.
- Notepad or phone notes: Record each opening as you go. Label the room, the window, and any odd detail.
- Old screen sample: Bring it with you if possible. Matching frame style and hardware gets easier when you can compare directly.
Practical rule: Measure first, shop second. Buying mesh before confirming frame condition is how homeowners end up doing the same job twice.
Basic tools that actually help
Most do it yourself screens projects don’t need a shop full of equipment. They do need the right few items.
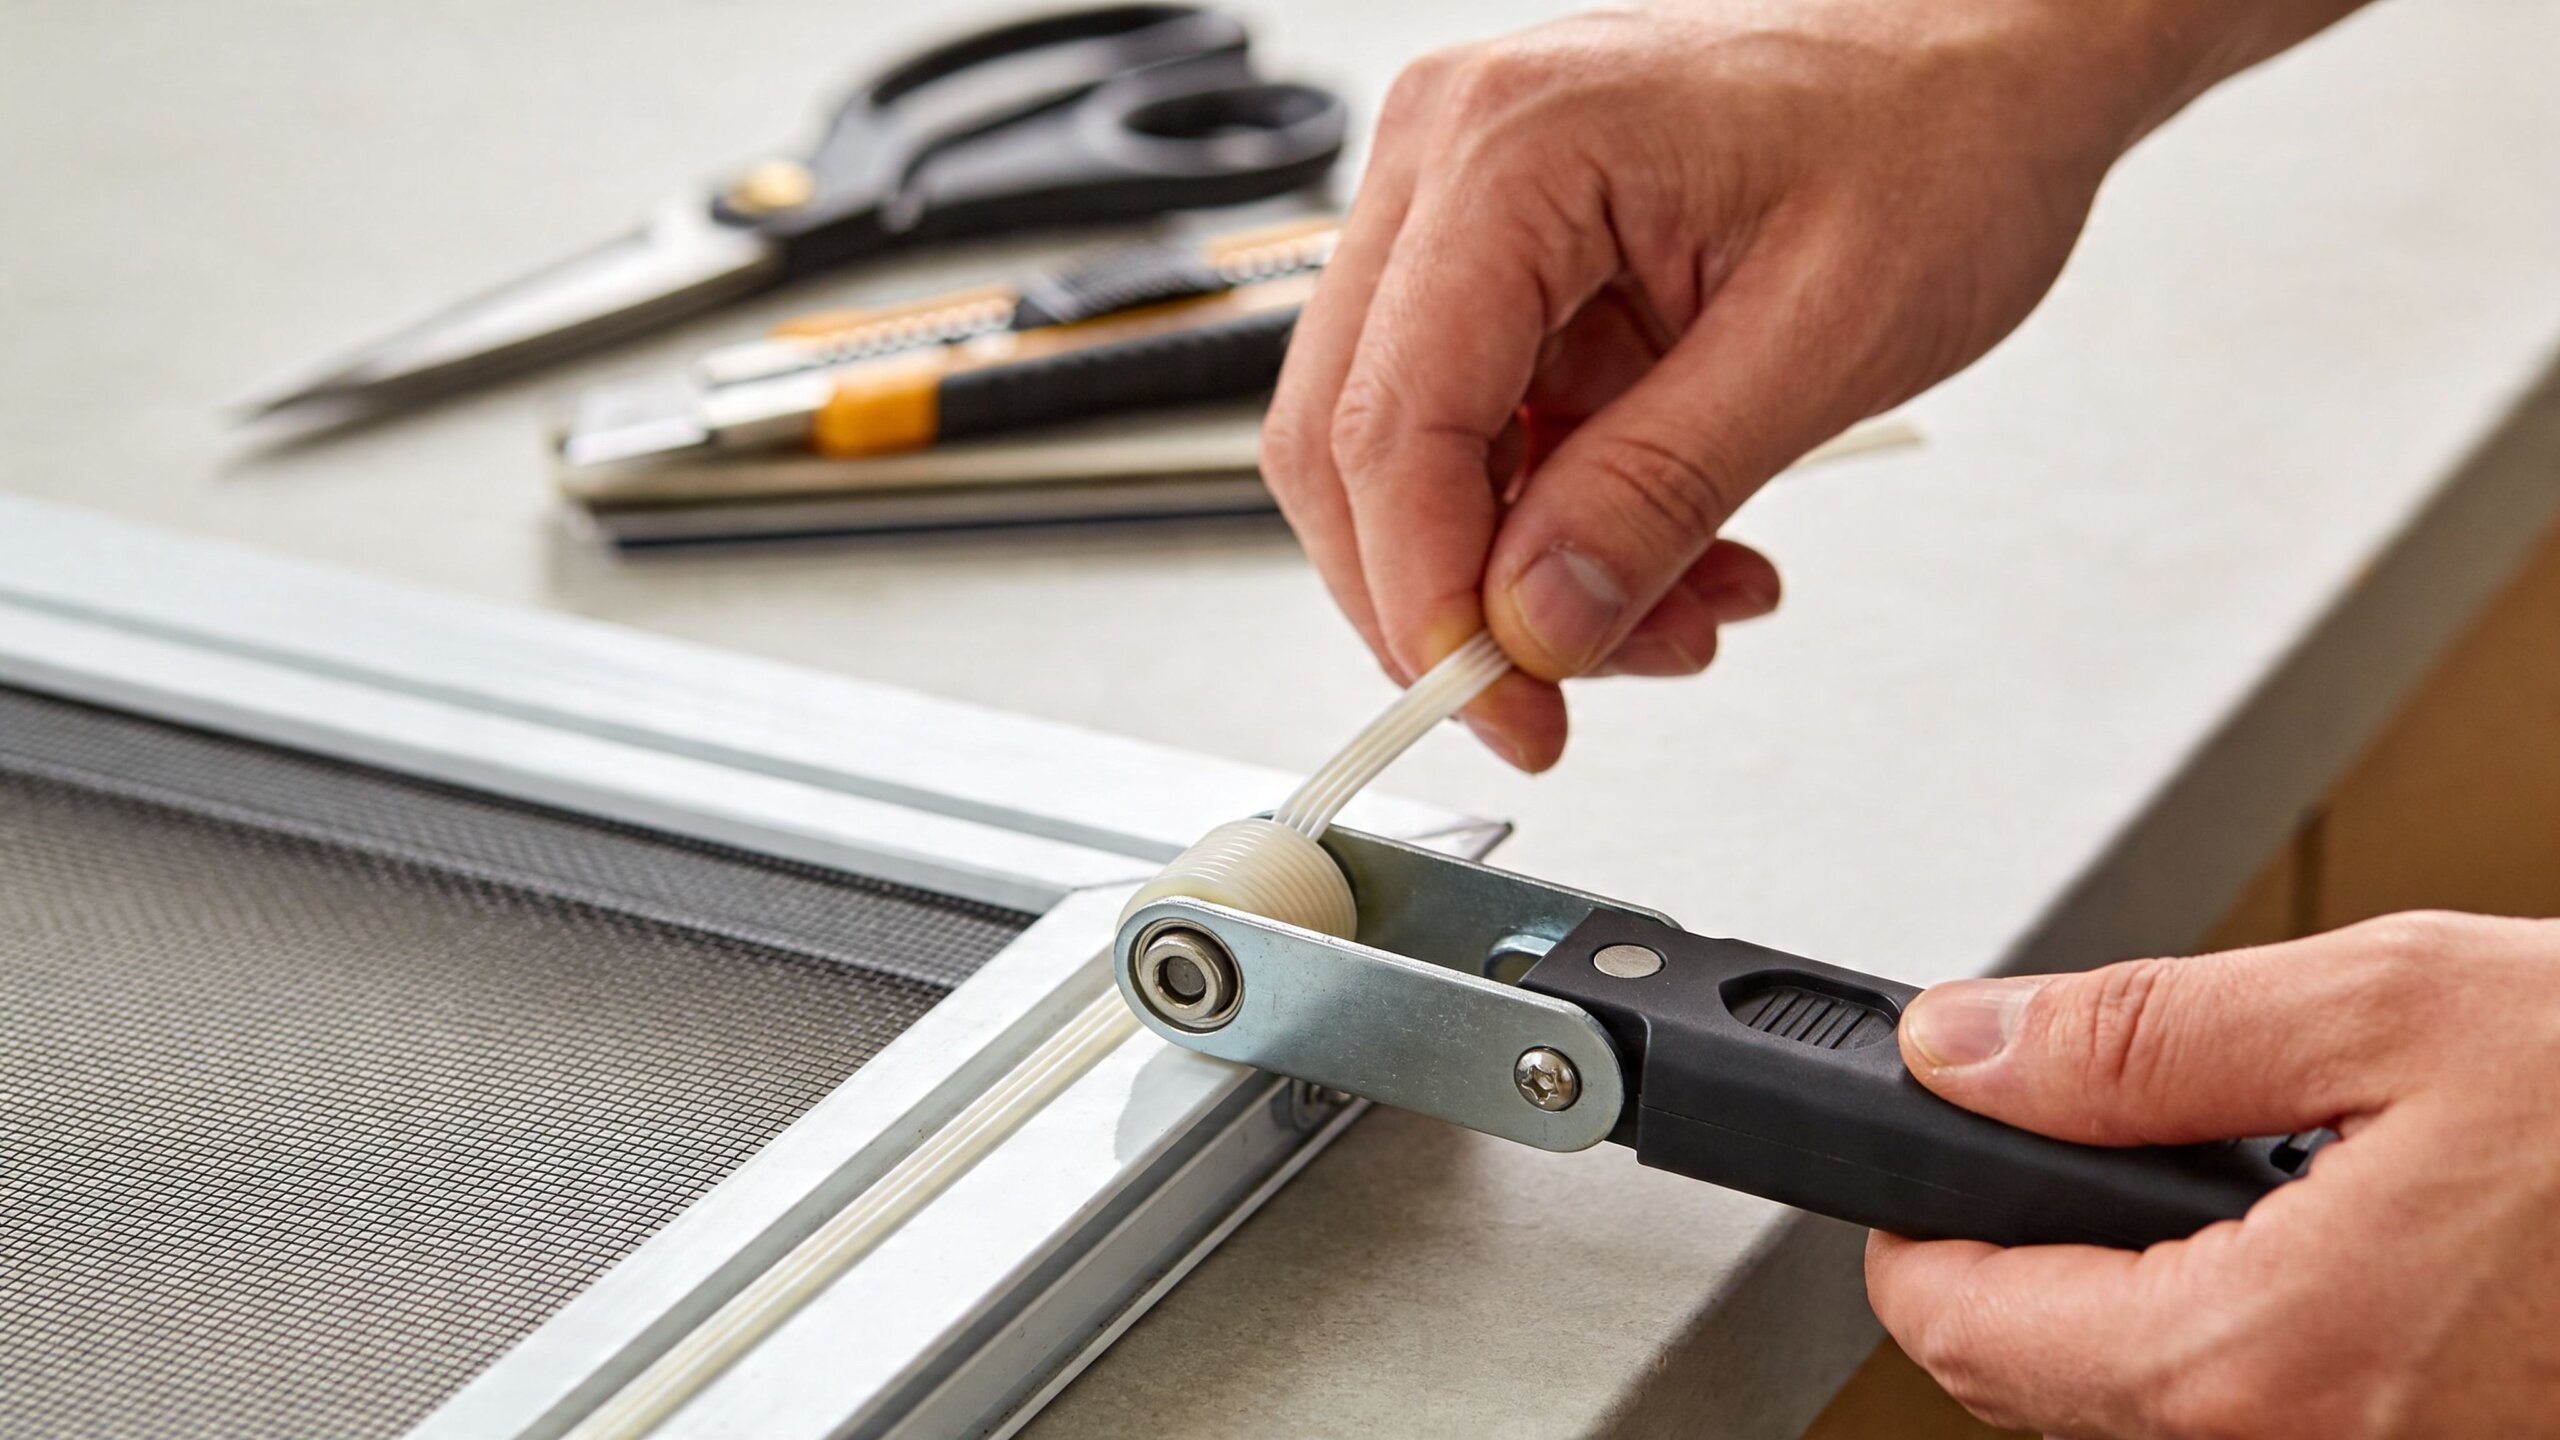
- Spline roller: This is the one tool that makes the job noticeably easier. The roller helps seat spline evenly without chewing up the frame channel.
- Utility knife: Use a sharp blade for trimming excess mesh cleanly.
- Flat work surface: A garage floor, folding table, or sturdy workbench works. Uneven surfaces create uneven tension.
- Replacement spline: Bring a piece of the old spline to compare. Similar-looking sizes can fit very differently.
- Frame kit and corner pieces: Only if the old frame is bent, cracked, or missing hardware.
- Straightedge or square: Helpful when building a new frame and checking whether corners are true.
If you’d rather compare options before buying, this guide to replacement screening material is useful for sorting through common screen types and where each one makes sense.
Choosing the right screen material for your Colorado home
Some materials are easier to install. Some hold shape better. Some are chosen more for visibility or sun control than for ease of repair. In Colorado Springs, sun exposure and weather swings should be part of the decision.
| Material Type | Pros | Cons | Best For |
|---|---|---|---|
| Fiberglass | Flexible, easy to work with, forgiving for first-time installers | Can stretch or sag if tension is poor | Standard window screens and straightforward repairs |
| Aluminum | More rigid, crisp appearance, good for homeowners who want a firmer screen | Less forgiving during installation and easier to crease | Homes where durability and a stiffer finish matter |
| Pet-resistant mesh | Tougher against claws and rough use | Harder to roll in and can be less forgiving on lightweight frames | Homes with dogs or cats that push against screens |
| Solar screen material | Helps manage sun exposure and glare | Reduces outward visibility more than standard mesh | South- and west-facing windows with intense sun |
Don’t skip the small parts
The missing parts are often what stall the project, not the mesh itself.
Check for these before you leave the store:
- Lift tabs or pull tabs: Without them, reinstalling the screen is awkward.
- Corner inserts: Old plastic corners can become brittle over time.
- Frame clips or plungers: If the screen never felt secure, the retention hardware may be the actual issue.
- Extra mesh: Give yourself room to cut oversized and trim later. Tight margins make clean installation harder.
A screen project goes much smoother when the shopping list matches the actual repair. Homeowners who prep well usually enjoy the job. Homeowners who guess at materials usually end up making a second trip.
How to Build and Repair Your Window Screens
Most homeowners doing do it yourself screens are tackling one of two jobs. They’re either replacing damaged mesh in an existing frame, or they’re assembling a new frame for a missing or unusable screen. The rhythm is different for each, but the mindset should be the same. Work flat, work carefully, and don’t rush the corners.
Rescreening an existing frame
This is the repair many can handle if the frame still sits flat and fits the opening correctly. Start by removing the old spline. Go slow. If you gouge the spline channel or twist the frame while pulling the old material free, the new install gets harder right away.
Once the old mesh is off, clean the channel. Dust, brittle spline fragments, and outdoor debris all interfere with how the new spline seats. Lay the new mesh over the frame with enough extra around all sides so you’re not fighting the edge while you work.
The important part is tension, but not the kind people usually picture. You’re not trying to stretch the mesh like a drumhead by hand. You want it smooth and controlled while the spline creates the hold.
- Start on one side: Press the spline in with steady pressure.
- Move to the opposite side: This helps distribute tension instead of pulling the frame out of square.
- Finish the remaining sides: Work your way around carefully, especially at the corners.
- Trim last: Don’t cut excess mesh before the spline is fully seated.
A utility knife with a fresh blade makes the trim cleaner. Angle the cut away from the spline so you don’t nick it and loosen the edge you just set.
If the frame bows while you work, stop and reset. A “tight” screen in a bent frame won’t fit well back in the window.
Building a new screen frame
Building from a kit takes more patience than rescreening. The frame pieces need to match the opening, the corners must be square, and the hardware has to be oriented correctly before you install the mesh. A common mistake is treating the frame like a simple rectangle and ignoring how it mounts into the window.
Dry-fit the frame pieces first. Set the corners, check for square, and make sure tabs or clips face the right direction. If something seems off, don’t force it together and hope it works later. Correcting orientation after the mesh is installed is much harder.
For many homeowners, seeing the process once helps more than reading about it. This walkthrough gives a useful visual reference:
When the frame is assembled, the mesh installation feels familiar. Lay it over the frame, hold it flat, and roll the spline in with even pressure. The corners deserve extra attention because that’s where twists and wrinkles usually start.
What usually works best
This isn’t a project where force solves much. Better results come from pacing and consistency.
A few habits make a noticeable difference:
- Use a stable surface: The frame needs support under the full perimeter.
- Keep your pressure even: Jerky rolling creates waves and loose corners.
- Watch the frame as much as the mesh: If the frame starts flexing, your tension is off.
- Test fit before calling it done: Reinstall the screen and make sure it sits securely.
Some homeowners enjoy this kind of work and get great results. Others can complete the repair but don’t love the finish. Both outcomes are normal. The difference is often less about effort and more about how forgiving the frame and material are.
Knowing when the frame is the problem
If the new mesh looks fine on the table but the screen still rattles or pops loose in the window, the issue may not be the mesh at all. It may be a bent frame, worn corner hardware, or a poor fit that predates the repair. In those cases, rescreening alone won’t fix the full problem.
That’s where honest assessment matters. A lot of frustration in do it yourself screens comes from repairing the visible damage while missing the structural issue underneath.
Common DIY Screen Mistakes and Colorado Climate Challenges
The most common screen mistakes are basic. The screen gets measured loosely. The wrong spline gets forced into the channel. The mesh looks smooth on the workbench but installs with ripples, or the frame bows because the material was pulled too hard.
Those are universal DIY problems. Colorado Springs adds another layer that many generic guides skip.

The mistakes homeowners make most often
A screen repair can look finished and still fail early. Usually the issue traces back to one of these:
- Misreading the frame condition: If the frame is already bent or loose at the corners, fresh mesh won’t bring it back.
- Using whatever spline is available: Close enough often isn’t close enough with screen spline.
- Cutting too early: Trimming excess mesh before the spline is fully seated can let the material shift.
- Ignoring the fit in the opening: A screen should install securely, not just look tidy on the bench.
These mistakes don’t always show up immediately. Sometimes the screen goes back in and seems fine until the next windy day.
Why Colorado changes the equation
Generic DIY guidance often misses the local climate piece. In Colorado Springs, high-altitude UV intensity, major daily temperature swings, and strong wind loads in mountainous terrain can speed up deterioration and call for specialized materials and installation methods (regional DIY screen guidance gap).
That matters in real homes. A south-facing screen may age differently than one shaded by trees. A house in Black Forest or on a more exposed lot can put more stress on a lightly built frame. Older homes with non-standard openings often need more than a one-size-fits-all approach from a kit off the shelf.
Some screen repairs fail because the installation was poor. Others fail because the material choice never matched the house.
Conditions people don’t plan for
Colorado homeowners also deal with dry air, dust, and seasonal shifts that put wear on small components. Corners and tabs can become brittle. Mesh can lose its clean, taut appearance faster in harsh exposure. Wind can reveal weak fitment that seemed acceptable indoors.
That’s one reason maintenance gets overlooked. Tutorials focus heavily on installation, but they rarely talk about cleaning, seasonal inspection, or knowing when replacement makes more sense than another patch. In this climate, those details matter more than people expect.
When to Trust a Professional for Your Screen Needs
There’s nothing wrong with doing a screen repair yourself. But there are situations where calling a pro is the smarter move. That’s especially true when the job affects safety, appearance, or long-term performance.

Repairs that stop being simple
Some projects cross the line from manageable to tedious fast.
- Upper-story windows: Ladder work changes the risk completely.
- Custom or older openings: Historic homes and non-standard windows often need careful fitting.
- Specialty materials: If you’re considering heat control options, this overview of advanced solar screens for windows helps explain where specialized products fit.
- Multiple damaged screens: What sounds like a weekend project can take much longer when every screen has a slightly different issue.
Professionals also tend to spot things homeowners miss, like weak corners, hardware wear, and frame distortion that explains why a screen keeps failing.
Performance over time matters too
Professional installation affects more than how the screen looks on day one. According to the mechanical screening reference, a good DIY installation can be 70 to 85 percent effective, but problems such as screen blinding can reduce airflow by 5 to 15 percent monthly without proper maintenance, which is one reason trained installers focus on both material choice and long-term upkeep (mechanical screening reference).
That matters if you want the screen to function well through changing seasons instead of just looking repaired for a short while.
For homeowners weighing repair versus replacement, this guide to the cost of window screen replacement can help frame the decision before you buy materials that may not solve the full problem.
The convenience factor is real
A professional service isn’t an admission that you couldn’t do it. It’s often a decision about time, safety, and finish quality. If you also need interior window cleaning, exterior window washing, track cleaning, or screen cleaning, it can make sense to bundle the work so the whole window system is handled at once.
Cultivate House Detailing provides window screen repair alongside residential and commercial window cleaning in Colorado Springs, which can be practical for homeowners who want the screens fixed and the glass cleaned in the same visit.
Get Flawless Screens for Your Colorado Springs Home
Do it yourself screens can be a worthwhile project. If the frame is sound, the opening is standard, and you take your time with material selection and installation, you can get a solid result. For many homeowners, that first successful rescreen is satisfying.
But Colorado Springs homes ask more from screens than many online tutorials account for. Intense sun, wind exposure, and fast weather swings all put pressure on the materials and the fit. That’s why a repair that seems minor on the workbench can turn into another loose, sagging, or short-lived screen sooner than expected.
The practical takeaway is simple. Handle the easy repairs yourself if you enjoy the work and the screen is straightforward. Call for help when the frame is damaged, the opening is unusual, the screen is hard to reach, or you want the job done cleanly and efficiently the first time. That same logic applies to the glass itself. Professional window cleaning in Colorado Springs, CO does more than improve appearance. It helps protect your windows, brighten the home, and remove the buildup that ordinary cleaning often leaves behind.
If your screens are worn out and your windows could use attention too, this is a good time to take care of both.
If you need help with screen repair, screen cleaning, or streak-free window cleaning in Colorado Springs and nearby communities, contact Cultivate House Detailing to request a quote. We handle residential and commercial window cleaning, exterior window washing, interior window cleaning, and related maintenance so your home gets fresh air, cleaner glass, and a better view.