
If you're looking at an empty window opening, a torn screen, or a bent old frame in the garage, you're probably deciding between two things. Spend part of your weekend figuring out how to make your own window screens, or hand it off and be done with it.
For many Colorado Springs homeowners, a DIY screen project is worth trying. Fresh air matters here, especially when the weather is mild, but our sun, wind, and dust also punish cheap materials and sloppy installs fast. A screen that looks fine on the workbench can bind in the track, sag in the middle, or tear at the corners once it's in real use.
The good news is that a basic screen build is manageable if you measure carefully and work patiently. The bad news is that small mistakes show up immediately. A cut that's slightly off, a groove facing the wrong way, or loose spline tension can turn a simple project into a repeat trip to the hardware store.
Gathering Your Tools and Materials
A screen project goes smoother when everything is on the bench before you start. The core setup is simple: frame material, corner pieces, screen mesh, spline, and a few hand tools you may already own.
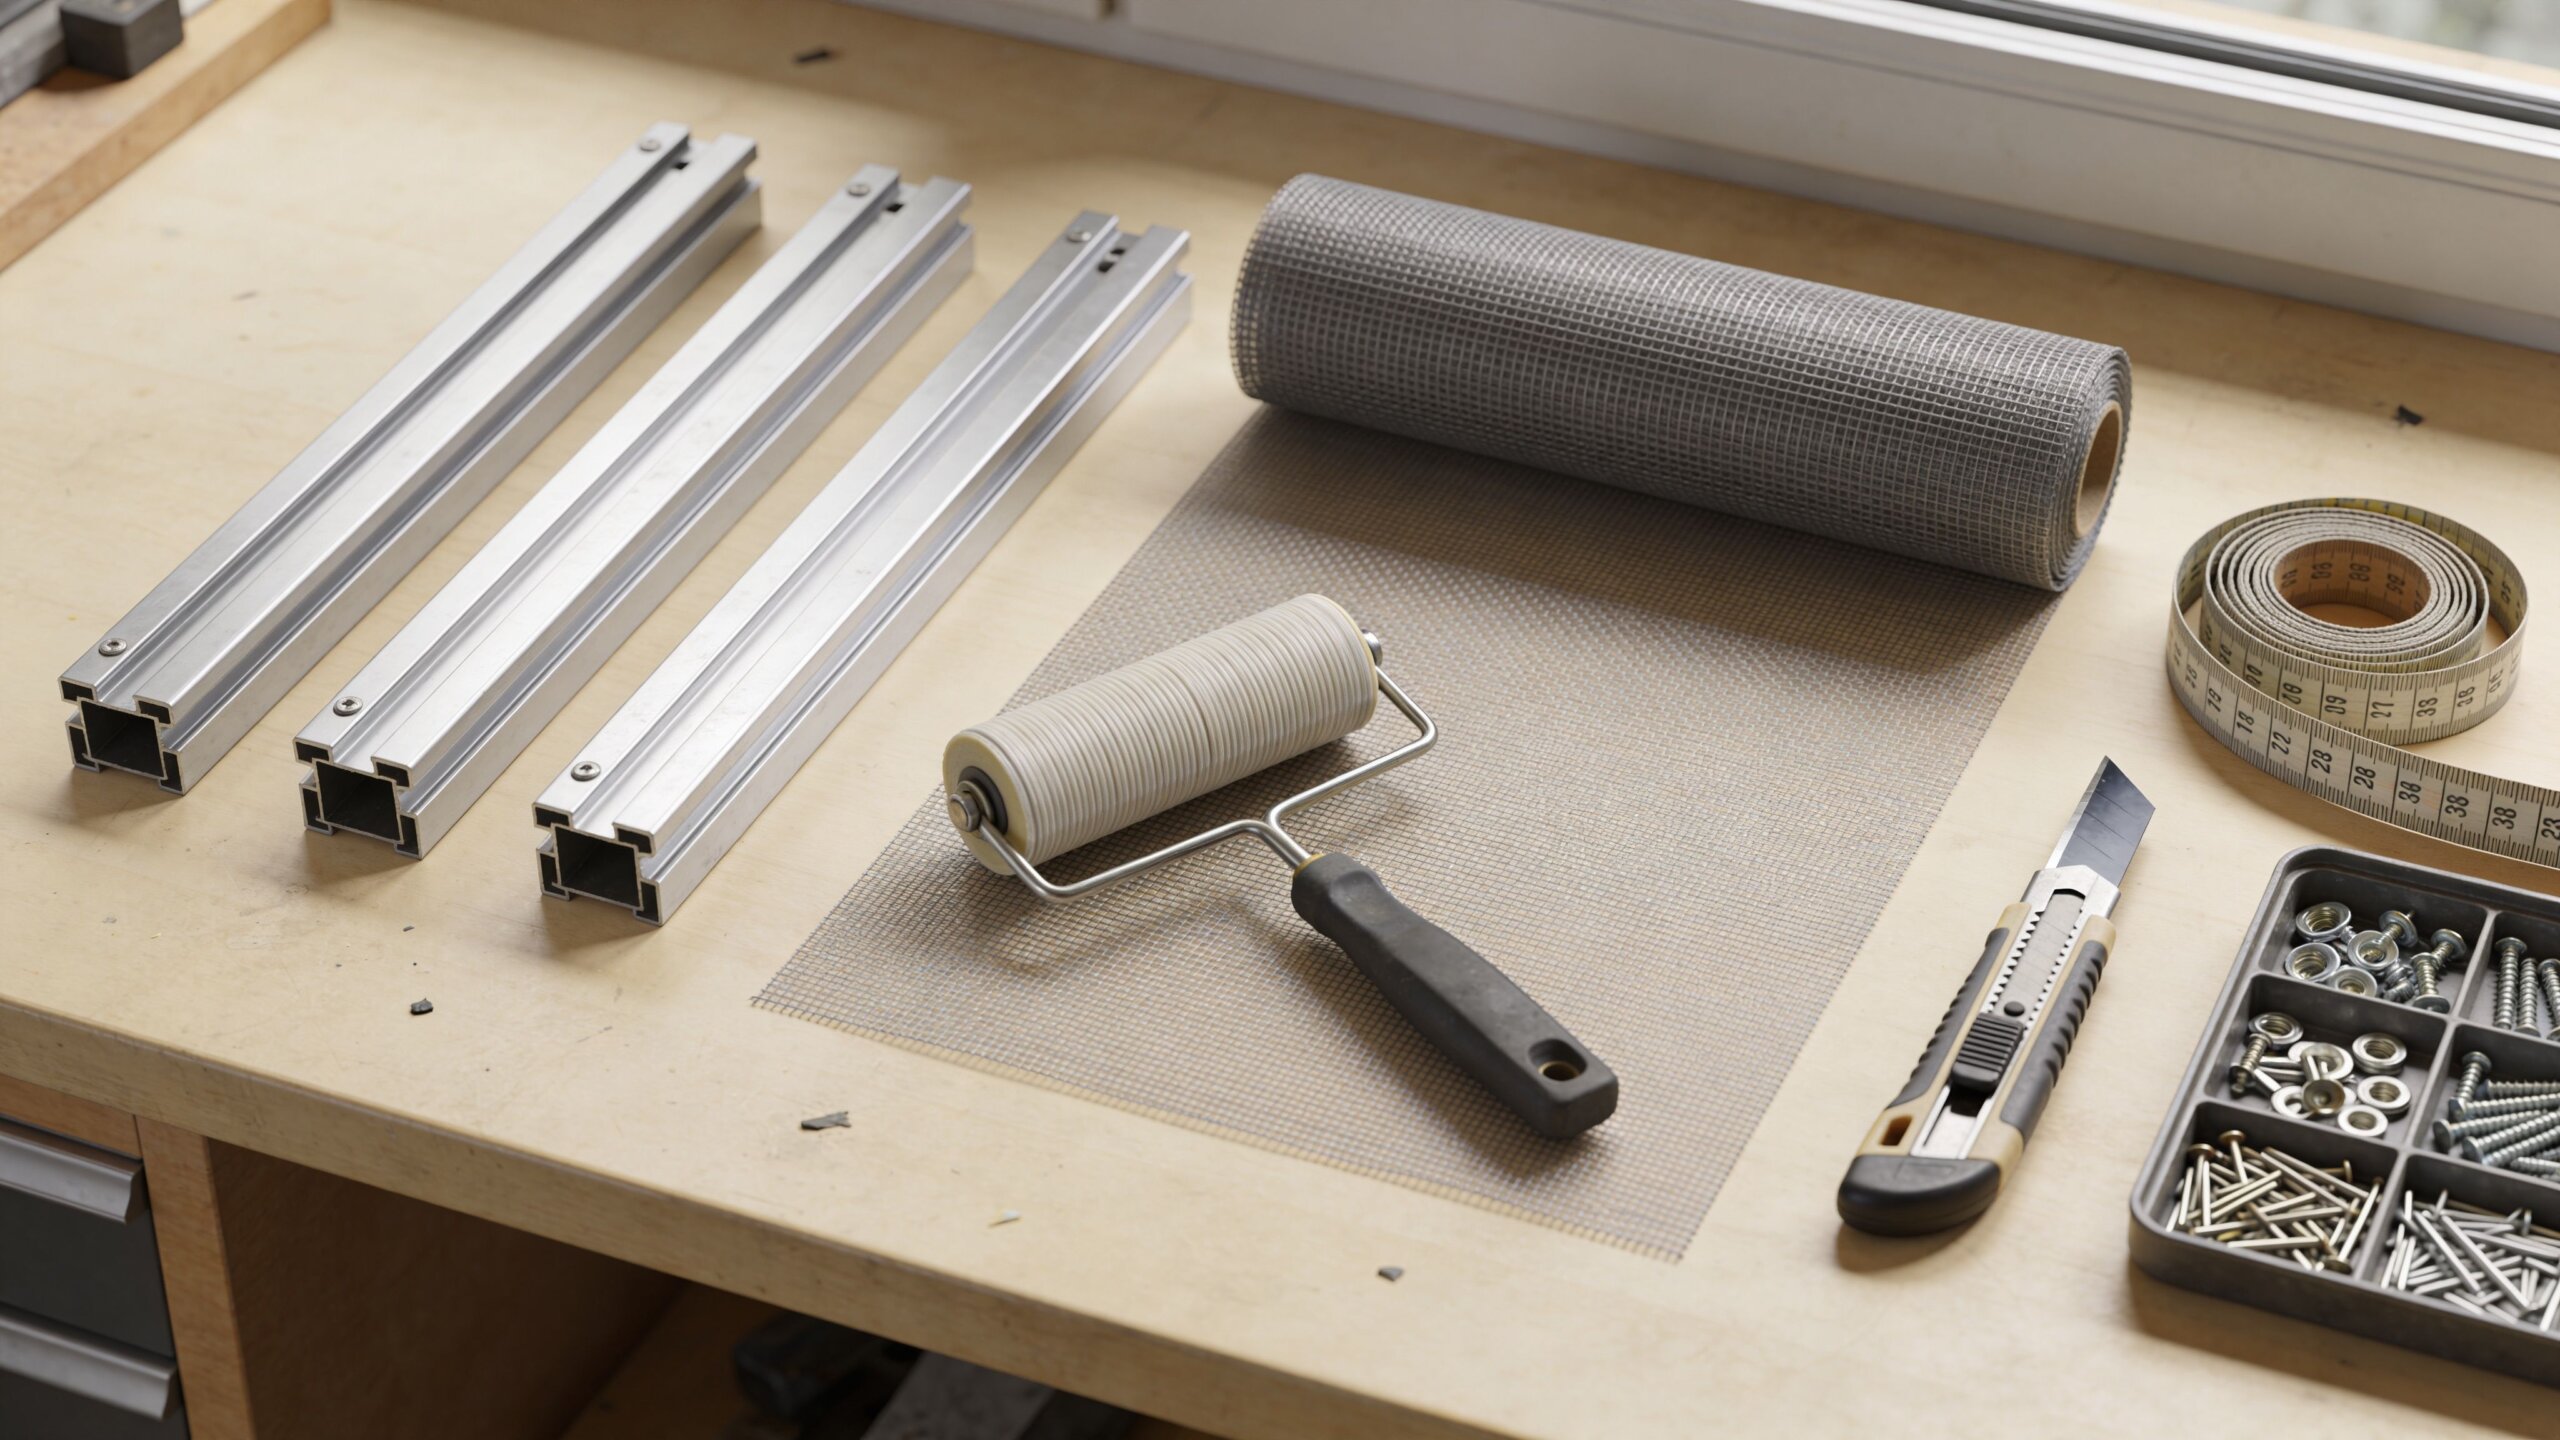
What you need on the bench
Most homeowners start with these items:
- Frame kit with aluminum frame stock, corners, and any hardware your window style requires
- Screen mesh in fiberglass or aluminum
- Vinyl spline sized to the frame groove
- Tape measure for opening dimensions
- Hacksaw for cutting aluminum frame pieces
- Miter box to guide clean angle cuts
- Spline roller to press mesh and spline into the channel
- Utility knife with a fresh blade for trimming excess mesh
- Rubber mallet for seating corners without deforming the frame
- Safety gear such as gloves and eye protection
If you're replacing only the fabric and your frame is still usable, it helps to review replacement screening material options before buying a full kit.
Fiberglass or aluminum mesh
Colorado Springs conditions matter. Fiberglass is easier for most DIY homeowners to work with because it doesn't kink as easily and it's forgiving during spline installation. Aluminum mesh feels more rigid, but it can crease and stay creased if you get rough with it.
Practical rule: If this is your first screen build, fiberglass is usually the easier path. If your main concern is working around strong sun exposure, choose a mesh intended for longer outdoor life rather than the cheapest roll on the shelf.
For Colorado homes, UV resistance matters more than many people expect. High-altitude sun exposes every exterior material more aggressively, and screens are no exception. If the window gets full afternoon sun, choose a product meant for exterior exposure instead of whatever happens to be cheapest.
Time and cost expectations
There isn't one universal time estimate because old frames, awkward openings, and learning curves change the pace. A straightforward rectangular screen goes much faster than a tall screen on a second-story window or a frame that needs repair first.
The main question isn't whether the parts are hard to find. It's whether you want to spend your time measuring, cutting, test-fitting, and reworking if the first attempt doesn't seat correctly.
A quick planning table helps:
| Item | Why it matters |
|---|---|
| Frame kit | Gives you the aluminum frame pieces and corners needed to build from scratch |
| Mesh roll | The actual screening surface that blocks insects and lets air move |
| Spline roller | Makes the difference between a clean install and a wrinkled mess |
| Utility knife | Needed for controlled trimming after the spline is seated |
| Miter box and hacksaw | Help you cut corners that actually meet cleanly |
If your goal is getting windows open again before the next warm spell, DIY can make sense. If you already know you don't enjoy detail work, that's useful information too.
Measuring and Cutting for a Perfect Fit
A screen that is off by even a little can turn into a half-hour of trimming, test-fitting, and starting over. In Colorado Springs, I see this a lot on older homes where the opening looks square until you put a tape on it.
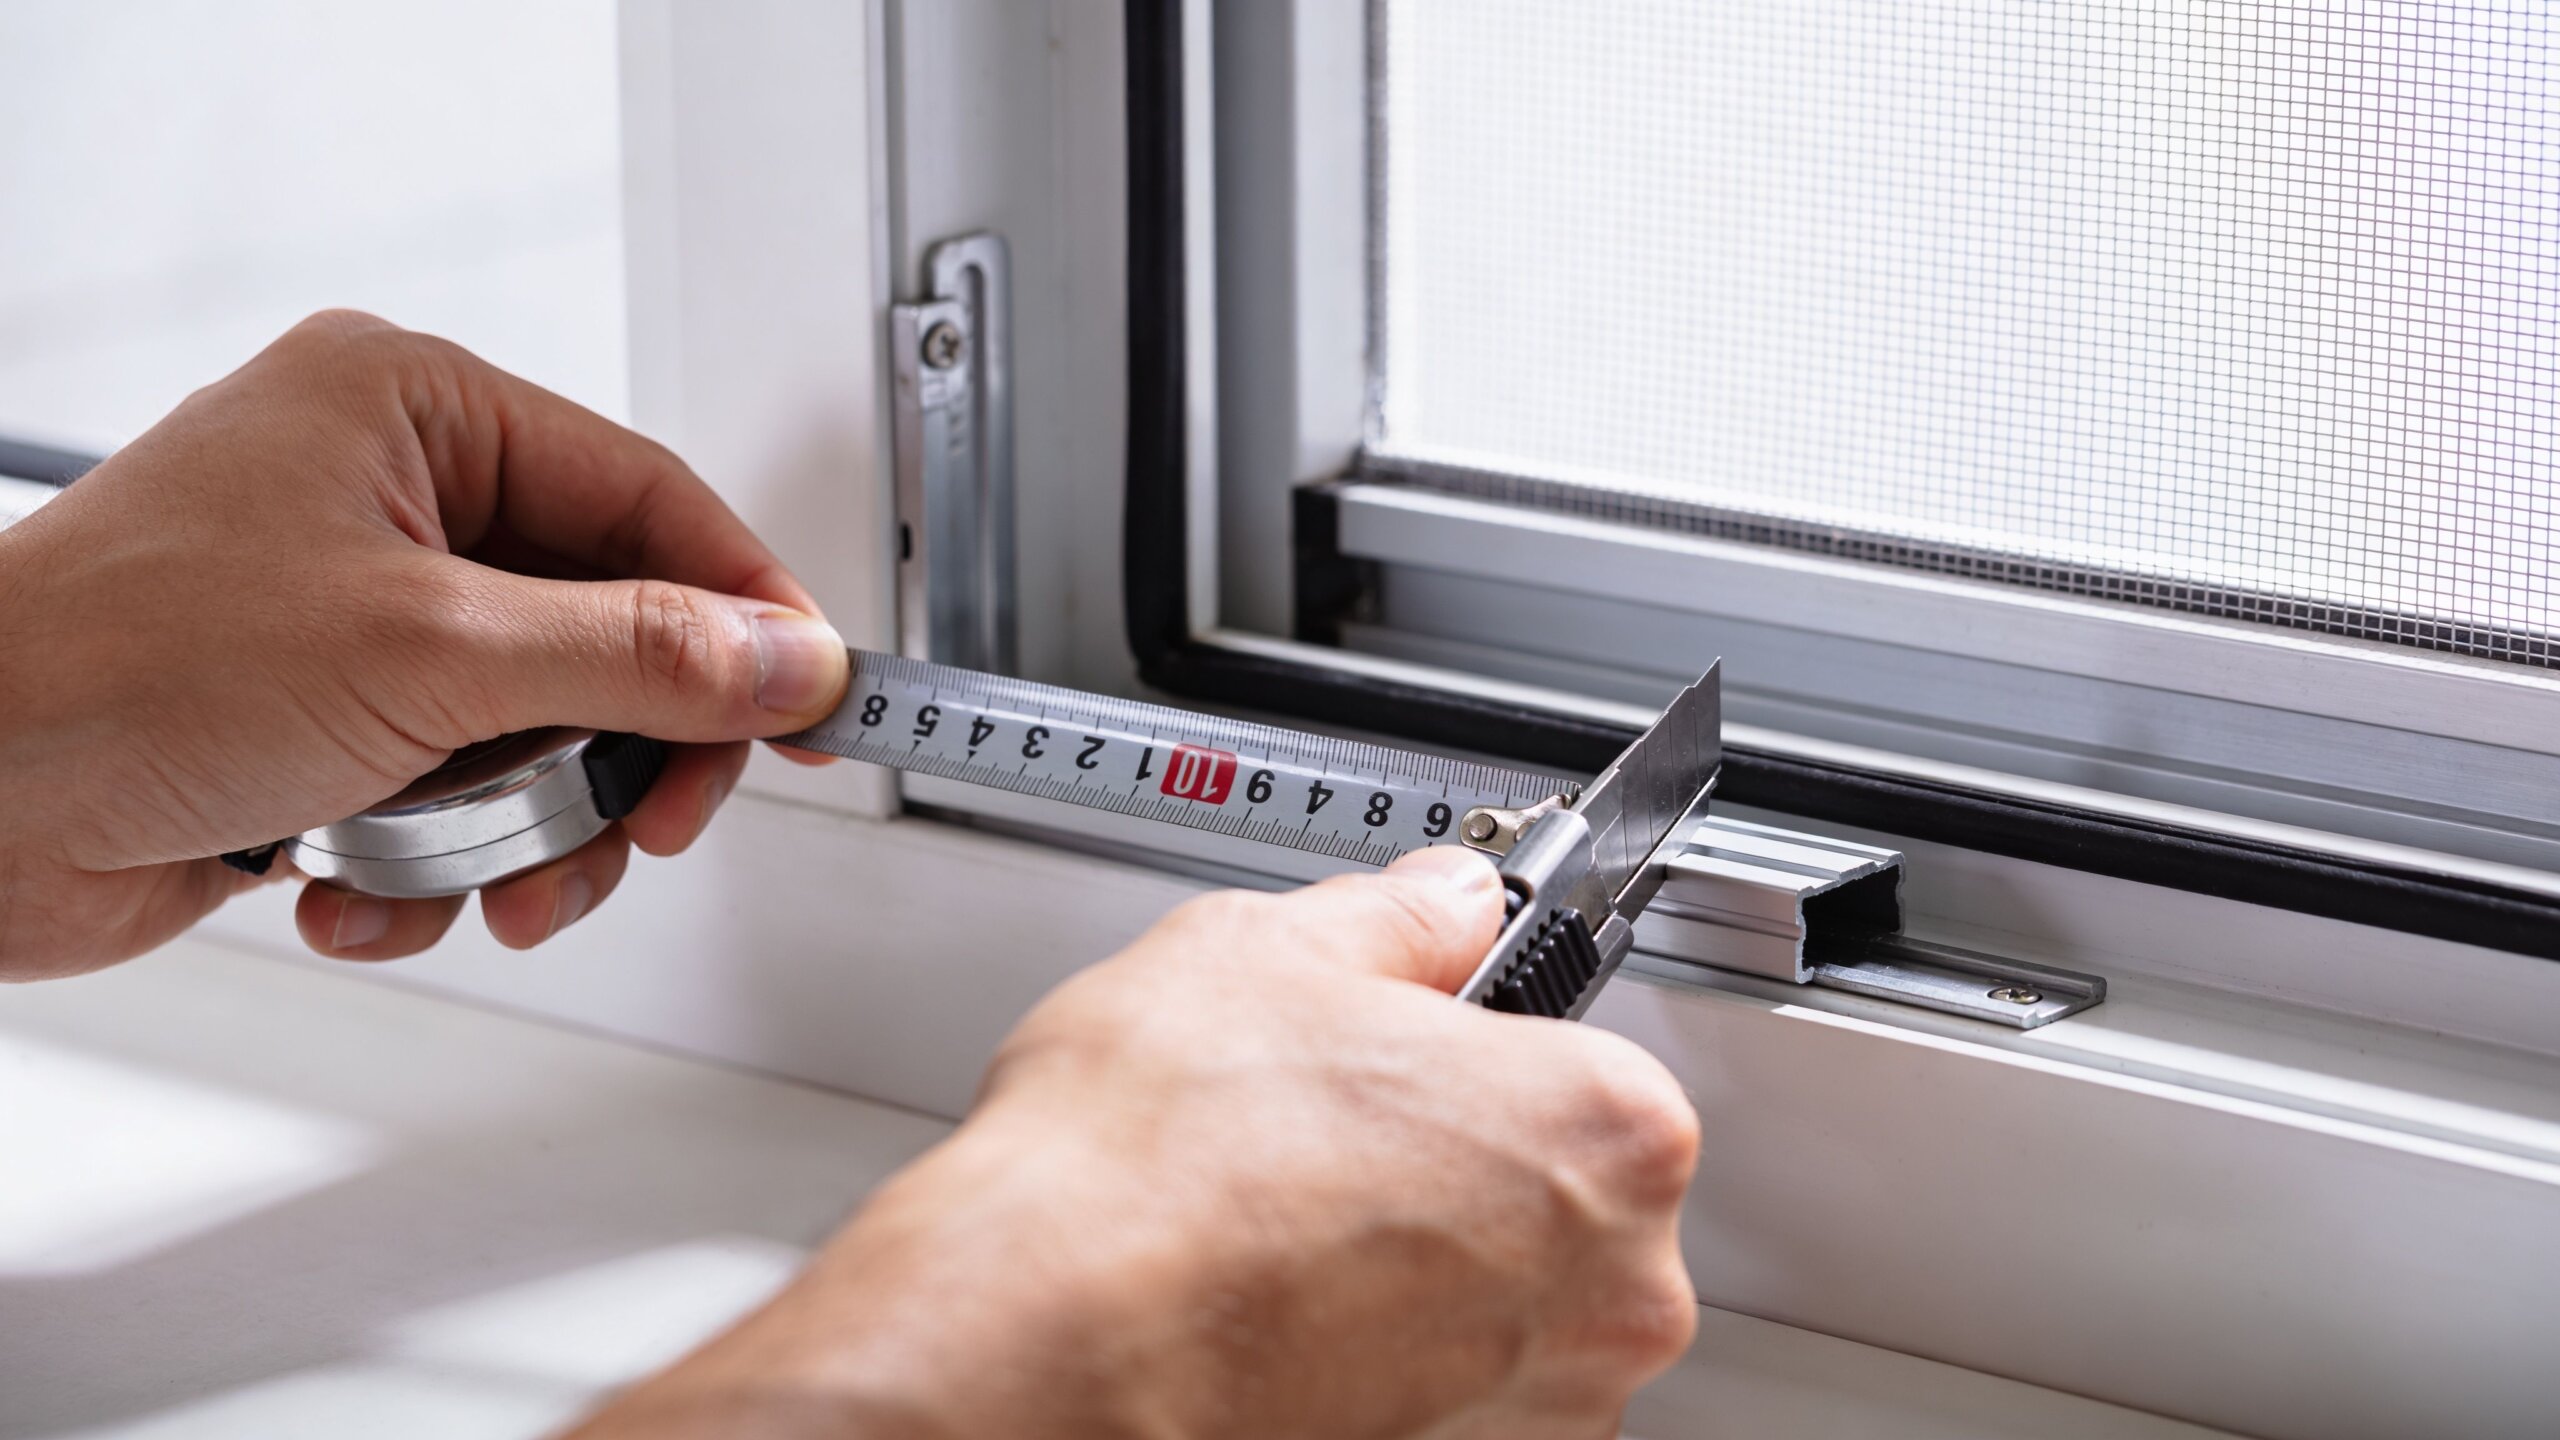
Measure the opening in more than one place
Measure width at the top, middle, and bottom. Measure height at the left, center, and right. Use the smallest width and the smallest height.
That step matters because window openings change over time. Paint buildup, minor frame movement, and wear in the channel can all change the fit. A screen has to fit the tightest part of the opening, not the cleanest-looking part.
If you want a local reference before cutting, these DIY screen measuring notes walk through the process in more detail.
Use a small clearance so the screen actually seats
After you confirm the opening size, subtract about 1/8 inch from the width and height for clearance. That gives the frame room to slide into place without binding.
An exact measurement on paper often turns into a frustrating fit in real life. Aluminum frames need a little room, especially on openings that are not perfectly uniform. If the screen has to be forced in, it is oversized. If it slips in with too much play, it can rattle in the wind or sit crooked.
For homeowners also replacing storm windows or comparing fit details across exterior components, Bulls Eye Repair's installation tips are a useful companion read.
A good-fitting screen sits snugly and comes out without a fight.
Cut carefully and check your first piece before cutting the rest
Mark each frame piece clearly before you pick up the saw. Width pieces and height pieces get mixed up more often than people expect, especially when the difference is small.
Use a miter box and hacksaw for clean, controlled cuts. Let the blade work at its own pace. Pushing too hard usually leaves a rough end or a cut that drifts off line, and that small error shows up later when the corners refuse to seat fully.
A few habits save a lot of aggravation:
- Label each side before cutting.
- Cut one piece first and test it against your measurement.
- Smooth any burrs so the corner inserts slide in cleanly.
- Dry-fit all four sides before committing to mesh.
That last check is where many DIY jobs are won or lost. If the frame is out of square on the table, the high-altitude sun here will not be kind to it once it is installed. A frame that starts stressed tends to loosen up faster outdoors. If you get to this point and the fit is still questionable, that is usually where professional screen repair starts making more sense than another trip to the hardware store.
Assembling the Frame and Installing the Mesh
A screen can look fine on the workbench and still fail in the window if the frame goes together slightly twisted or the mesh gets rolled in unevenly. Around Colorado Springs, that matters more than many DIYers expect. Strong sun and dry air tend to expose weak assembly fast.
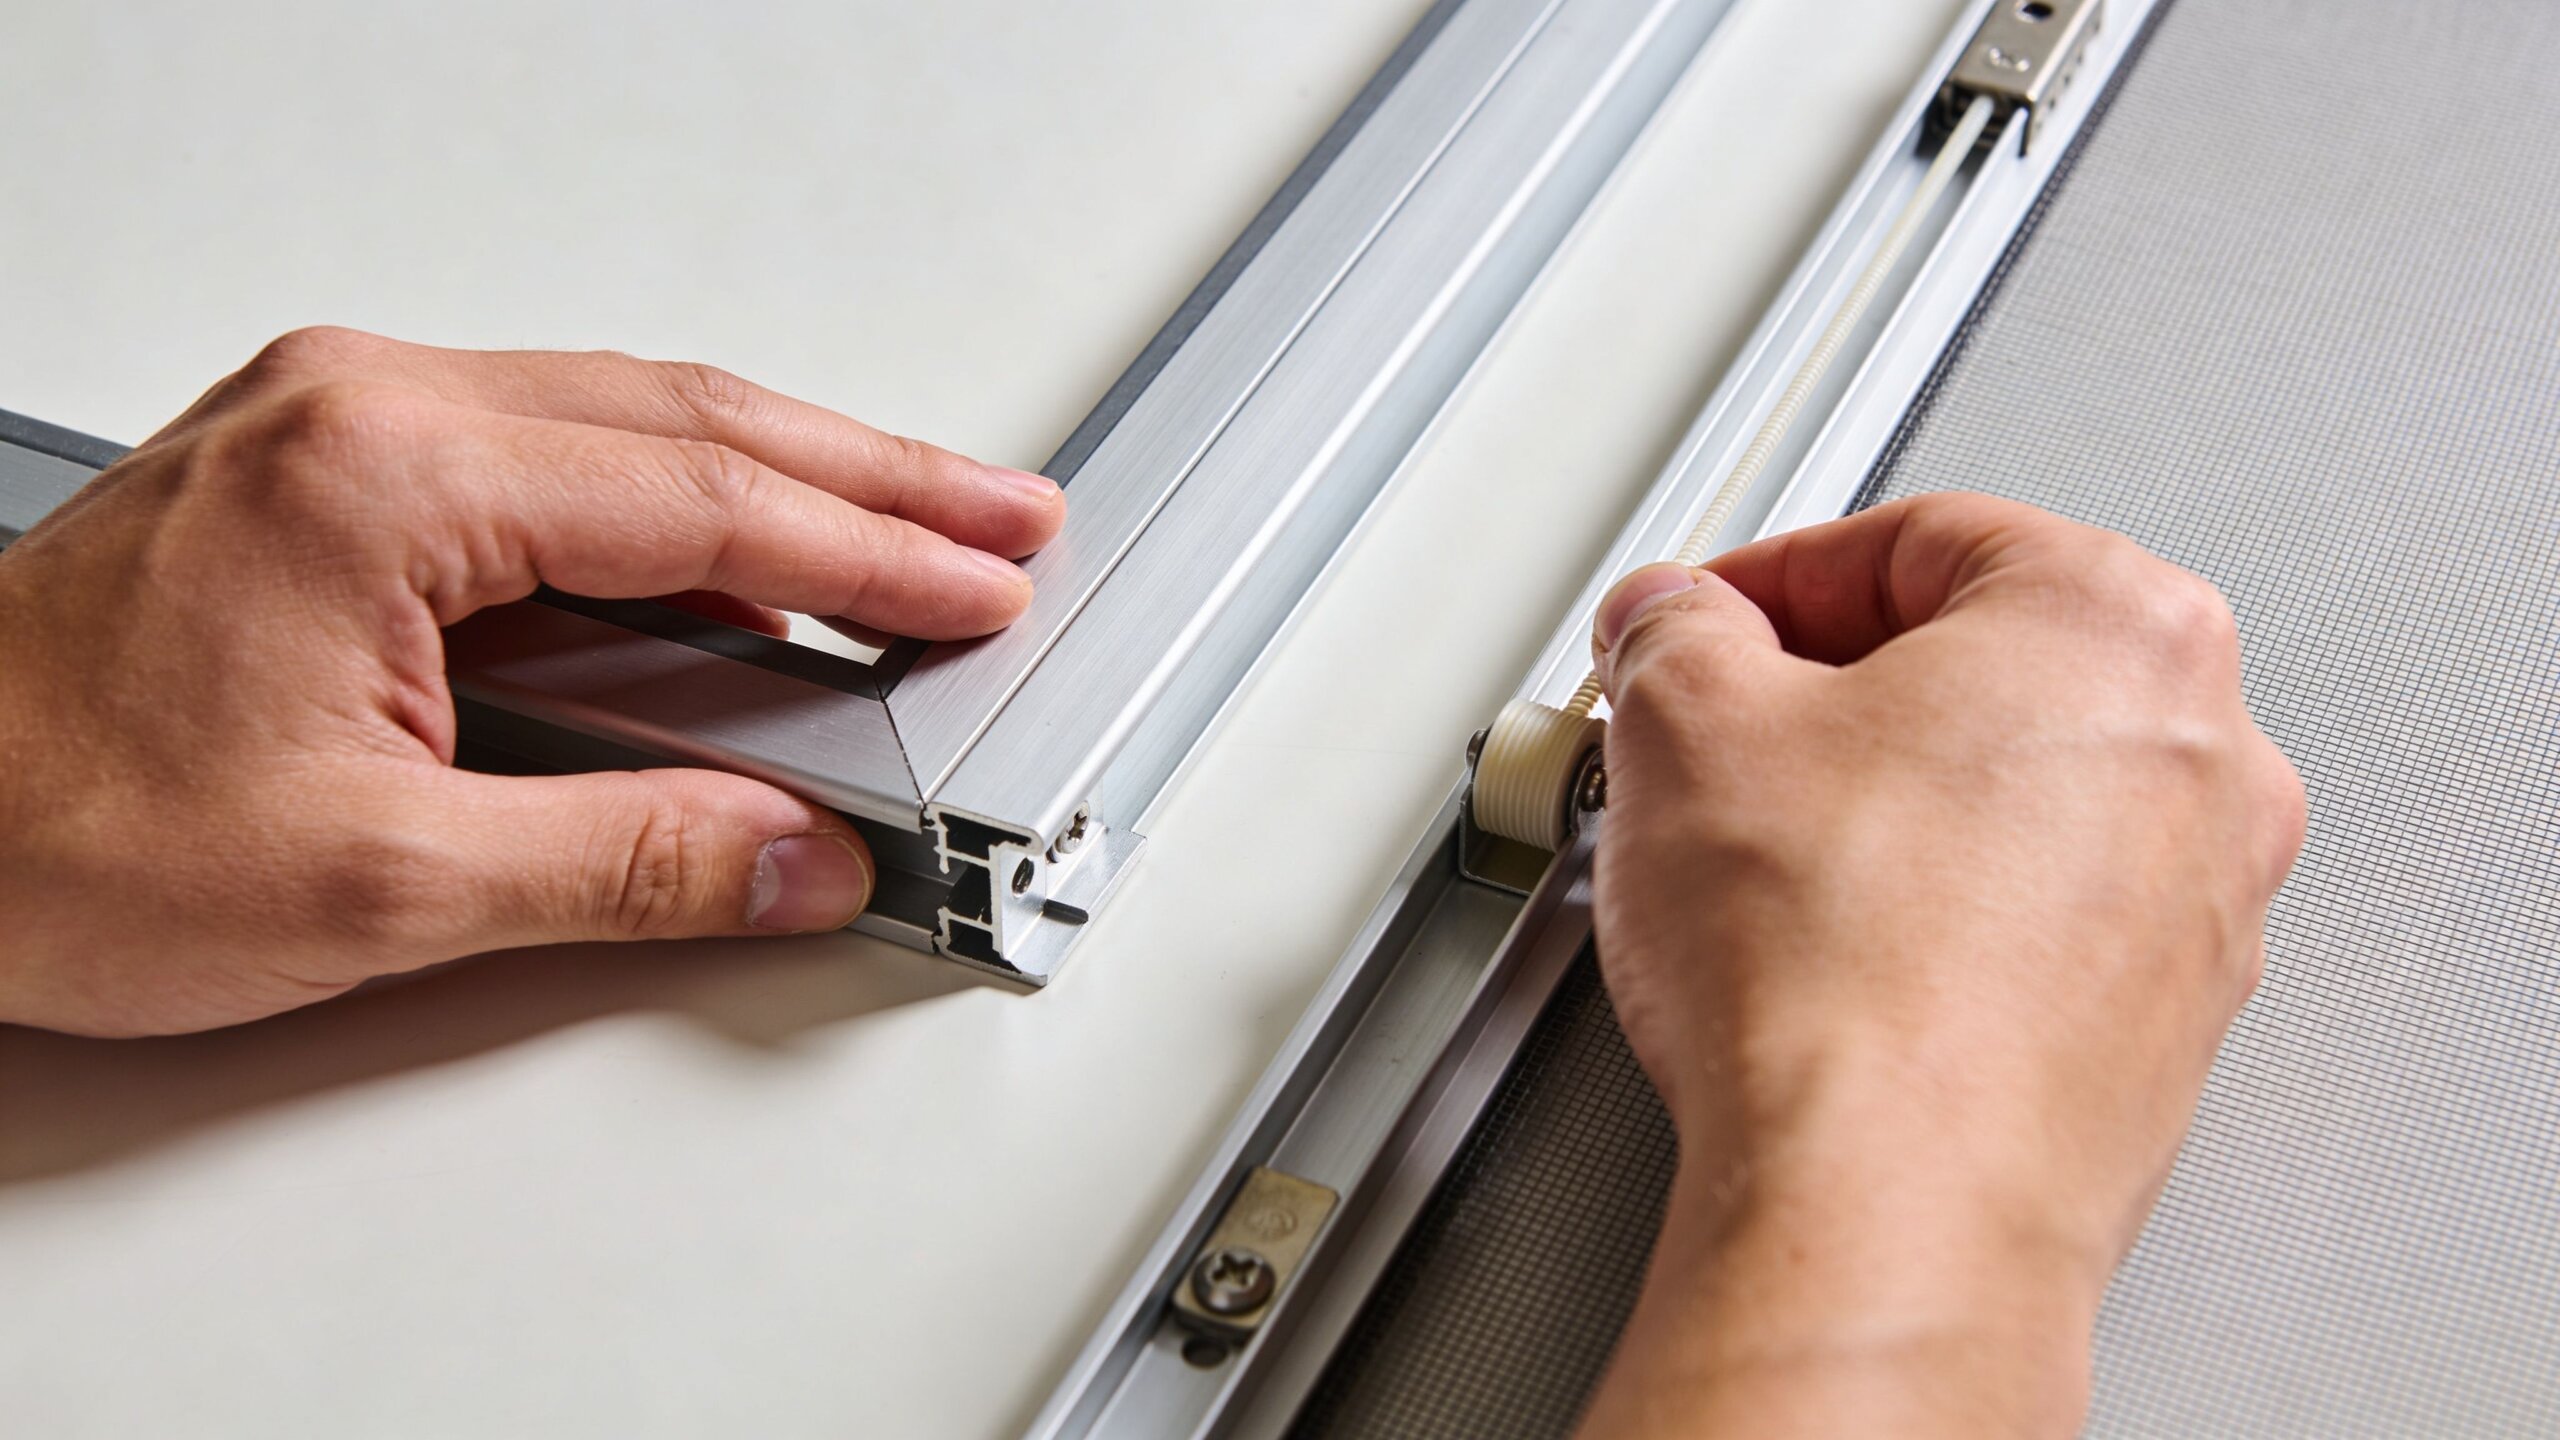
Build the frame before you think about mesh tension
Insert the corner pieces into each frame end and assemble the four sides on a flat table or sheet of plywood. Keep the spline groove facing inward on every piece. One flipped rail is enough to turn a simple job into a teardown.
Tap the corners together with a rubber mallet. Use controlled hits and check alignment as you go. Thin aluminum bends easily, and once a frame gets tweaked, the screen rarely sits as cleanly as it should.
Square the frame before you move on. Measure corner to corner both ways, or at least set it into the opening for a quick dry check if the frame style allows it. A small misalignment at this stage usually shows up later as wrinkles, loose spline, or a screen that binds when you try to reinstall it.
Lay out the mesh with enough extra material
Roll the mesh over the assembled frame and leave a few inches of overlap on all sides. That extra material gives you something to hold while you work and keeps the mesh from slipping out of position.
Fiberglass is easier for first-time DIY work because it has a little give. Aluminum mesh stays crisp, but it can crease if handled roughly. In Colorado Springs, I often see older screens fail from sun exposure long before the frame wears out, so choosing the replacement mesh matters almost as much as the installation.
A steady sequence helps:
- Center the mesh so the overlap is even on all sides
- Press it lightly into the groove before installing the spline
- Work opposite sides in sequence to keep tension balanced
- Keep the weave straight instead of pulling hard from one edge
Good screen tension feels controlled, not forced.
Roll the spline and trim the excess
Start the spline in one corner and use the correct roller to press it into the groove a little at a time. Keep light tension on the mesh with your free hand while you work around the frame. Pulling too hard can bow the frame inward, especially on larger screens.
Corners deserve extra patience. Ease the mesh into place before seating the spline fully so it does not bunch up. If you want another solid reference on handling corners, frame edges, and fit details, Bulls Eye Repair's installation tips are worth reviewing because the same careful habits apply when you're trying to get a clean, square install.
Once the spline is seated, trim the excess mesh with a fresh utility blade. Keep the blade angled away from the spline. One careless cut can nick the new screen or slice the vinyl, and then you are back at the start.
Use this quick check before calling it done:
| Check | What you want to see |
|---|---|
| Corners | Closed tightly with no obvious gap |
| Mesh surface | Flat and even, no ripples across the center |
| Spline | Fully seated in the groove, no sections popping up |
| Test fit | Screen slides into place without binding |
If the screen still looks wavy after a careful install, pull the spline and reset it. That is usually faster than trying to live with a bad fit. For homeowners who would rather skip the trial and error, this is one of the jobs we handle often at Cultivate House Detailing, especially when a screen repair is paired with window cleaning and the goal is to get the whole exterior looking right in one visit.
DIY Challenges and When to Call a Pro for Screen Repair
You get the new screen built, carry it back to the window, and it still will not sit right. That is the point where a simple Saturday project turns into a pile of trimmed mesh, extra spline, and a frame that somehow looks worse than when you started.
In Colorado Springs, I see this a lot. The dry air, wind, and strong sun at altitude are hard on screen materials, and older aluminum frames do not always tolerate being bent back into shape more than once. A homeowner can absolutely handle a basic rescreen, but the margin for error gets smaller once the frame is warped, the opening is odd-sized, or the screen has to fit tightly into older channels and clips.
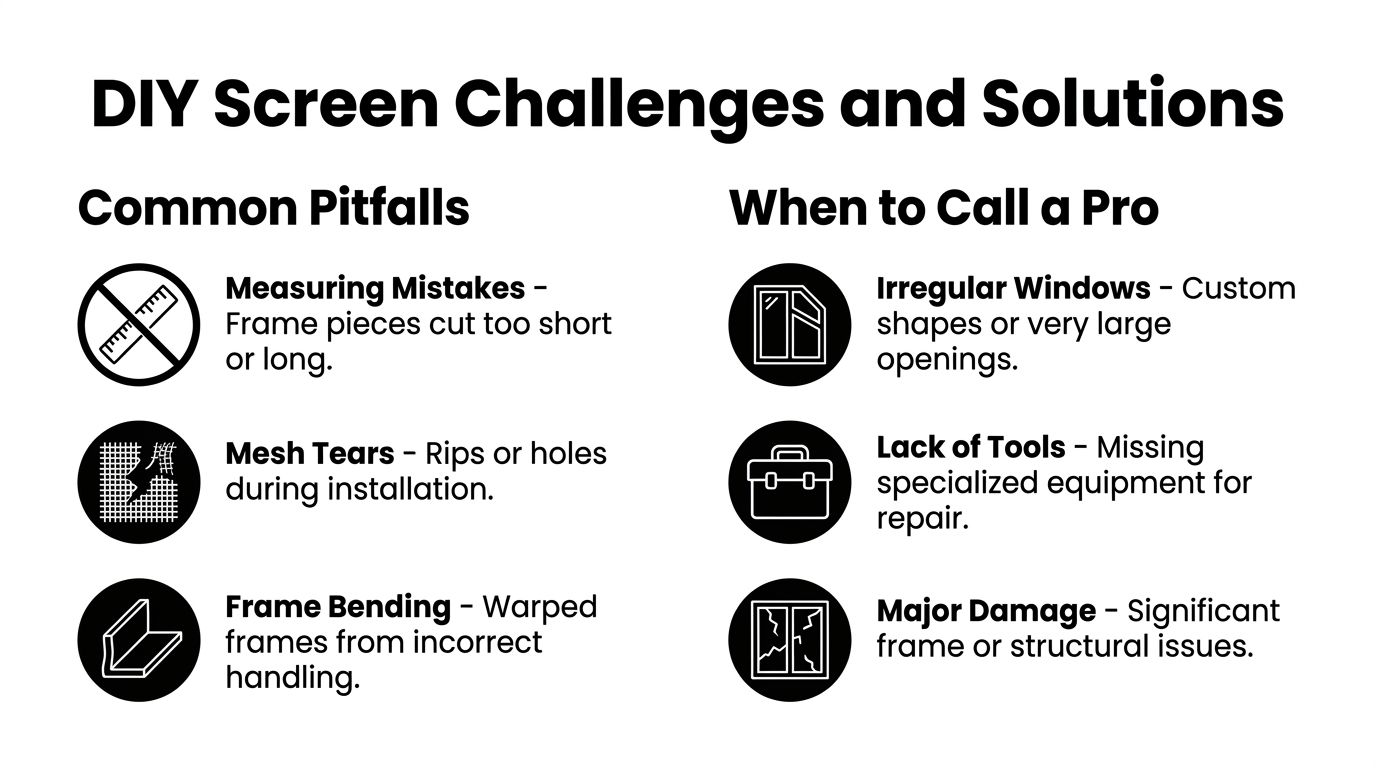
What usually goes wrong
A few problems show up over and over:
- Corners drift out of square, so the screen looks finished on the workbench but binds at the window
- Mesh gets sliced or stretched unevenly, usually during trimming or from pulling too hard
- Old aluminum frames kink, especially after someone tries to flatten a bend by hand
- Spline lifts back out of the groove, which leaves the mesh loose after a day or two
- The final fit is too tight or too loose, often because one small measurement was off at the start
These are fixable problems. They just cost parts, patience, and sometimes a full restart.
Bent frames are the biggest dividing line between a good DIY candidate and a repair that should probably be handed off. A slight bow can sometimes be corrected with careful pressure and a square check. A twisted frame, cracked corner, or screen that has already been repaired several times usually keeps fighting you. At that stage, replacing components or rebuilding the screen is often the cleaner solution.
Repair or rebuild
Use the condition of the frame to make the call, not just the condition of the mesh.
| Condition | Best move |
|---|---|
| Frame is square, mesh is damaged | Rescreen it |
| Frame has a slight bend | Try a careful repair first |
| Corners won't hold or frame is badly warped | Rebuild or hand it off |
| Opening is unusual or oversized | Get help before buying parts |
Some window setups need more than an off-the-shelf kit. If you are comparing screen options around unusual openings, replacement windows, or different frame styles, Equity Building Materials window solutions can help you sort out the window configurations that affect screen fit.
Some jobs look like screen projects but start with a window opening that is no longer true.
When calling a pro makes more sense
Professional help is usually the better call when you have multiple damaged screens, second-story windows, custom sizes, missing clips, pet damage, or frames that no longer sit flat. It also makes sense when you want the repair to look clean the first time and do not want to buy specialty tools for a job you may not repeat for years.
That is where local experience matters. Around Colorado Springs, screen work is rarely just about replacing mesh. We also deal with sun-brittle materials, dusty tracks, and windows that need to look right as a whole. At Cultivate House Detailing, we handle screen repair for homeowners who want a proper fit without the trial and error, especially when it makes sense to pair that work with full window cleaning and get the whole exterior looking sharp in one visit.
Enjoying the View with Professional Window Cleaning
A new screen always looks better when the glass behind it is clean. That's where many DIY projects hit a funny wall. You finish the screen, step back, and notice the hard water spots, dusty edges, handprints, and grime that were there the whole time.
In Colorado Springs, CO, windows collect more than everyday dirt. Wind-blown dust, pollen, sprinkler overspray, and strong sun all leave their mark. A good screen improves airflow, but it doesn't improve the view if the pane itself is cloudy.
Why clean glass changes the result
Professional window cleaning isn't just about appearance, though appearance is the first thing people notice. Clean exterior glass brightens the house from the curb, and clean interior glass changes how rooms feel from inside.
For homeowners searching for window cleaning near me, professional window cleaning, or window cleaning in Colorado Springs, CO, value is usually convenience plus consistency. The windows get cleaned thoroughly, the edges look finished, and the work gets done without dragging ladders, buckets, towels, and extension poles all over the property.
A full service approach matters because windows aren't only glass. Tracks collect debris. Screens hold dust. Corners trap buildup that basic spray-and-wipe methods leave behind.
What homeowners usually want handled
Often, the focus isn't on one isolated task. The aim is for the whole window area to look right.
That often includes:
- Exterior window cleaning for dirt, dust, and weather buildup
- Interior window cleaning for fingerprints, haze, and everyday smudges
- Screen cleaning so airflow doesn't carry dust back into the house
- Track cleaning to remove debris from the lower channels
- Seasonal window cleaning before entertaining, listing a home, or heading into a new season
Commercial properties have the same need, just at a different scale. Storefronts, offices, and small business buildings benefit from regular commercial window cleaning because clean glass changes how the property presents to customers.
Clean screens help the breeze. Clean windows improve the whole room.
When you pair a properly fitted screen with streak-free glass, the result feels finished. You notice more light, a clearer view, and less of that dull film that builds up so gradually you stop seeing it.
Why Colorado Springs Chooses Cultivate House Detailing
A screen can look fine from ten feet away and still fit poorly, ripple in the corners, or pull loose after a few windy weeks. That is usually the point where a DIY project stops feeling satisfying and starts feeling like one more thing to redo.
That is why local homeowners hire Cultivate House Detailing. They want the job handled carefully, on schedule, and with results that hold up in real Colorado Springs conditions.
What a professional finish actually involves
A good screen repair is not only about swapping in new mesh. The frame has to stay square. The mesh has to sit flat without waves or soft spots. The spline has to be set firmly enough to hold, without damaging an older frame that has already spent years in high-altitude sun.
That kind of work gets harder on large screens, second-story windows, and older homes where openings are not perfectly uniform. Small mistakes show up fast. You see puckered corners, loose edges, or a screen that never quite sits right in the window.
We handle those details every week. The benefit for homeowners is simple. The screen fits the opening, looks clean, and works the way it should.
What people expect from a local exterior cleaning company
Colorado Springs homes deal with intense UV exposure, wind, dust, spring pollen, and hard water spotting. Those conditions affect more than the glass. They wear on screen mesh, dry out spline, and leave tracks and frames dirtier than many homeowners expect.
A dependable service experience usually includes:
- Clear scheduling so you know when the crew is coming
- Respect for the property with careful work around landscaping, gates, and entry points
- Residential window cleaning that improves the view and the look of the home
- Commercial window cleaning for businesses that need clean, professional-looking glass
- Related maintenance help for screens, tracks, and exterior buildup that should be handled at the same time
Cultivate House Detailing serves Colorado Springs and nearby communities including Monument, Black Forest, Manitou Springs, and Woodland Park. Working local matters. We see how our climate affects windows through each season, and we adjust the work accordingly.
DIY screen repair still makes sense for some homeowners. If you enjoy hands-on projects and have the right tools, it can be worth doing yourself. If you would rather skip the measuring errors, wrinkled mesh, and ladder work, professional help is usually the faster and cleaner option.
If your screens need repair or your glass needs a streak-free reset, Cultivate House Detailing makes it easy. We help homeowners and businesses in Colorado Springs with professional window cleaning, screen repair, and exterior maintenance that saves time and delivers a cleaner, brighter finish. Request a quote and get your windows back to looking the way they should.