
A torn screen usually shows up at the worst time. You open the window for fresh air in Colorado Springs, spot a rip in the mesh, and realize you're inviting in bugs, dust, and windblown debris instead.
The good news is that window screen repair diy is very doable when the damage is minor and the frame is still solid. The less-fun truth is that small mistakes, especially with tension, spline fit, or material choice, can turn a simple repair into a saggy screen that never sits right again. In Colorado, that matters more than many homeowners expect because high-altitude sun, dry air, and sudden weather changes are hard on screens.
If you're deciding whether to patch, rescreen, or replace, the right answer depends on the damage, the frame condition, and how much time you want to spend getting it right. Here's a practical guide to handling it yourself, plus where DIY usually stops making sense.
Gathering Your Tools and Materials
A lot of DIY screen jobs go sideways before the old mesh even comes out. A homeowner in Colorado Springs buys the cheapest roll at the hardware store, reuses dried-out spline, and then wonders why the finished screen looks loose by the weekend after one windy afternoon. Good prep saves more frustration here than fancy technique.
What you need
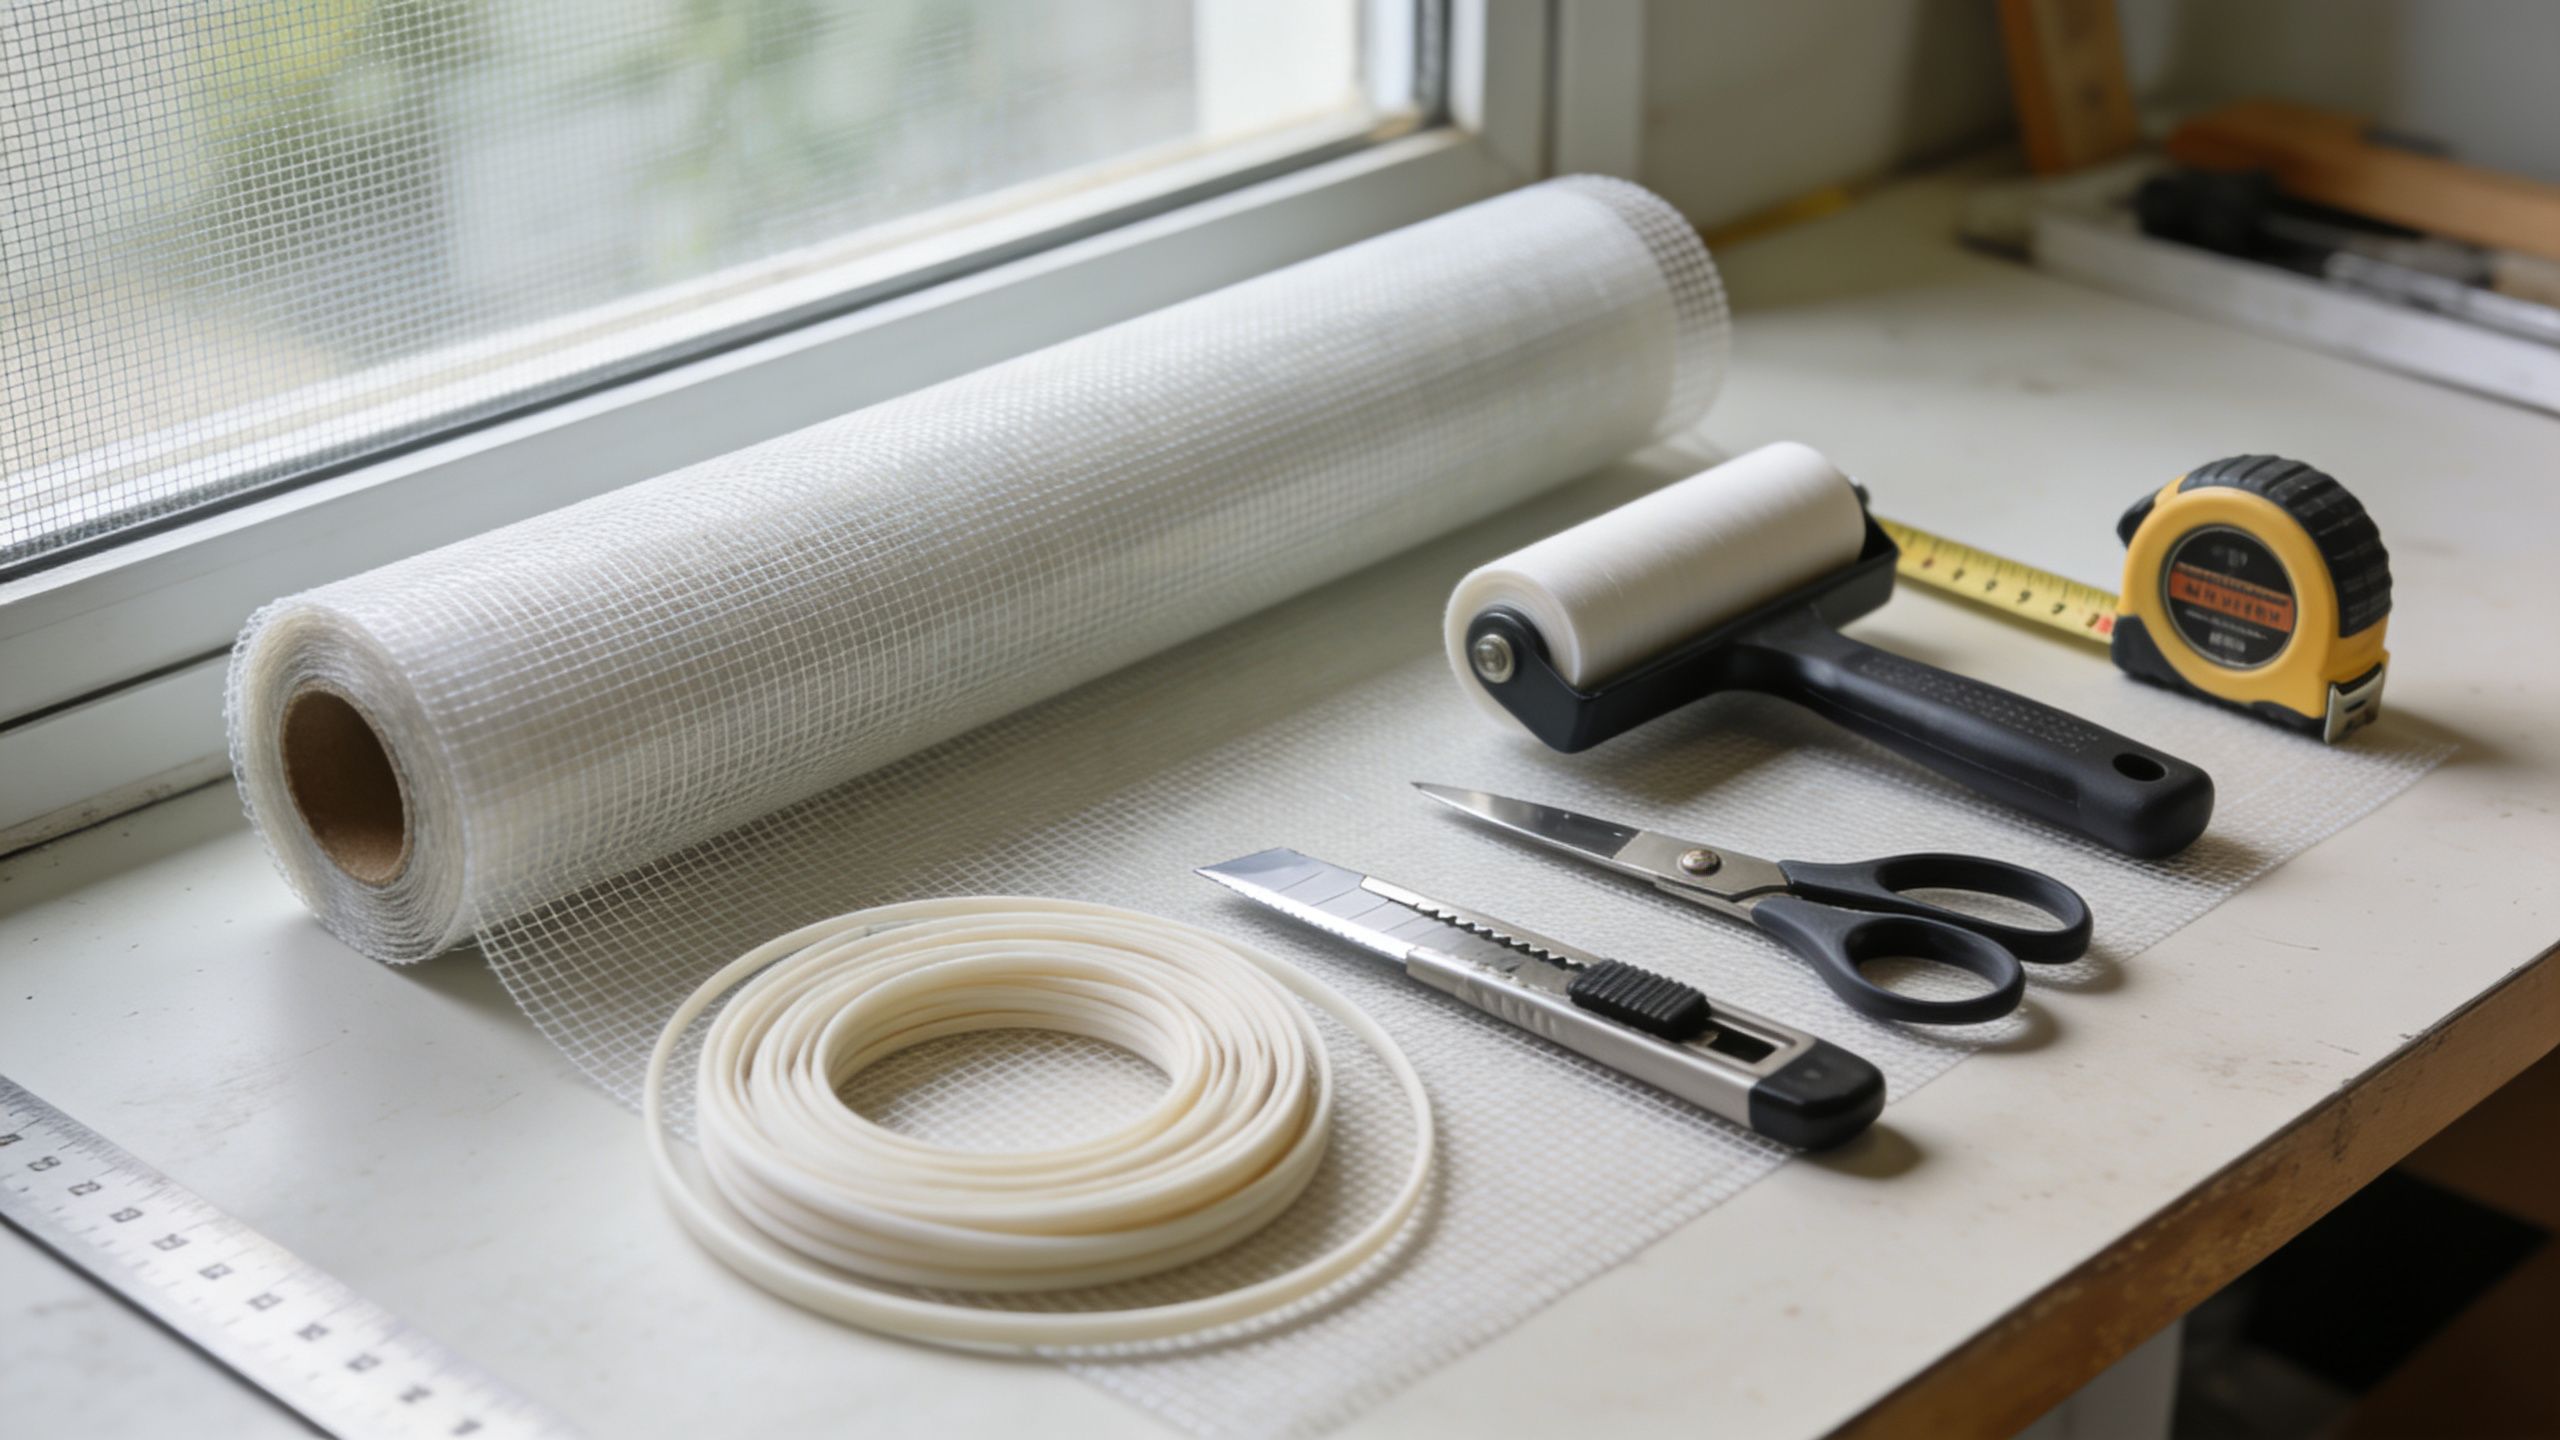
Start with the basics:
- Screen mesh: Fiberglass, aluminum, or a heavier-duty mesh for pets or stronger sun exposure
- Spline: New spline sized to your frame channel
- Spline roller: The right wheel makes it much easier to set the mesh without twisting it
- Utility knife or scissors: For trimming clean edges
- Flat screwdriver or pick: To remove old spline without gouging the frame
- Tape measure: To confirm frame size and material width before you buy
- Clean rag: To clear dust and grit from the channel
If you are still putting together your general homeowner gear, this guide to building a budget home repair toolkit is a useful starting point. It covers the kind of tools that get used more than once, instead of filling a drawer with one-job purchases.
Material cost stays fairly modest for a basic repair, but the total climbs once you add the roller, extra spline sizes, or upgraded mesh. Lowe's screen repair guide gives a practical overview of the common supplies homeowners end up buying for this kind of project, along with the typical tool list involved in a full rescreen job, according to their window screen repair instructions.
Choose mesh that fits Colorado conditions
Screen material is not all the same, especially here. High-altitude UV, dry air, hail, and sudden temperature swings wear screens out faster than many homeowners expect.
Standard fiberglass is still the easiest option for a first repair. It rolls in with less fight, stays flexible, and usually gives beginners the cleanest result.
Aluminum holds a sharper profile, but it is less forgiving. One crease or kink can leave a permanent flaw that stands out from the street.
Pet-resistant or solar mesh makes sense for homes that get hard sun, active pets, or more wear on lower-level windows. The trade-off is installation effort. Thicker mesh often needs a different spline size and more pressure during installation, which is where many DIY jobs start looking uneven. If you want to compare options before buying, this page on replacement screening material gives a practical look at the mesh types homeowners usually consider.
Match the spline to the job
Old spline is one of the biggest trouble spots. In Colorado's dry climate, it can shrink, harden, or crack with age, even if it still looks usable at first glance.
If you switch to thicker mesh, your old spline may no longer hold it properly. If you stay with the same mesh but force in oversized spline, you can bend the frame or distort the corners. For a single screen, it is worth slowing down and testing fit before rolling the whole panel. That small check saves a lot of rework, and it is one of the reasons homeowners sometimes decide the time is better spent having a pro handle anything beyond a simple patch.
Quick Fixes for Small Holes and Tears
Not every damaged screen needs a full rescreen. If the hole is small and the rest of the mesh still has life left, patching is the fastest path back to a usable screen.
When patching works
Patching makes sense for:
- Small punctures: A stray branch, hail mark, or random poke
- Short tears: Damage that hasn't spread across the panel
- Pet claw snags: If the mesh around the area still feels strong
It usually doesn't work well when the screen is brittle, sun-damaged, or torn in multiple spots. In those cases, the patch may hold, but the rest of the mesh keeps failing.
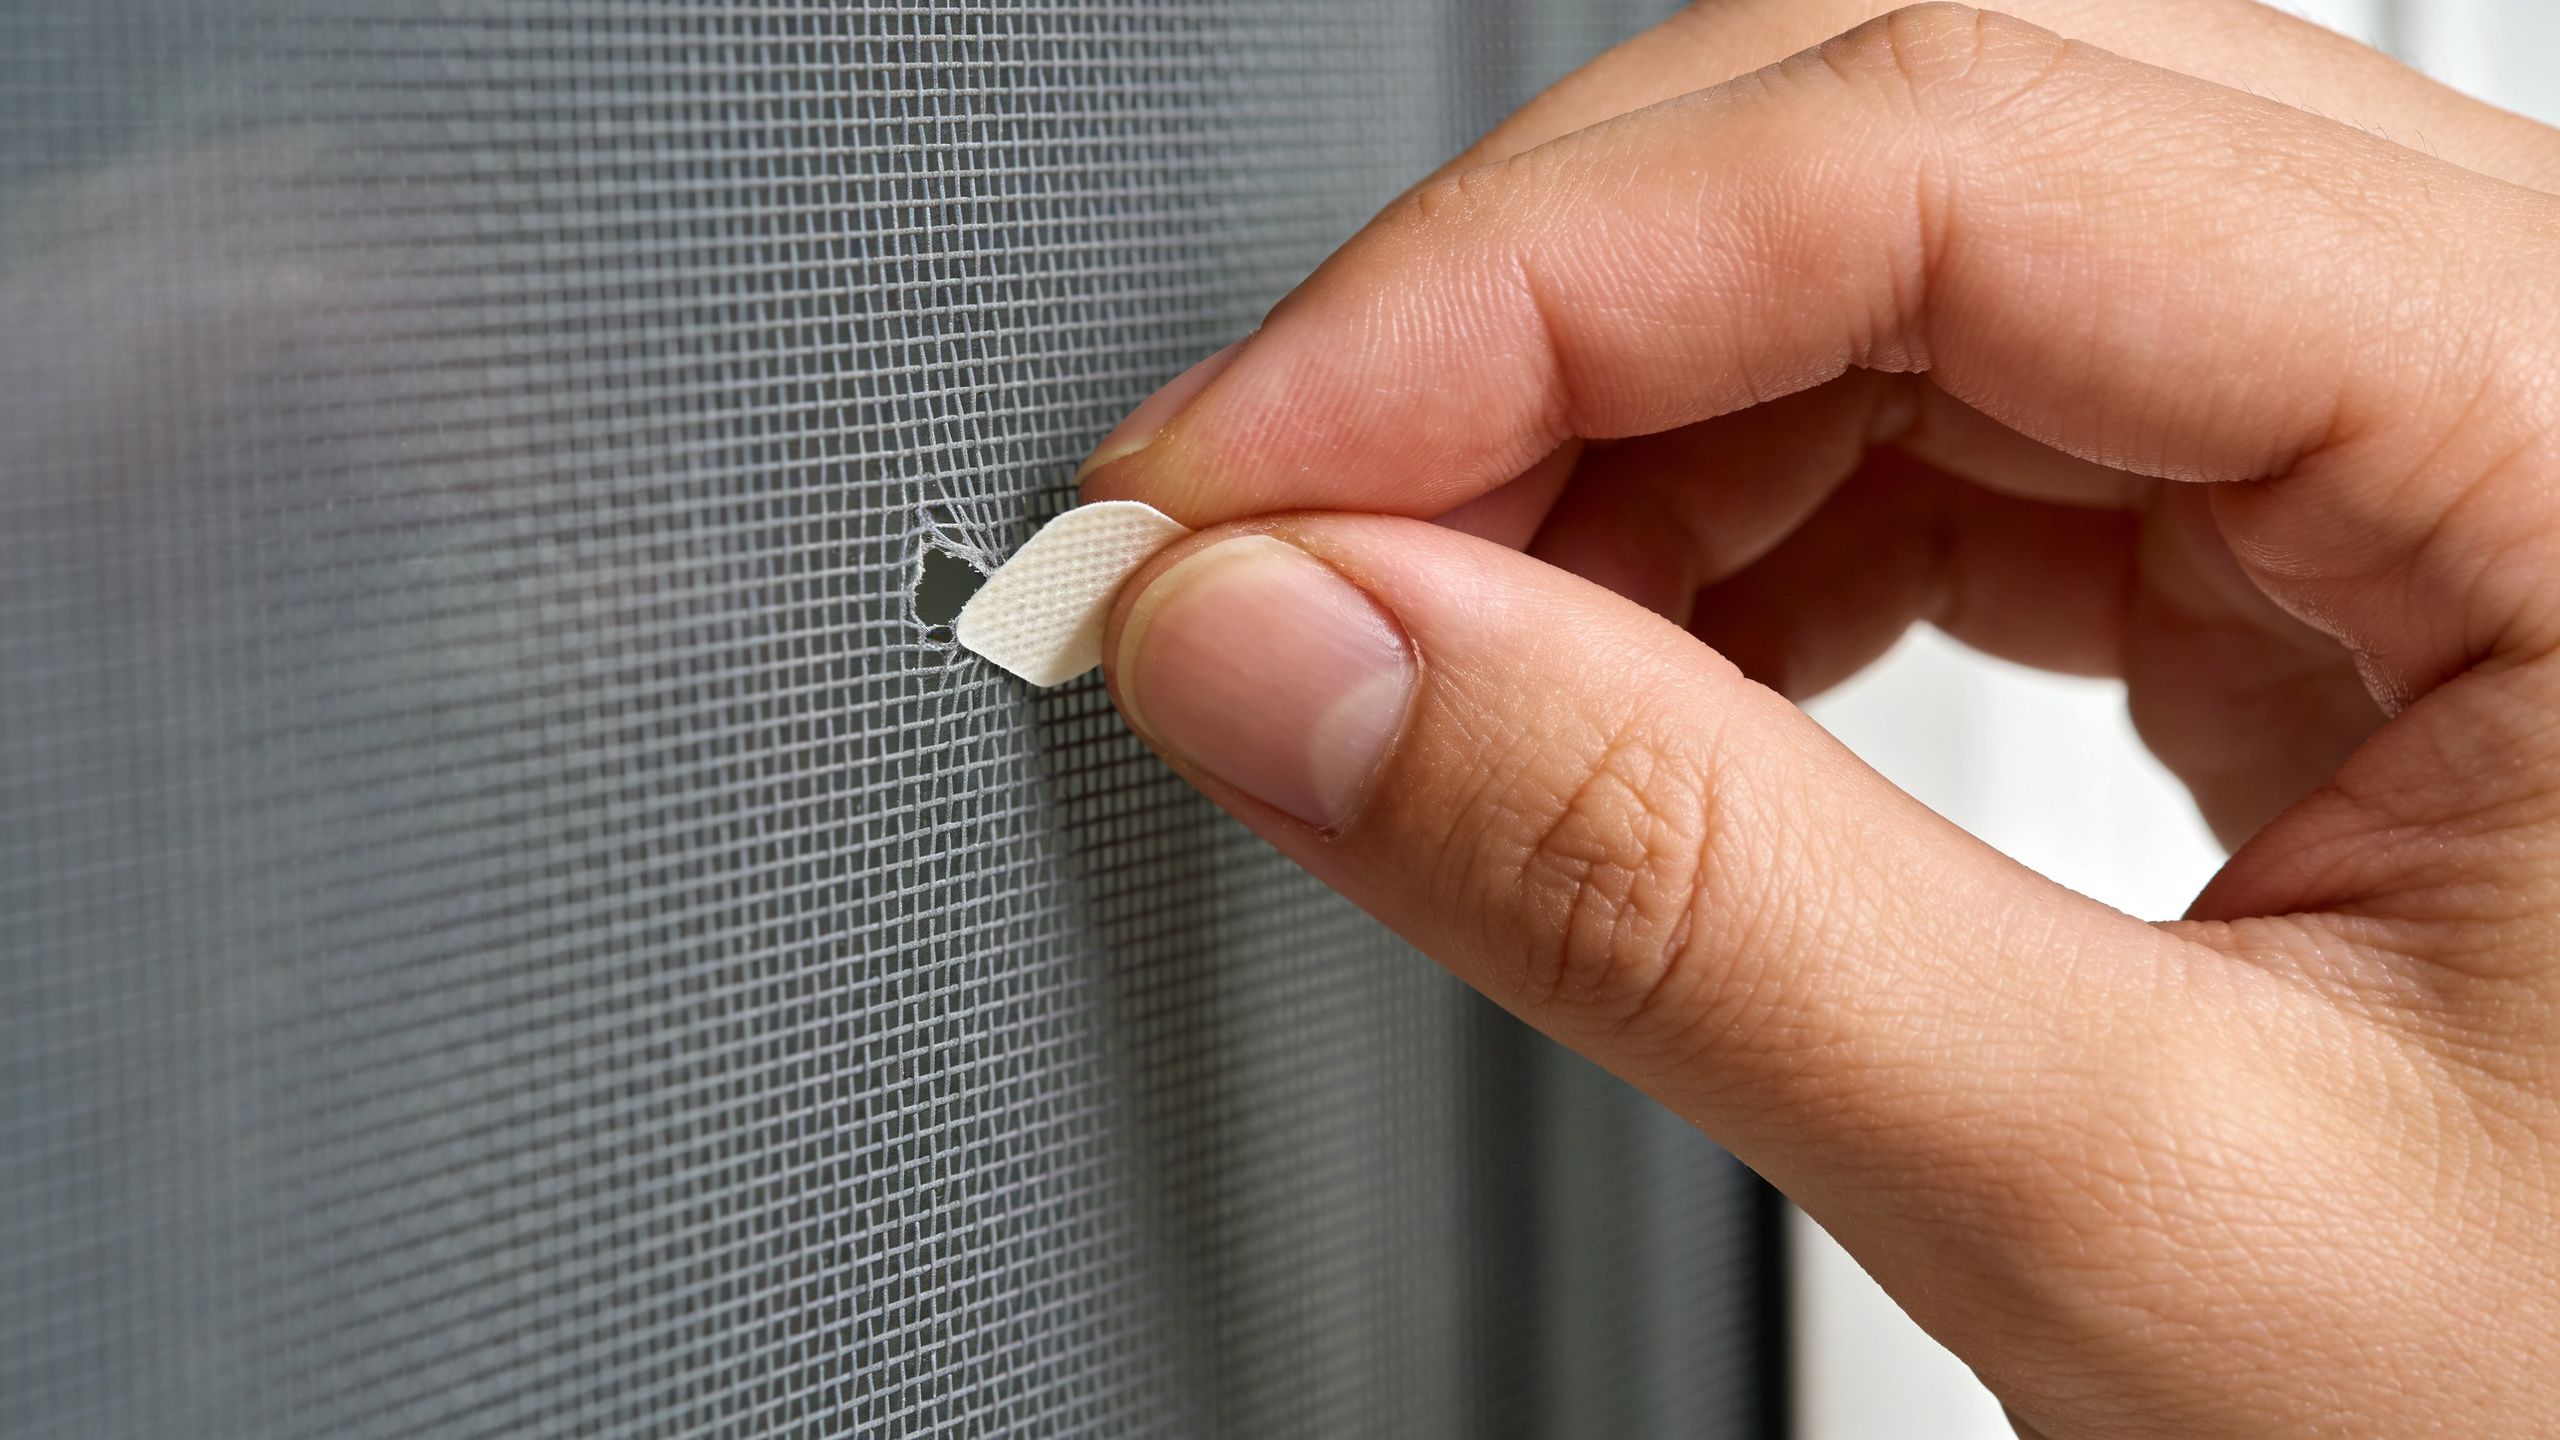
How to make a patch hold
For a durable patch, cut the repair material about 1/2 to 1 inch larger than the hole on all sides, then clean and dry the area before applying it. After placement, press an adhesive patch firmly for at least 30 seconds, and for better weather resistance, some specialists recommend patching both sides of the screen, according to Home Depot's repair guidance.
A clean patch usually comes down to patience:
- Trim fuzz and loose strands so nothing sticks up under the patch.
- Wipe away dust and let the mesh dry fully.
- Center the patch so the overlap is even on every side.
- Press firmly instead of just smoothing it lightly.
- Leave it alone long enough for the adhesive to bond properly.
A bad patch usually fails at the edges first. If the screen is dirty or the overlap is too small, the corners start lifting almost immediately.
Fiberglass versus metal screens
Fiberglass gives you more repair options. You can patch it, and in some cases, sew a small repair if the damage is limited and you want a more controlled fix.
Metal mesh is less forgiving. Aluminum is too stiff for sewing, so adhesive patches or a more complete repair are the practical choices. If you use the wrong method for the mesh type, the repair may look fine at first and then peel back or tear wider after a stretch of hot, windy weather.
A Step-by-Step Guide to Rescreening a Window
A torn screen on a breezy Colorado Springs afternoon can turn into a bigger project fast. The old mesh feels loose, the frame shifts on the table, and one rushed pass with the spline roller can leave you with ripples that show from the curb. Rescreening is still a solid DIY job if the frame is straight and you have a little patience. The trick is controlling tension, not fighting the screen.
The clean workflow that works
Set the screen on a flat work surface before you touch the spline. Use a small screwdriver or pick to lift one end, then pull the old spline out carefully so you do not nick the channel. Remove the old mesh and brush out the groove. Dust, brittle spline fragments, and pollen buildup make the new spline harder to seat evenly, which is a common problem on Front Range homes after a windy season.
Cut the new mesh so it extends past the frame on every side. Phifer's screen installation instructions show the same basic setup pros use: leave enough overhang to keep the material under control while you work, then trim only after the spline is fully in place.
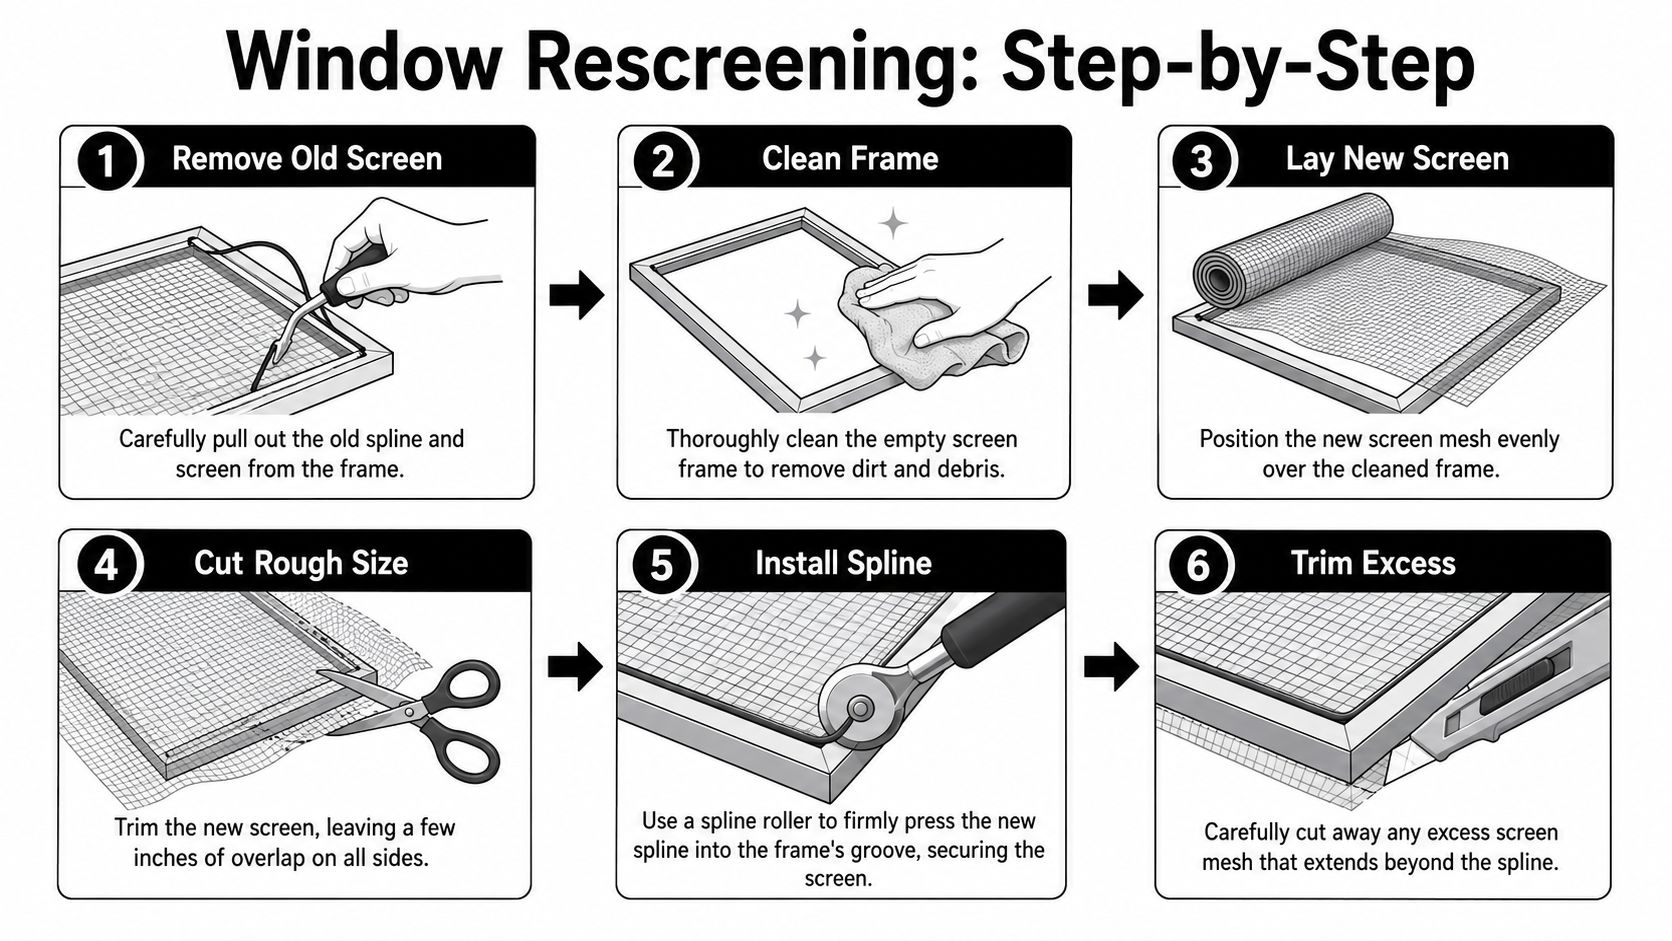
A reliable sequence looks like this:
- Remove the old spline and mesh without gouging the frame.
- Clean the frame channel so the new spline can sit at a consistent depth.
- Lay the new mesh over the frame with extra material on all sides.
- Press the spline into one corner first to anchor the screen.
- Roll the spline along each side gradually while keeping the mesh flat.
- Check for ripples before finishing the last side.
- Trim the excess mesh last with a sharp utility knife.
Tension matters more than force
The best-looking screens have even tension from corner to corner. They are not stretched drum-tight.
That distinction matters in Colorado. Dry air makes older spline less forgiving, and strong sun at altitude can leave replacement mesh and vinyl parts a little stiffer if they have been sitting in a hot garage. Pull too hard, and the frame can bow. Leave the mesh too loose, and the next round of wind can make it flap, wrinkle, or pop loose at a corner.
Start at one corner and work around the frame with steady pressure on the spline roller. Keep one hand on the mesh to guide it flat instead of tugging it tight. If diagonal waves start forming, stop and back up before you lock in the whole side. A small correction early saves a full redo.
If you have to force the spline or pull hard to chase out wrinkles, something is off. Usually it is the mesh alignment, the spline size, or a frame that is starting to bend.
DIY rescreening often slows down at the corners. That is normal. A first attempt can still come out clean, but it rarely goes as fast as the videos make it look. If you are working through a stack of sun-faded screens before a stormy weekend, that is the point where many homeowners decide their time is worth more than the learning curve. That is also why some people hand the job to a local service like Cultivate House Detailing when they want consistent tension and a cleaner finished look across every window.
Watch the full motion before you begin
Seeing hand placement helps a lot with spline control and corner handling.
Common mistakes that ruin the finish
A few mistakes show up again and again on DIY rescreening jobs:
- Using the wrong spline size: Too small and it slips. Too large and it can damage the frame channel or distort the frame.
- Trimming the mesh too soon: The material can pull free before the final side is set.
- Ignoring a frame that lifts off the table: That usually means the frame is bowing under too much tension.
- Rushing corners: Corners need controlled pressure and clean alignment.
- Buying materials before checking the existing screen: Mesh type, spline diameter, and frame depth all matter.
If the screen sits flat, the mesh looks even in the light, and the frame slides back into the window without resistance, a DIY rescreen was probably good enough. If the frame fights you, the corners look uneven, or the finished screen makes the window look tired from the street, that is usually a sign the repair needs more than fresh mesh.
Addressing Bent or Damaged Screen Frames
A fresh piece of mesh will not rescue a bad frame. In Colorado Springs, that shows up all the time. A screen looks like a simple tear repair until you set the frame back in place and notice one corner lifting, a side rail bowing, or the whole thing rattling when the wind picks up.
How to tell if the frame is still worth saving
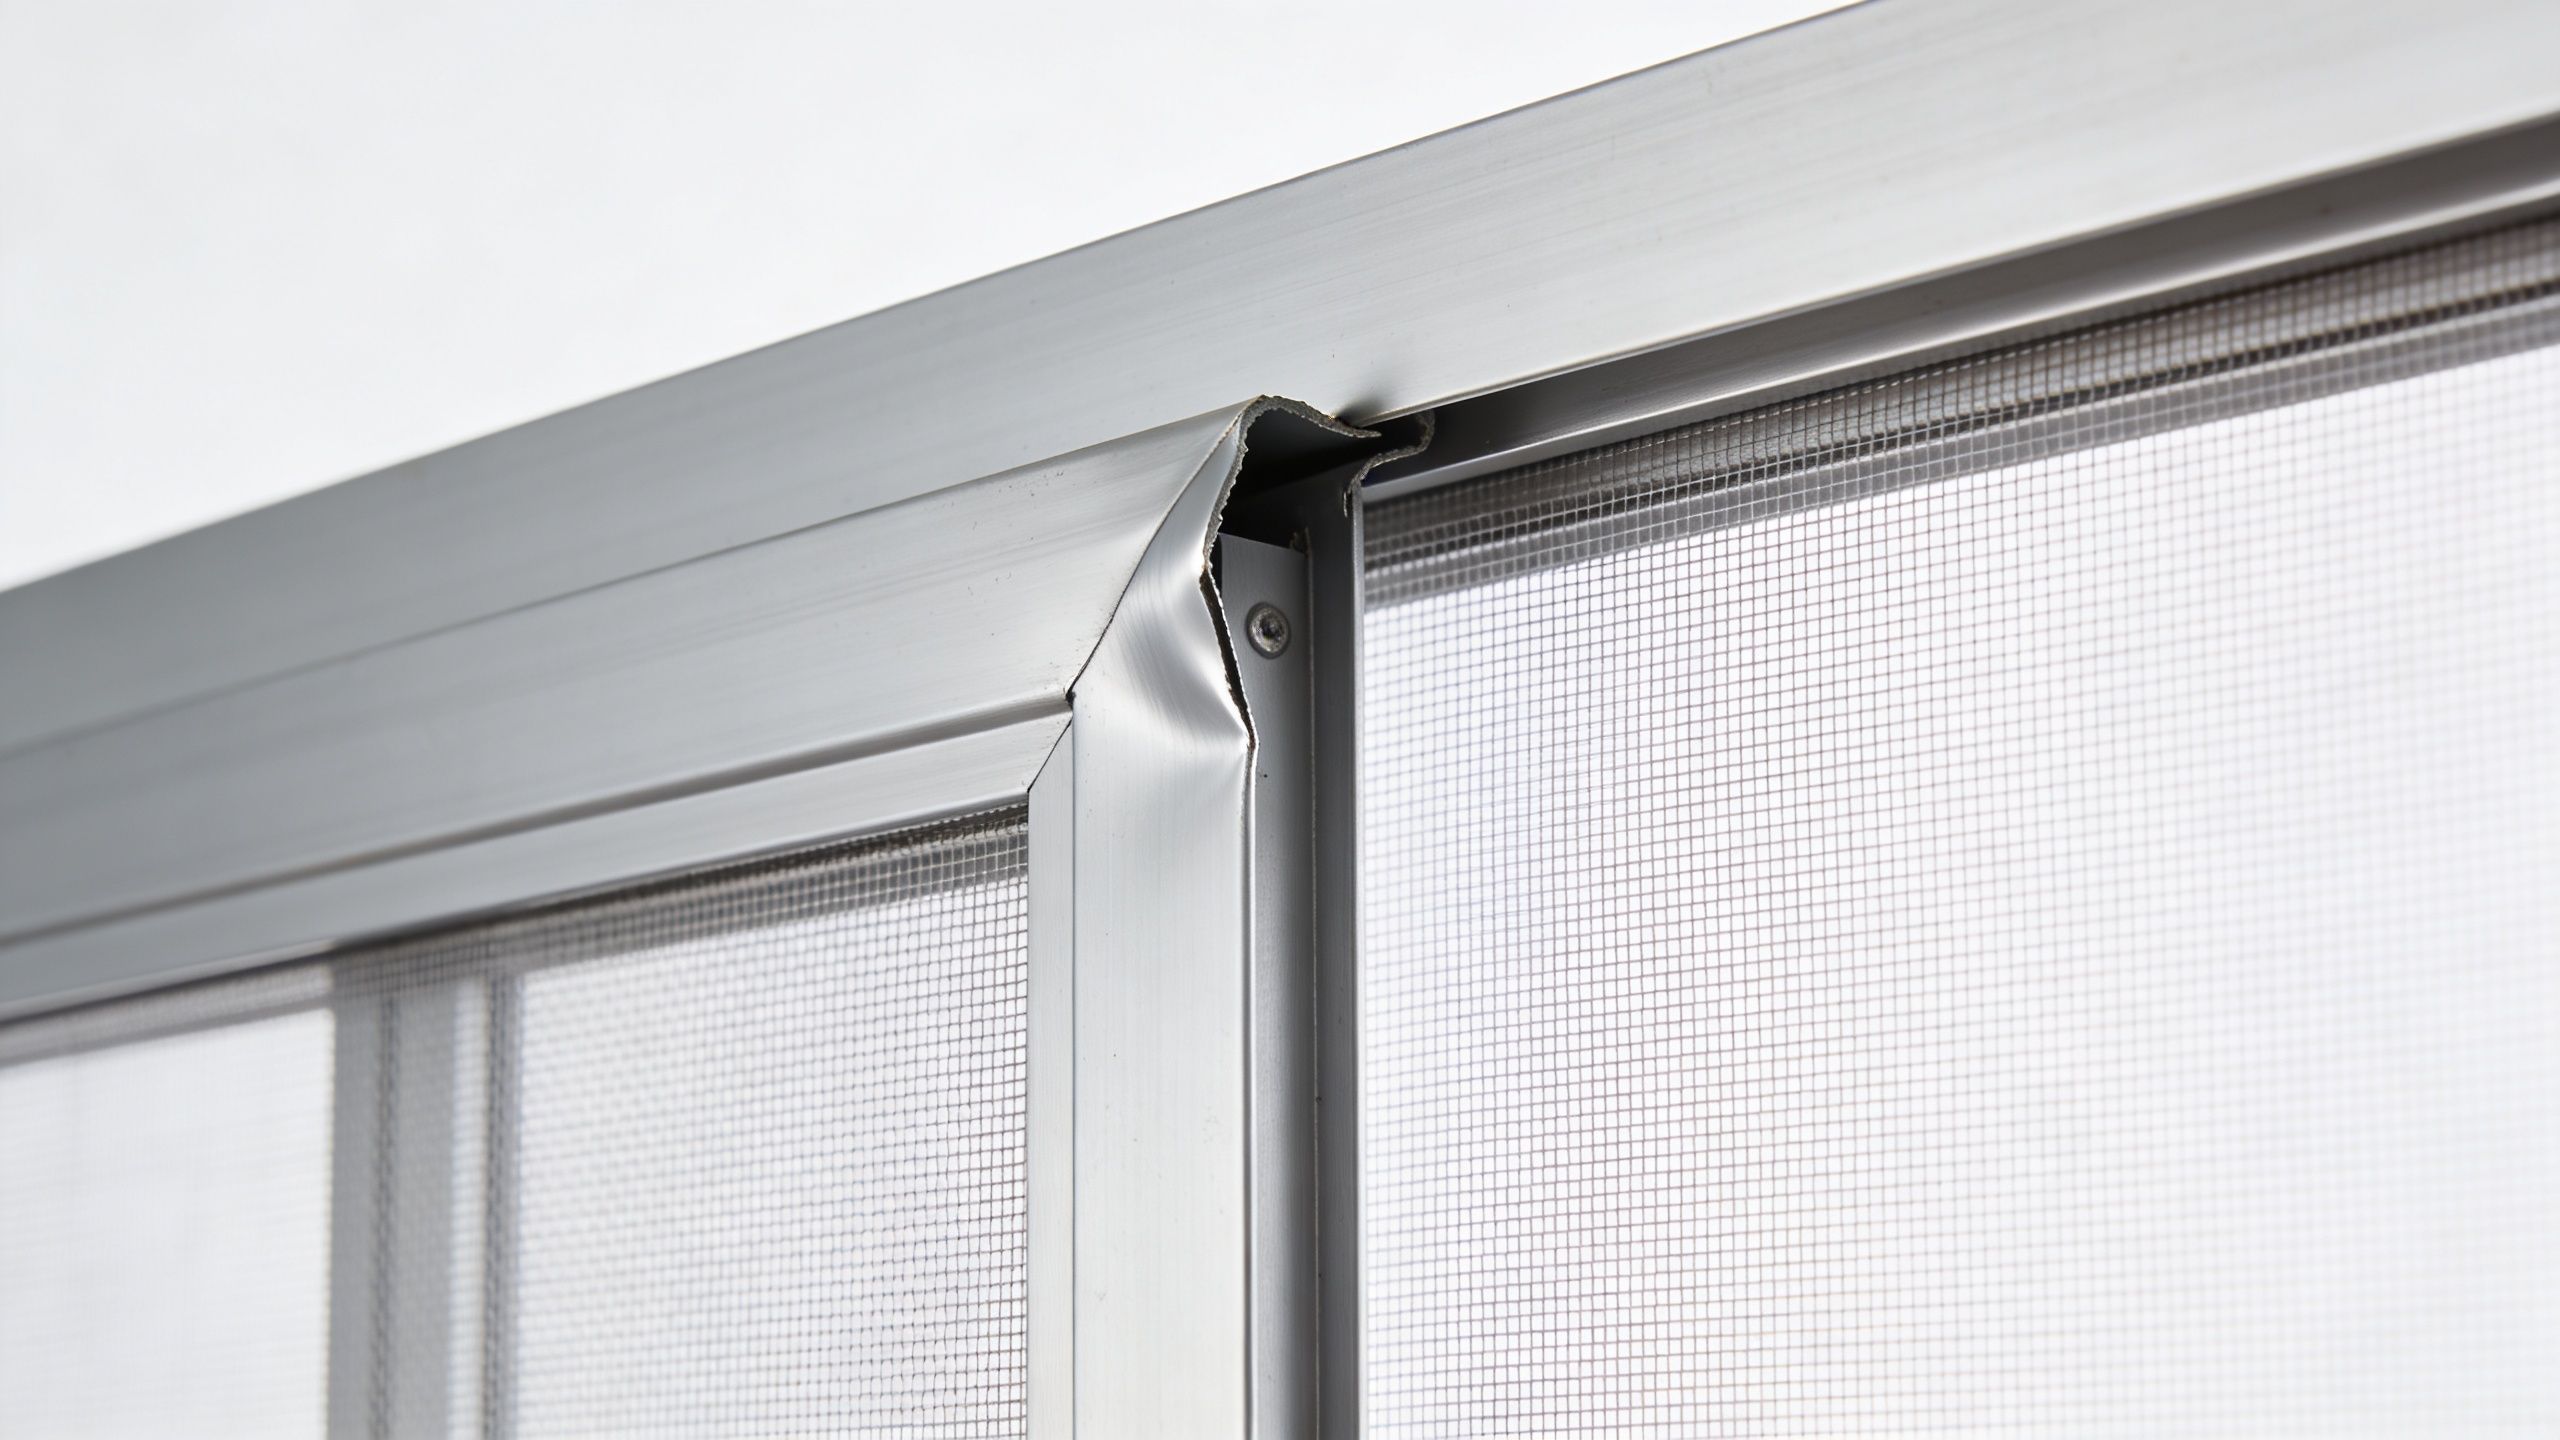
Colorado's dry air, strong sun, and fast weather swings are hard on older aluminum frames. UV exposure dries out corners and spline over time. Hail, gusty afternoons, and repeated removal for cleaning can leave a frame slightly twisted long before the mesh finally tears.
Set the screen on a flat table before you do anything else. If it rocks, the frame is out of square. If one rail bows inward or outward, the screen may never sit cleanly in the opening even with brand-new mesh.
Check these areas closely:
- Corners: Plastic corner pieces crack, loosen, or pull apart
- Long rails: A small bend in the middle often turns into a visible gap at the window
- Spline channel: Wear or corrosion can keep the new spline from holding
- Overall shape: A twisted frame usually causes fit problems right away
Guides on full screen replacement, including this overview from The Home Depot, show the same basic rule. A frame has to be square and stable before a repair will last.
When a light repair can work
Minor damage is sometimes fixable. A gentle bend on one side can often be straightened by hand on a flat surface. Slow pressure matters. Push too hard and aluminum tends to crease, which leaves you with a frame that looks worse and fits worse.
Here is a practical way to judge it:
| Frame condition | DIY outlook |
|---|---|
| Small bend on one side | Usually worth trying to straighten |
| Slightly loose corner | May hold as a short-term fix |
| Noticeable twist or bow | Usually not worth rescreening |
| Corroded, cracked, or repeatedly bent frame | Replace instead |
One quick test helps. If the empty frame will not sit flat and slide into the window opening without resistance, stop there. New mesh adds tension and makes the flaw easier to see.
For homeowners weighing repair cost against appearance, this breakdown of new window screen costs and replacement options helps clarify when replacing the frame is the cleaner long-term choice.
Colorado conditions make that choice matter more. A barely acceptable repair can look fine in the garage, then show every wave and gap in direct afternoon sun. If the screen faces the street, protects a main living area, or has already been bent more than once, replacement is usually the better investment. That is often the point where homeowners call Cultivate House Detailing instead of spending another Saturday trying to make a tired frame look straight again.
When to Skip DIY and Call a Professional
You pull a screen out on a windy Colorado Springs afternoon, planning a quick repair. Then the frame rocks on the patio, the old mesh cracks at the corner, and the job that looked simple starts eating up the rest of your Saturday.
That is usually the point where a decision must be made. DIY screen repair works best on one straightforward window where the frame is sound, the mesh is standard, and you can take your time. Professional service starts to make more sense when the repair has to look clean from the street, hold up through strong sun and dry air, or get done across several windows without a lot of trial and error.
Price matters, but so does what happens after the repair. A cheap fix can look fine indoors and still show ripples, loose corners, or slight frame bowing once that high-altitude light hits it. If you are comparing repair against replacement, this guide to new window screen costs and replacement options gives a clearer picture of where the money goes.
The practical cutoff point
Call a professional when the job includes any of these:
- Several damaged screens at once: The first one teaches you the process. By the third or fourth, the time savings of hiring it out usually become obvious.
- Upper-story or hard-to-reach windows: Screen work is simple on a bench. It is less simple when access is awkward and you are carrying frames up and down ladders.
- Custom sizes or specialty mesh: Solar screen, pet screen, and heavier materials can be less forgiving than standard fiberglass.
- Visible front-facing windows: Minor flaws stand out fast on the front of the house, especially with Colorado sun washing across the glass.
- A result that needs to last: If the old screen has already been patched, reworked, or forced back into shape once, another DIY round is often temporary.
There is also a durability trade-off that homeowners here run into all the time. Colorado's UV exposure and sudden weather swings are hard on screen material and corners. If your repair only looks decent on day one, it may not stay that way through a few hot weeks, a hail pop-up, or another season of dry, brittle mesh.
Why hiring out can be the better value
Professional screen repair is often less about difficulty and more about consistency. Getting one screen acceptably tight is manageable for a careful DIYer. Getting a whole set to match, sit square, and improve the look of the windows is where frustration usually shows up.
Cultivate House Detailing handles screen repair and replacement as part of exterior window service, which helps when you want the glass, tracks, and screens cleaned up together instead of split into separate projects. For homeowners who care about curb appeal, that bundled approach usually saves time and avoids the common DIY finish problems like wavy mesh, loose spline, and frames that never quite sit right again.
If the screen is basic, low-risk, and out of direct view, a DIY repair is often good enough. If the window is prominent, the frame needs to look crisp, or you want the result to hold up cleanly through Colorado conditions, hiring a pro is usually the better long-term call.
Your Top DIY Screen Repair Questions Answered
Can I patch a screen instead of replacing the whole mesh
Yes, if the hole is small and the surrounding mesh is still in good shape. Patching is usually the right move for isolated damage. If the material feels brittle, faded, or weak in several places, a patch only delays the bigger repair.
How do I know if I need new spline
If the old spline feels brittle, flattened, loose in the groove, or no longer matches the thickness of your replacement mesh, replace it. Reusing worn spline is one of the quickest ways to end up with a screen that loosens later.
What's the biggest DIY mistake people make
Over-tightening the mesh. Homeowners often chase a drum-tight finish, but that can bow the frame and create diagonal ripples. A smooth, even screen usually comes from controlled tension, not force.
Can I use the same process on a screen door
The general process is similar, but screen doors often take more abuse and may use heavier material or different frame components. If the door screen gets regular pet traffic or hard use, material choice matters even more than it does on a standard window.
What material should I pick for Colorado Springs
For many homeowners, fiberglass is the easiest to install. If your windows get strong sun or your screens take abuse from pets or kids, upgraded mesh can make more sense. The trade-off is that thicker screening may take more care during installation and may need a different spline fit.
How do I keep repaired screens looking good
Clean them gently. A soft brush, light rinse, and careful handling during removal and reinstalling go a long way. If you're already booking residential window cleaning, exterior window cleaning, or interior window cleaning in Colorado Springs, it also helps to have screens and tracks cleaned at the same time so dust and grit don't keep wearing on the mesh.
Small screen problems are easier to fix than screen systems that have been neglected for years. Catching one tear early is always less frustrating than replacing several failed screens at once.
Should I repair or replace if the frame is old
If the frame is straight, corners are firm, and the groove still holds spline properly, rescreening can be worthwhile. If the rails are bent, corners are failing, or the frame has already been tweaked several times, replacement is usually the cleaner answer.
If you'd rather skip the trial-and-error, Cultivate House Detailing helps homeowners in Colorado Springs and nearby areas with window screen repair, replacement, and window cleaning services that improve curb appeal and make your windows function the way they should. If your screens are torn, warped, or just dragging down the look of otherwise clean windows, reach out for a quote and get everything handled in one visit.