You notice it when the morning sun hits the glass just right. A few bubbles sit along the rear door, one corner of the film has lifted near the defroster, and the windshield strip has developed a faint purple haze. The windows may still function, but the vehicle looks tired, visibility can suffer, and you're left wondering whether to patch the tint, remove it, or replace it.
Learning how to fix tinted windows starts with identifying the failure rather than attacking the most obvious blemish. This guide walks through practical repair and removal methods, explains when DIY work makes sense, and shows how Colorado Springs, CO, vehicle owners can choose a safer next step.
Spotting the Problem on Your Tinted Windows
Start your inspection when sunlight reaches the glass from the side. Walk around the vehicle slowly and look at both the inside surface and the film's edges, especially where the tint meets the rubber gasket, door frame, or rear defroster lines.
A bubble may look like a small raised dome, while a separated section can appear as a cloudy pocket that changes shape when you view it from different angles. Look for white lines along the edge, hazy patches, scratches that catch the light, and dark streaks that resemble ink beneath the film.
What to check first
Run a clean fingernail lightly across a suspect area. Don't press hard. You're checking whether the film remains bonded to the glass or whether it has separated and is moving independently.
Pay close attention to these signs:
- Small isolated bubbles: A few trapped pockets near an edge may still respond to gentle heat and careful smoothing.
- Lifted corners: Film that has pulled away from the gasket can collect dust and moisture, making the defect spread.
- Purple or brown haze: Discoloration often points to an aging film rather than a fresh installation mistake.
- Widespread wrinkles: Repeated ripples across the pane usually mean the adhesive or film has deteriorated.
- Sharp scratches: Damage that catches sunlight may be in the film, the adhesive, or the glass itself.
Fresh damage often has defined edges. A recent lift may look clean where the film has separated, and a new bubble may have a clear boundary. Older failure tends to look broader and less uniform, with fading, brittleness, browning, or multiple lifted areas.
Window tint isn't permanent. Industry guidance reports that budget dyed film often begins failing in about 3–5 years, while higher-end ceramic film can last 10–20 years or even the life of the vehicle. The tint lifespan guide from TintLaws explains why age matters when deciding between cleaning, re-bonding, removal, and replacement.
Practical rule: Diagnose the film's condition before choosing a tool. A visible bubble is only a symptom, and pressing it flat won't restore adhesive that has already failed.
What Causes Bubbles, Peeling, and Purple Discoloration
Tint problems usually fall into three categories, and each one points toward a different repair decision. Bubbles can come from trapped moisture, adhesive breakdown, or film tension around curved glass. Peeling usually begins at a weak edge, while purple discoloration signals a film that has aged beyond a simple cosmetic touch-up.
Moisture left behind during installation may create small pockets beneath the film. Sunlight and repeated heating can also make the adhesive release gases or lose its grip. On curved corners, film stretched too tightly can pull away as temperatures change.
Peeling often begins where the film wasn't fully pressed into the edge or where contamination sits under the adhesive. Water and mineral deposits can work beneath a loose edge, while heat cycling around rear-window defroster grids can accelerate separation.
Purple color typically indicates deterioration in older dyed film. The color change isn't something a glass cleaner can reverse. Once the film has faded across much of the pane, replacement is generally more realistic than trying to restore the original color.
Common tint problems by cause and severity
| Problem | Likely Cause | Typical Location | Severity |
|---|---|---|---|
| Small bubbles | Trapped moisture or localized adhesive separation | Door glass or a film edge | Low to moderate |
| Edge lift | Weak bonding, contamination, or moisture beneath the edge | Gaskets, corners, and door frames | Moderate |
| Purple discoloration | Aging film chemistry and color degradation | Older side windows or windshield strips | Moderate to high |
| Broad wrinkles | Film shrinkage, tension, or adhesive failure | Curved panes and large sections | High |
| Sticky residue after peeling | Aged adhesive left on the glass | Any tinted pane | Moderate |
| Damage near defroster lines | Aggressive removal or failing film around the grid | Rear window | High |
Harsh cleaning can make a marginal installation worse. Ammonia-based products, abrasive pads, and forceful scraping may weaken the film or leave marks on the glass. If several windows show the same pattern, the problem is probably the age or quality of the film, not one isolated spot.
That diagnosis gives you three practical choices: repair a small defect, remove the old material, or install new film after the glass has been cleaned completely.
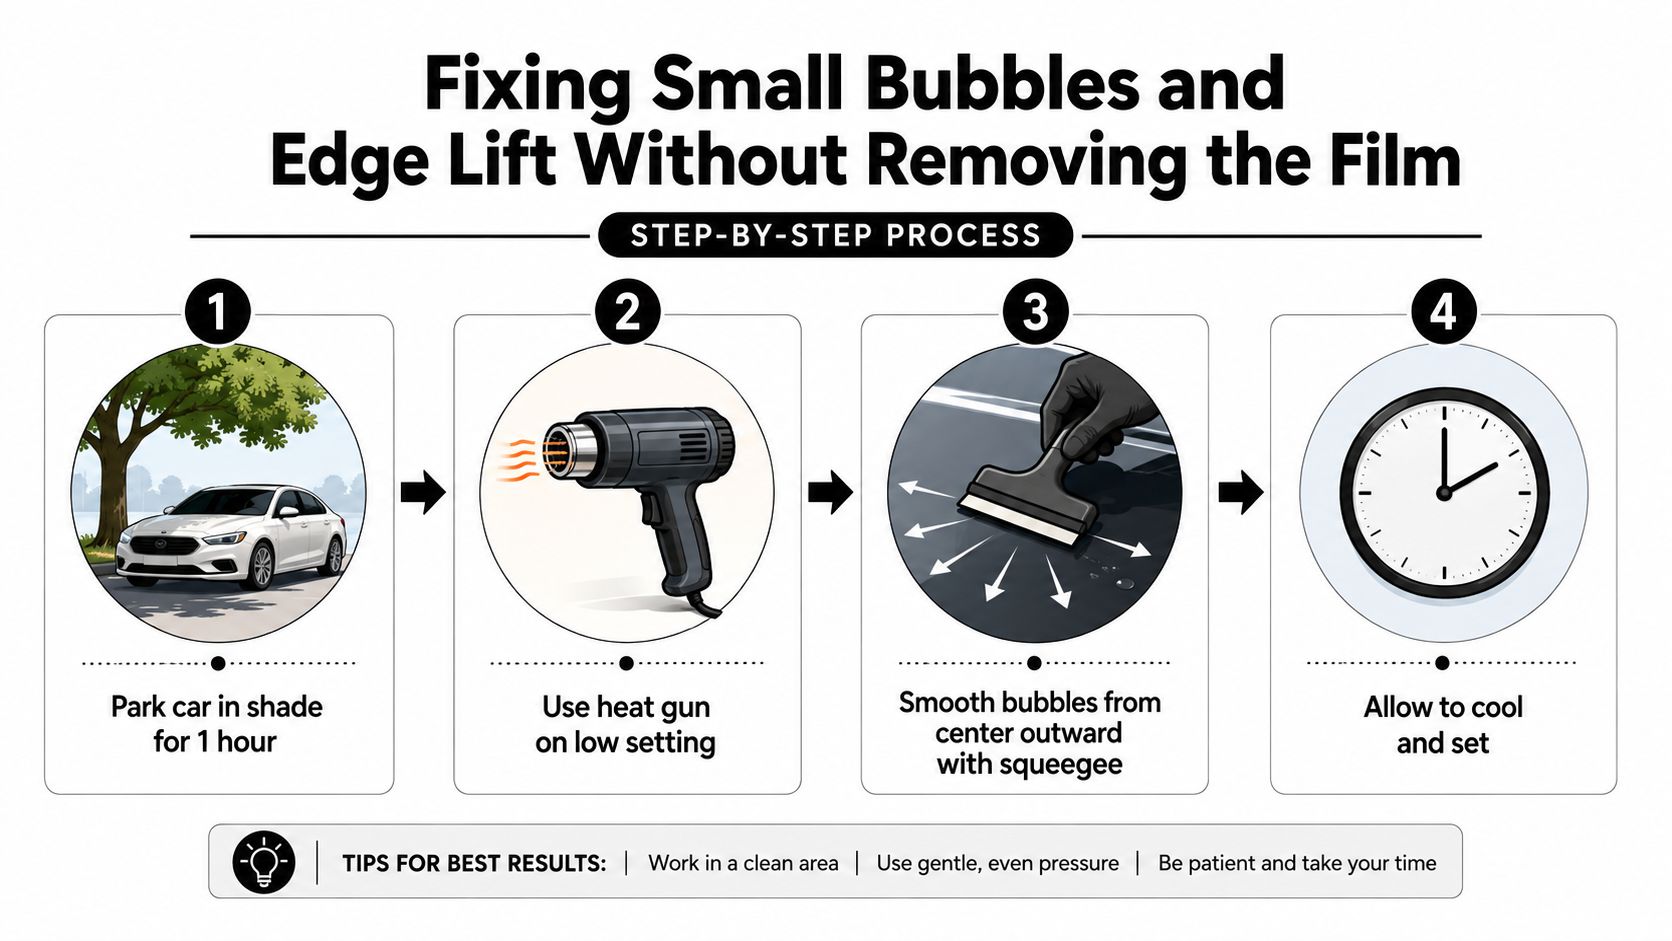
Fixing Small Bubbles and Edge Lift Without Removing the Film
Small bubbles and a recently lifted corner may be repairable if the surrounding film still looks clear, flexible, and firmly bonded. The basic method is controlled warmth followed by gentle pressure. Heat softens the adhesive and makes the film pliable, while a squeegee moves trapped air toward an existing edge instead of trapping it in another pocket.
A careful repair sequence
Cool the glass first. Park the vehicle in shade for at least an hour. A cool pane gives you more control because the film isn't already stretched by direct sunlight.
Use low heat. Set a heat gun to low, or use a hair dryer. Hold it 6 to 8 inches from the surface, as recommended by a published repair guide, and keep it moving. The repair guidance from Urable warns that overheating can singe the film and leave it white or brittle.
Warm a small area. Work around the bubble rather than heating the entire window. Stop when the film becomes just pliable. Never use a torch, and don't hold the heat in one place.
Press from the middle outward. Wrap a hard plastic squeegee in microfiber, then push the bubble toward the closest edge with slow, overlapping passes. A credit card can work in a pinch, but protect its edge so it won't scratch or catch the film.
Treat a lifted corner gently. Slide a thin plastic card beneath the loose section only far enough to access it. Lightly mist the exposed adhesive with a 90% isopropyl alcohol solution, press the film down, and use a credit-card edge at about 30 degrees to seat the edge.
Leave it alone while it sets. Make a final pass toward the edge, then avoid rolling the window down for 24 to 48 hours. The film needs time to settle and regain contact with the glass.
Small bubbles and wrinkles are the defects most commonly addressed with a heated film and shallow-angle squeegee. This practical window-tint repair guide describes the same first-line approach, pushing trapped air or moisture toward the nearest edge.
For broader background on applying privacy film carefully, this guide to window privacy film for UK homes offers useful context about film handling and smooth installation.
Stop if the film cracks, turns cloudy, pulls away in several directions, or refuses to stay flat after cooling. Those signs indicate adhesive failure or aged material, and repeated pressing will only make the surface more uneven.
Removing Old Tint and Cleaning the Adhesive Safely
Full removal makes more sense when the film is brittle, broadly bubbled, purple, or peeling across multiple edges. The film itself may come off in pieces, but the adhesive can remain firmly attached to the glass. Patience matters because force can scratch the pane, damage trim, or break rear defroster lines.
Park in shade and protect the interior with towels or plastic sheeting. Wear nitrile gloves and safety glasses, and remove trim or panels only when they block access. Keep the work area ventilated if you use an adhesive remover.
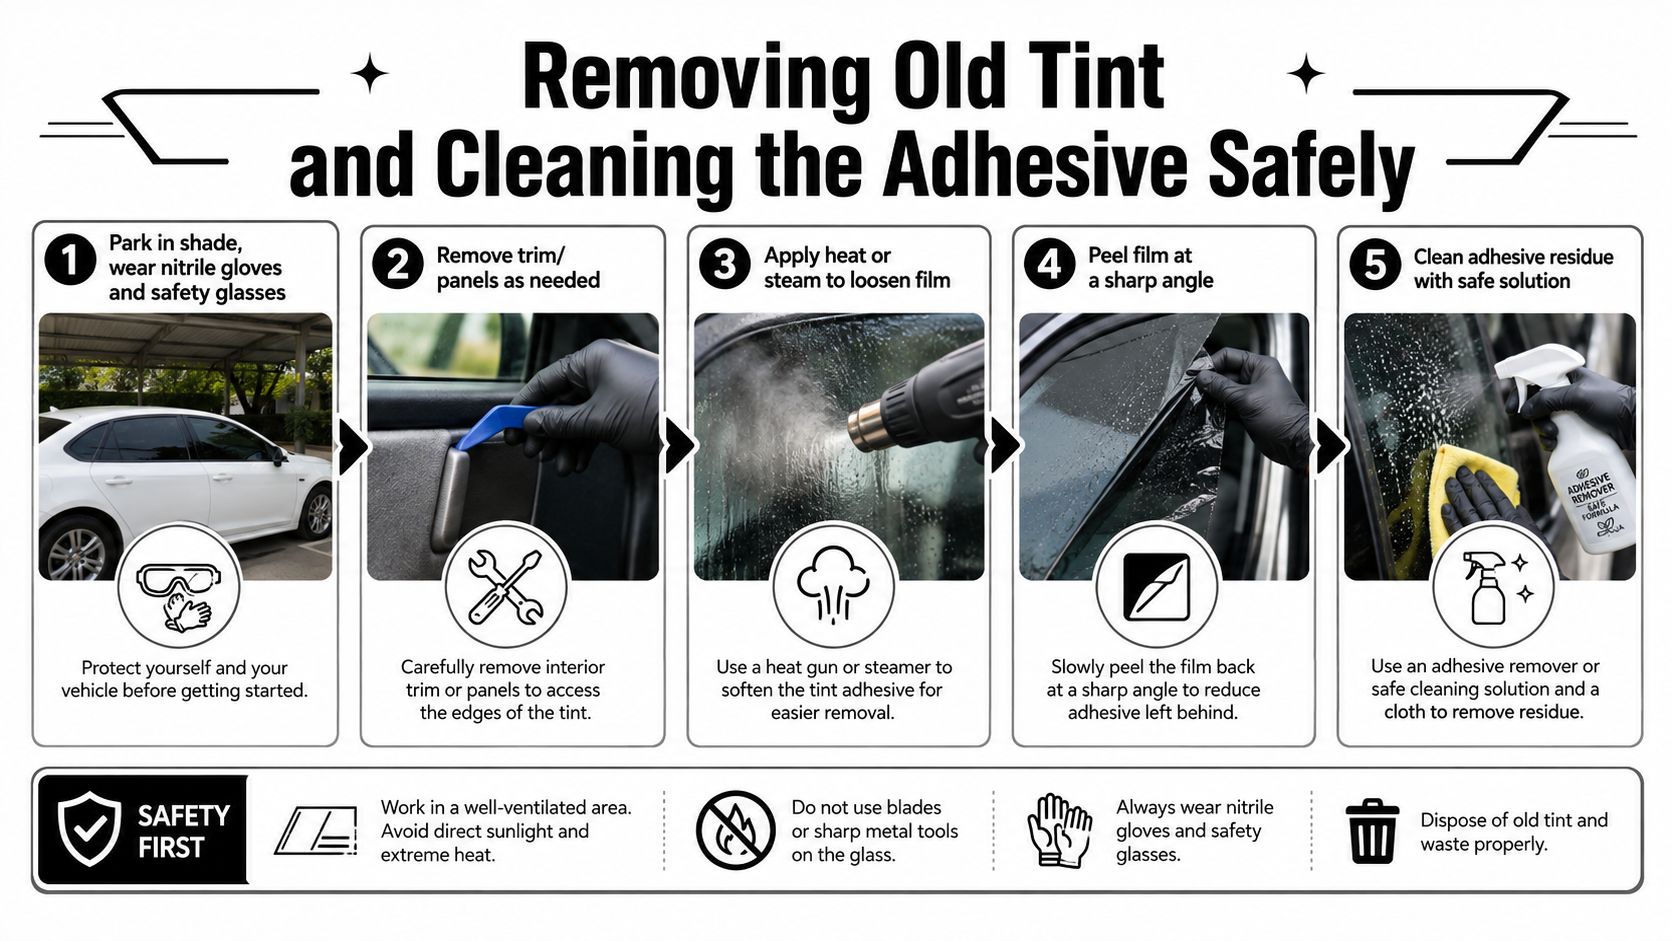
Heat removal for ordinary side glass
Use a heat gun on low or a hair dryer, keeping it roughly 6 to 8 inches away. Warm the film until the adhesive softens, then lift one corner and peel slowly. Keep the film at a sharp, controlled angle rather than yanking it straight across the glass.
If residue remains, lubricate the surface before scraping. A razor blade can be appropriate on regular glass when held nearly flat, but don't use that approach on a rear window with defroster lines.
Extra care around rear defrosters
Rear glass deserves a slower method. Use steam or low heat to soften the adhesive, then choose a plastic scraper or plastic razor blade instead of metal. This adhesive-removal guide specifically warns against dry scraping and distinguishes regular glass from rear windows with defroster lines.
Work parallel to the defroster paths. If a grid line begins lifting, stop. Repairing a damaged grid can be more difficult than removing the remaining film.
Rear-window warning: A clean-looking pane isn't worth sacrificing the heating grid. Use plastic tools, lubrication, and minimal pressure.
For stubborn adhesive, apply an appropriate remover or isopropyl alcohol, allow it to soften the residue, and wipe with microfiber. Published removal guidance commonly recommends waiting about 10 to 15 minutes after applying adhesive remover before scraping. This guide to removing tint glue safely also discusses maintaining a controlled heat distance, with recommendations ranging from 2 to 6 inches depending on the tool and method.
Finish with two rounds of glass cleaner. Inspect from an angle under natural light, because a pane can look clear straight on while still showing adhesive streaks from the side.
The same careful approach applies to other sticky material on glass. For additional cleaning ideas, see how to remove sticker residue from glass. Before applying any cleaner to tinted glass, check the product's compatibility in this tinted-window cleaning guide.
Old film and adhesive should be bagged and discarded according to local waste rules. Tinted side mirrors and laminated windshields need gentler handling than ordinary side glass, so stop if you're unsure which surface or layer you're working on.
DIY Repair Versus Hiring a Professional
DIY repair can be sensible when the defect is isolated and you're comfortable working slowly around glass. It becomes less attractive when the film is old, the rear pane has defroster lines, or the window is large enough that one mistake will be difficult to hide.
The main advantage is control over timing and supplies. The tradeoff is that you carry the risk of scratches, uneven edges, adhesive smears, and damage that may require replacement anyway. A professional also has the right setup for large panes, layered films, and tight trim areas.
A practical comparison
| Factor | DIY Repair | Professional Service |
|---|---|---|
| Best fit | One or two small defects on accessible glass | Broad failure, rear defrosters, large panes, or replacement |
| Main requirement | Patience, suitable tools, and a clean workspace | Experience, controlled removal, and proper installation equipment |
| Common risk | Scratches, torn film, uneven re-bonding, or residue | Lower handling risk, though the result still depends on the film selected |
| Removal challenge | Adhesive may take substantial effort to soften and clear | Technicians can match heat, steam, scrapers, and cleaners to the glass |
| Decision signal | Film remains flexible and mostly bonded | Film is brittle, discolored, cracked, or failing in several places |
If you're deciding whether cleaning itself belongs on your weekend list, this comparison of DIY window cleaning and professional service offers a useful way to weigh access, safety, and finish quality.
Don't rely on invented cost assumptions when comparing options. The price depends on the number and type of windows, the film's condition, access, the presence of defroster lines, and whether you're repairing, removing, or installing new material. Ask for a written quote that separates film removal, adhesive cleanup, and new installation.
Stop-and-call signal: If the film tears into small pieces, the glass has defroster lines, or adhesive remains after careful softening, professional removal is usually safer than adding more force.
A professional can also evaluate whether the problem belongs to the tint or the glass. That distinction matters for scratched panes, laminated surfaces, factory privacy glass, and windows where visibility has become a concern.
Choosing Your Next Step for Tinted Windows
The most useful answer to how to fix tinted windows isn't always a repair technique. It's a decision about whether the existing film still deserves to stay on the glass.
Choose targeted repair when the film is still healthy
Repair is a reasonable first move when the tint is relatively young, the defect is isolated, and the rest of the pane remains clear and well bonded. A few small bubbles near an edge or one lifted corner may respond to low heat and careful smoothing.
Don't keep reworking the same spot. If it lifts again, spreads after cooling, or reveals discoloration underneath, the adhesive has likely lost its reliability.
Choose removal and replacement when failure is widespread
Full removal is the better path when several windows show peeling, the surface has a broad purple haze, or the film has become brittle and cracked. Trying to patch an aging section often leaves adjacent weak areas untouched.
Removal also creates a clean surface for a fresh installation. The new film needs properly prepared glass, not residue hidden beneath an old layer.
Consider an upgrade when the old film no longer meets your needs
Modern ceramic and nano-ceramic films give homeowners another option when they want a cleaner appearance, heat control, or improved signal transparency. Smart and electrically adjustable glass is also changing consumer expectations. Industry coverage describes growing interest in smart and solar-related tint systems during 2024–2025, while a CES 2025 preview highlighted smart glass capable of adjusting through hundreds of tint levels without traditional film. This industry overview of window-tint problems and newer systems provides helpful background.
Colorado compliance should guide any replacement decision. Vehicles registered in Colorado must transmit at least 70% of light through the windshield and 27% through the other windows, according to Colorado House Bill 19-1067. Colorado also permits a non-reflective windshield strip only across the top 4 inches, and it must not distort vision, affect color perception, or reflect light toward other motorists. The Colorado tint-law summary outlines those strip requirements.
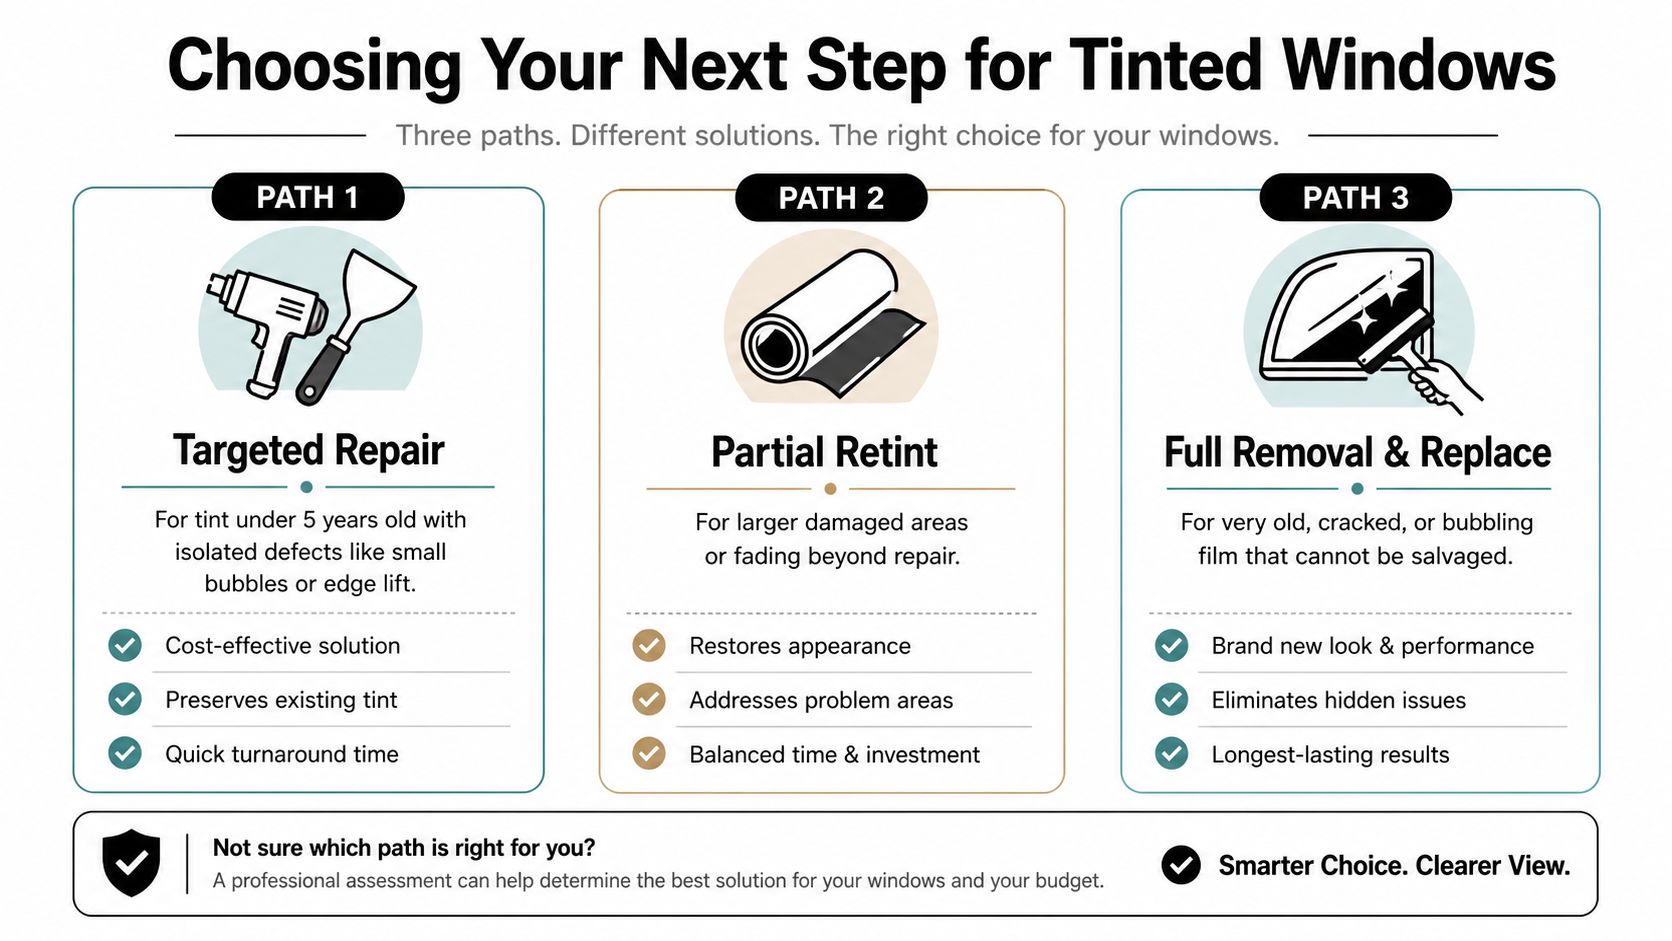
For vehicle owners in Colorado Springs, CO, the practical choice is simple. Repair a small, stable defect, remove failing film before it creates a larger visibility or adhesive problem, or replace it with a suitable modern system that matches your goals and Colorado's requirements.
Cultivate House Detailing offers careful exterior window cleaning, interior window cleaning, screen cleaning, track cleaning, and related maintenance for homes and businesses in Colorado Springs and nearby communities. If damaged tint has left your glass cloudy, streaked, or difficult to maintain, visit Cultivate House Detailing to request a quote and schedule professional service.