Clean glass changes a room fast. In Colorado Springs, though, that clean look can disappear the second you notice the screen. If the mesh is faded, chalky, bent, or spotted from old overspray, the view out to the Front Range never looks as crisp as it should.
That's usually when homeowners start searching how to paint a window screen. Sometimes that's the right move. Sometimes it isn't. A fresh coat can improve the look of a screen, but Colorado sun, wind, dust, and hard-water residue can also turn a simple DIY project into clogged mesh, streaked paint, and a screen that blocks more light than it helps.
Why Faded Screens Can Ruin Your Colorado View
You get the windows cleaned, the tracks wiped out, and the glass finally looks clear again. Then the afternoon light hits the screen and shows every flaw. The mesh looks gray instead of black. The corners are dusty. Maybe there's old exterior paint speckled across it from a previous house project.

That's a common frustration on both residential and commercial properties. Clean windows should make the view feel open. Worn screens do the opposite. They flatten natural light, dull curb appeal, and make even freshly cleaned glass look unfinished.
Screen painting has a real history
Painting screens isn't some brand-new DIY trend. During their mid-20th century peak, painted window screens covered an estimated 200,000 windows across Baltimore, Maryland, which made the city the global center of that folk art tradition, according to this historical coverage of Baltimore screen painting.
That history is interesting, but most homeowners in Colorado Springs aren't trying to create folk art on the front window. They're usually trying to solve a practical problem. They want the screens to look darker, cleaner, and less distracting from the view.
Practical rule: If your glass is clean but the window still looks tired, the screen is often the reason.
Why this matters in Colorado Springs
Our local light is bright. That's great for mountain views and natural light indoors, but it also makes faded mesh stand out more. A screen that looked acceptable a year ago can suddenly look washed out once the rest of the window is brought back to a streak-free finish.
If you've ever wondered why screen care deserves more attention, this guide on why clean window screens matter more than you think is worth a read. It gets to the heart of what many homeowners miss. Screens affect both appearance and airflow, and they can drag down the final result even after a solid window cleaning.
For those seeking window cleaning near me or window cleaning in Colorado Springs, CO, this is often the hidden issue behind windows that still don't look fully refreshed.
Choosing Your Paint and Application Tools
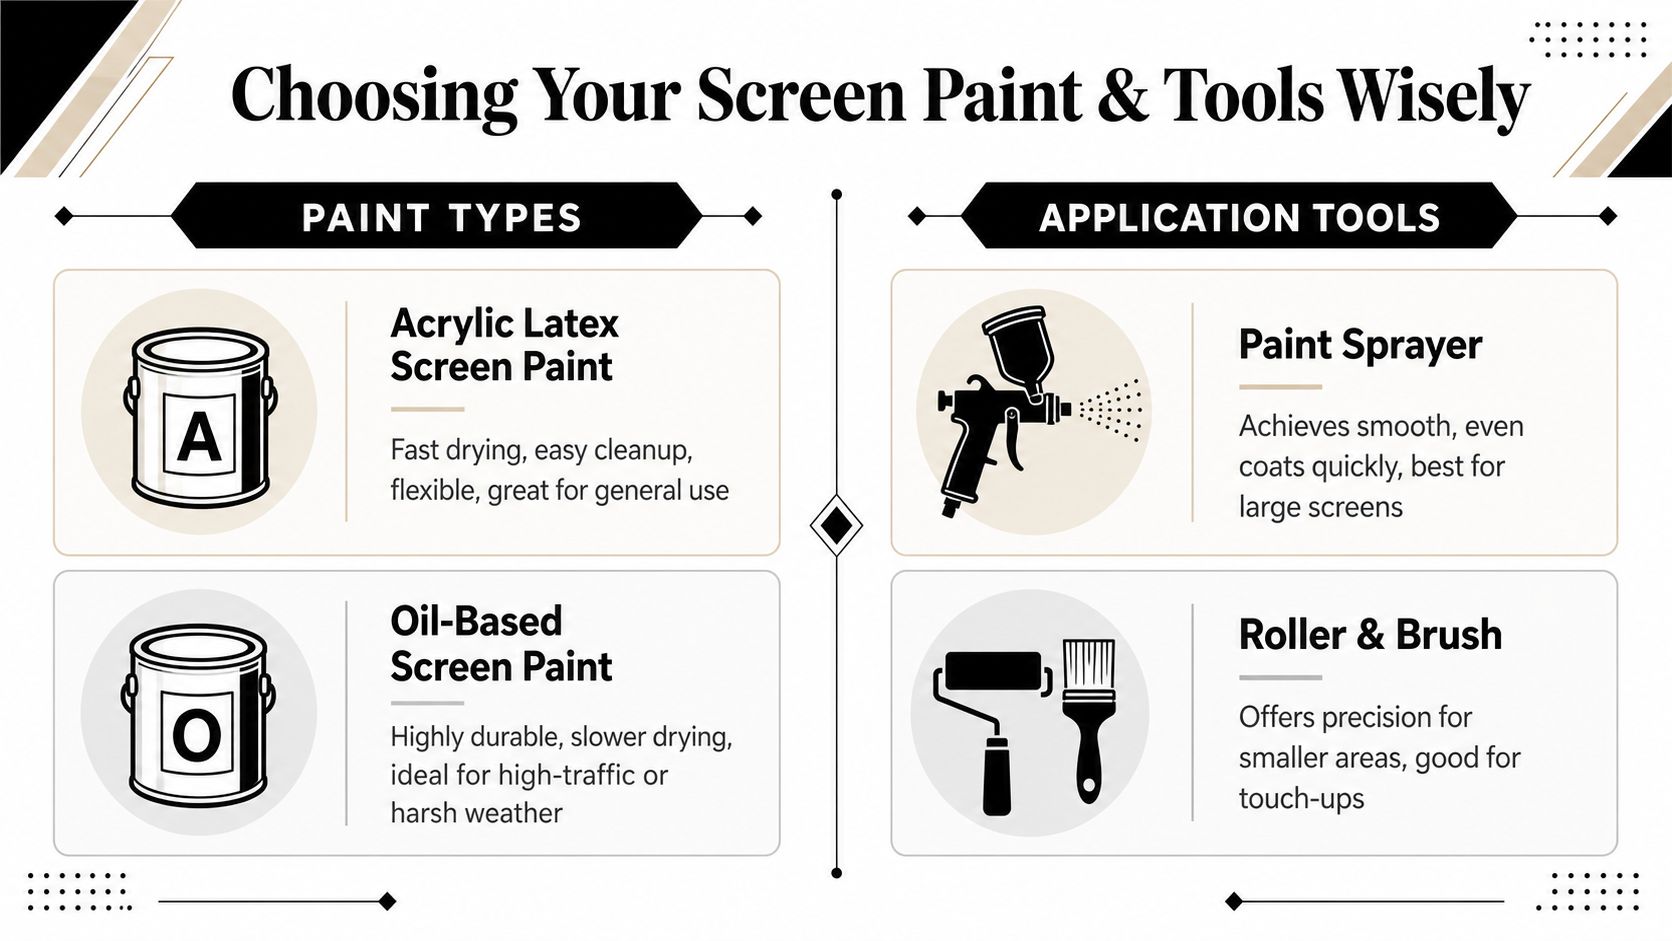
The paint matters. The tool matters just as much. Most failed attempts to paint a window screen come down to one problem: too much material hitting a mesh that needs to stay open.
Brush versus spray
A lot of people reach for spray paint first because it feels fast. On a large screen, it can be. But spray application can also create overspray on the frame, nearby glass, siding, or trim if the setup isn't controlled well. It's also easy to lay down too much paint without realizing it.
A brush takes longer, but it gives better control. That matters on older screens, smaller inserts, and any screen where you're trying to refresh color without loading the mesh shut.
Here's the trade-off in simple terms:
| Method | What works | What goes wrong |
|---|---|---|
| Brush application | Better control, easier to work into edges, safer for touch-ups | Slower, easy to overwork the paint if you rush |
| Spray application | Faster coverage, useful on larger screens | Higher risk of overspray, heavier coats, uneven buildup |
What kind of paint works better
For screen projects, watery paint is usually a mistake. You want a moderately viscous, high-pigment paint that covers well without flooding the openings in the mesh. Thin paint tends to run. Heavy application tends to clog.
If you're sorting through basics before you start, these primer paint tips for homeowners give a helpful overview of how coating choice affects adhesion and finish. The same principle applies here. Prep and product selection decide most of the outcome before the brush ever touches the screen.
Basic tool kit for a cleaner finish
You don't need a truckload of gear, but you do need the right setup.
- Soft brush selection: Use a quality brush with flexible bristles so you can control how much paint contacts the mesh.
- Painter's tape and drop cloths: These protect the frame, sill, and surrounding area if you're working near finished surfaces.
- A stable work surface: Lay the screen flat and keep it supported. Trying to paint it upright usually creates drips and missed spots.
- Clean rags: You'll need them to wipe excess paint off the brush and catch mistakes before they dry.
For homeowners weighing residential window cleaning or screen refresh work at the same time, professional judgment becomes crucial. The screen might be a good candidate for repainting, but if the mesh is brittle, torn, or already packed with buildup, new paint won't address the underlying issue.
A Step-by-Step Guide to Prepping and Painting
Preparation is where most DIY jobs succeed or fail. If the screen is dusty, oily, or still holding mineral residue, the paint won't lay down evenly. It will grab in patches, bridge openings, and leave the mesh looking heavier than before.
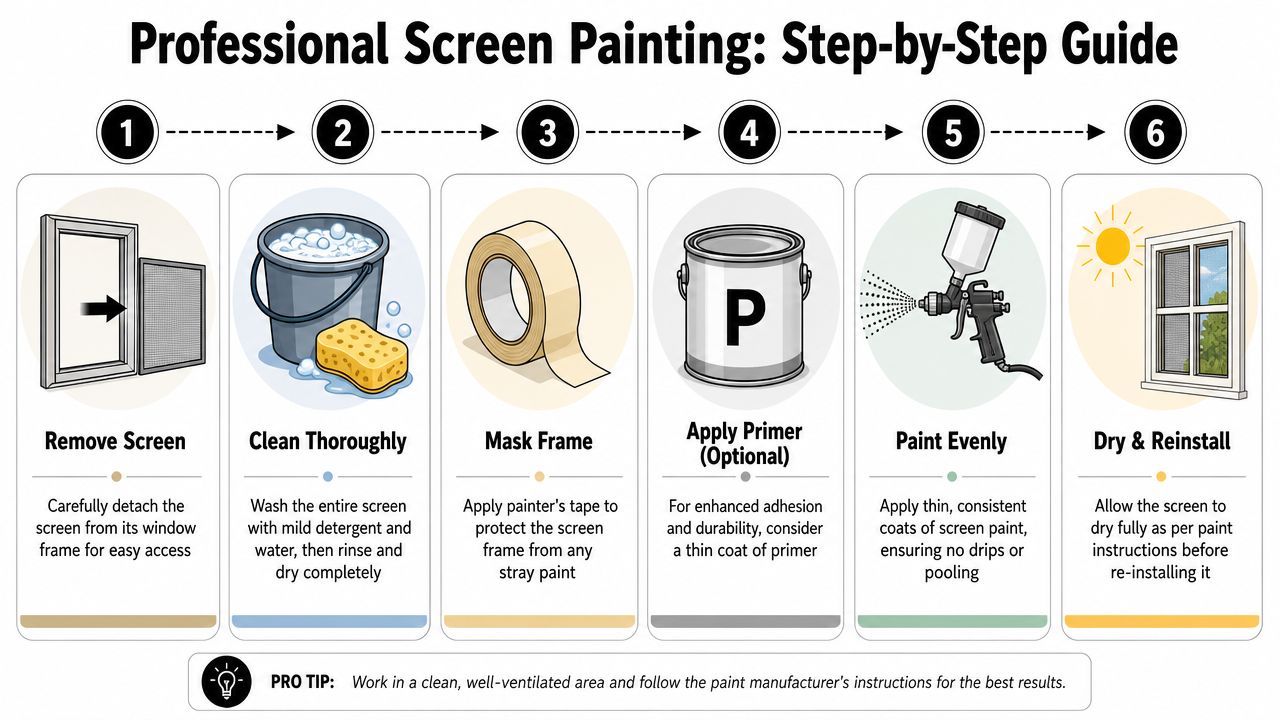
The expert method is straightforward. It requires removing the screen from the frame opening, washing and fully drying the mesh, then applying paint with a DIP & DAB approach so only the brush tips are wetted and excess paint is removed before touching the screen, as outlined in this screen painting methodology reference.
Step one starts before the paint
Take the screen out completely. Don't try to paint it in the window. That shortcut usually leads to missed edges, trapped dust, and paint where it doesn't belong.
Then wash the screen thoroughly. Mild soap, water, and a gentle scrub are the starting point. If you want a deeper rundown on prep, these pro methods for cleaning screens are a useful companion resource because they reinforce the same principle. Clean mesh takes coating more evenly.
A screen can look clean and still hold enough fine dust or residue to ruin paint adhesion.
How to apply the paint without clogging the mesh
Once the screen is completely dry, work in a shaded, cool area. Direct sun causes paint to dry too fast, and fast drying on mesh usually means clumps and uneven spots.
Use this sequence:
- Load lightly: Dip only the tips of the brush.
- Remove excess: Dab or wipe off extra paint before touching the screen.
- Work in thin passes: Stroke vertically, then horizontally, so the woven wires get coated on multiple sides.
- Pause briefly: Allow a short dry time between coats.
- Test before adding more: Lightly touch to check whether the previous coat has set.
That light-touch method matters more than people expect. One heavy pass can close openings in the mesh and make the finished screen look muddy from inside the house.
What homeowners usually get wrong
The most common mistake is trying to get full color in one coat. That sounds efficient, but it rarely looks good. Screens respond better to thin, controlled layers than to one thick application.
Another problem is painting in the wrong conditions. If it's hot, breezy, or the screen is sitting in direct sunlight, the paint can flash dry before it spreads evenly. The result is rough texture, visible marks, and inconsistent color.
A better checklist looks like this:
- Remove first: Painting a screen while it's still installed creates more cleanup and a weaker result.
- Wash and dry fully: Dirt and oils interfere with adhesion.
- Use a controlled brush method: The DIP & DAB approach helps preserve airflow and visibility.
- Choose patience over speed: Several light coats almost always beat one heavy coat.
- Inspect from both sides: What looks even from the front can appear blotchy from indoors.
For homeowners focused on professional window cleaning, screen cleaning, and a clean final appearance, expectations need to stay realistic. A painted screen can look better, but only if the mesh is still structurally sound.
Troubleshooting Common Screen Painting Problems
A screen project usually goes wrong in predictable ways. The paint clogs the holes. The finish looks patchy. Overspray lands where it shouldn't. Or the screen already had old buildup before the project started, so the new paint only locks the problem in deeper.
Clogged mesh and uneven finish
If the openings fill with paint, airflow drops and the view gets cloudy. On a minor clog, a careful pick with a small tool can reopen individual holes. The key word is careful. Push too hard and you can stretch or tear the mesh.
Uneven color often comes from inconsistent loading on the brush or from trying to touch up half-dried paint. Once that starts, many people keep fiddling with it and make the surface worse.
A simple field guide:
- Small clogs: Clear them gently, one opening at a time.
- Lap marks: Let the coat dry, then reapply lightly across the full area.
- Frame smears: Clean them quickly before they cure.
- Blotchy coverage: Usually means the prep wasn't complete or the coat was too heavy.
Old paint and hard-water buildup are a different problem
A common failing of DIY articles is that existing tutorials often don't explain how to remove old paint buildup from screens without damaging the mesh, especially in hard-water areas where standard cleaning often isn't enough and more specialized methods like soft-bristle scrubbing combined with mechanical poking may be needed, as described in this discussion of paint buildup on screens.
That matters in Colorado Springs. Hard-water spotting and exterior residue can sit on a screen for a long time. Once overspray, minerals, dust, and oxidation combine, repainting over the top usually doesn't rescue the screen. It just buries the issue.
Some screens need refreshing. Others need what I'd call a real rescue, meaning targeted cleanup, repair, or full replacement instead of another coat of paint.
If your screen already feels brittle, has flaking old paint, or looks plugged even after washing, stop before adding more product. At that point, repair or replacement is usually the cleaner path.
Functional Benefits Beyond Curb Appeal
A lot of homeowners think screen painting is purely cosmetic. It isn't. In a sunny market like Colorado Springs, the finish on the mesh can affect how the window performs day to day.
Most online advice treats painted screens like a craft project, but there's real practical value in using darker, UV-resistant acrylic coatings for glare reduction and privacy, especially in high-sun exposure settings, as noted in this resource on painted window screens and functional use.
Why darker screens often look better from inside
A darker screen tends to visually recede. That means your eye notices the view more and the mesh less. It can also soften harsh brightness on certain exposures, which is useful in rooms that get intense afternoon sun.
For commercial spaces, that can improve comfort near storefront glass. For homes, it can make a bright room feel easier on the eyes without changing the window itself.
Where the trade-off shows up
The benefit only holds if the coating is even and the mesh stays open. A badly painted dark screen can reduce visibility instead of improving it. That's why the goal isn't just darker color. The goal is a thin, uniform finish that preserves the screen's function.
For people comparing commercial window cleaning, exterior window cleaning, and screen upgrades, this is an important distinction. Done well, a painted screen can help with appearance, glare, and privacy. Done poorly, it becomes one more thing blocking the glass.
When to Call a Pro for Screen Repair in Colorado Springs
Some screens are good DIY candidates. Many aren't. If the frame is bent, the corners are loose, the mesh is torn, or the screen already has layers of old paint and buildup, repainting won't give you a clean, lasting result.

Signs the smarter move is repair or replacement
A pro is usually the better call when:
- The mesh is damaged: Tears, sagging, or brittleness mean the material itself has reached the end of the line.
- The frame isn't true: Bent aluminum or loose corners make the whole screen sit poorly, no matter how good the paint looks.
- You're dealing with buildup, not fading: Old overspray, mineral residue, and clogged mesh need corrective work first.
- You want the full window to look right: The best finish often comes from pairing screen work with interior window cleaning, exterior window washing, track cleaning, and detailed screen service.
If you like doing your own projects, this guide to DIY window screen repairs is a helpful reference for understanding what's manageable at home and what starts getting fiddly fast.
Cost context matters
Professional service often makes more sense when you look at the whole job, not just the screen in isolation. In Colorado Springs, a typical 2,200 square foot two-story home in Briargate costs about $410 for a full-service package that includes interior, exterior, and screen cleaning, according to this Colorado Springs window cleaning pricing example.
That doesn't mean every property will be the same. It does show that homeowners already invest in complete window care when they want the house to look finished, not halfway done. If you're also weighing repair costs, this local guide to window screen replacement pricing can help frame the decision.
For optimal results in professional window cleaning, residential window cleaning, or window cleaning in Colorado Springs, CO, the best outcome usually comes from choosing the right fix for the screen's condition. Fresh paint helps in some cases. In others, repair or replacement is what restores the view.
If your windows are clean but your screens still make the house look tired, Cultivate House Detailing can help you sort out the right next step. Whether you need professional window cleaning, screen repair, or a full exterior refresh in Colorado Springs and nearby service areas, reach out for a quote and get a clear plan for cleaner glass, better-looking screens, and a finish that lasts.
Looking for a professional to take care of it? Cultivate House Detailing offers window screen repair and replacement. Get a free quote.