You open the windows on a bright Colorado Springs morning, hoping for cool air and a clear view of Pikes Peak, and the first thing you notice is the screen. Maybe it’s torn at one corner. Maybe the frame is bent just enough that it won’t sit flat. Maybe the whole screen is missing because it finally gave up after a windy season and a few hard slams.
That’s usually when homeowners start looking into building window screens themselves. It seems simple at first. A frame, some mesh, a little spline, and you’re done. Sometimes it is that simple. A lot of the time, it isn’t.
Colorado homes make the job more interesting. Sun exposure is strong, daily temperature swings are real, and not every window opening is as square as it looks. If you enjoy DIY work, a screen project can be satisfying. If you want a clean fit without trial and error, professional repair and replacement often saves time, frustration, and wasted materials.
Enjoying the View from Your Colorado Springs Home
You crack a window on a cool Colorado Springs evening and expect fresh air. Instead, the screen rattles in the track, bows inward, or leaves enough gap at the corner for insects and cottonwood fluff to come straight through.

That small failure changes how a room feels. Bedrooms stay shut up at night. Kitchen windows stop getting used during mild weather. A good screen should let air in, keep pests out, and disappear visually once it is in place.
In Colorado, that standard is harder to hit than many homeowners expect. Strong sun dries out mesh and plastic corners over time. Wind puts stress on light frames, especially on west-facing elevations and second-story windows. Older homes around Colorado Springs also tend to have openings that look square but measure a little off, which is where many DIY screen projects start going sideways.
The job itself is not complicated. The tolerances are.
A screen can look fine on a workbench and still fit poorly in the window. I see that a lot with replacement screens built from store-bought frame kits. The corners are slightly out, the spline is the wrong diameter, or the mesh was pulled unevenly and twisted the frame just enough to create a problem once it goes back into the track.
Common trouble spots show up fast:
- Frames bind in the opening because the measurements were taken from one point instead of several.
- Mesh sits loose or rippled because tension was added unevenly during rolling.
- Spline backs out later after heat, cold, and sun exposure work against a loose fit.
- Clips, tabs, or fasteners fail early because the wrong hardware was used or installed into thin material without enough bite. If your build involves hardware, spend a minute on choosing self-tapping fasteners before you start.
Material choice matters too. Fiberglass is forgiving and common, but it can sag if the install is sloppy. Aluminum mesh stays crisp, though it is less forgiving during installation and easier to crease. For homeowners comparing options, this guide to replacement screening material for different window screen needs helps sort out what holds up best in real conditions.
Some homeowners enjoy this kind of project and do fine with it. Others get halfway through, burn a Saturday on recuts, and still end up with one screen that does not sit right. In that case, professional screen repair is not a shortcut. It is often the more practical call, especially if the windows also need track cleaning, glass cleaning, or frame adjustments at the same time.
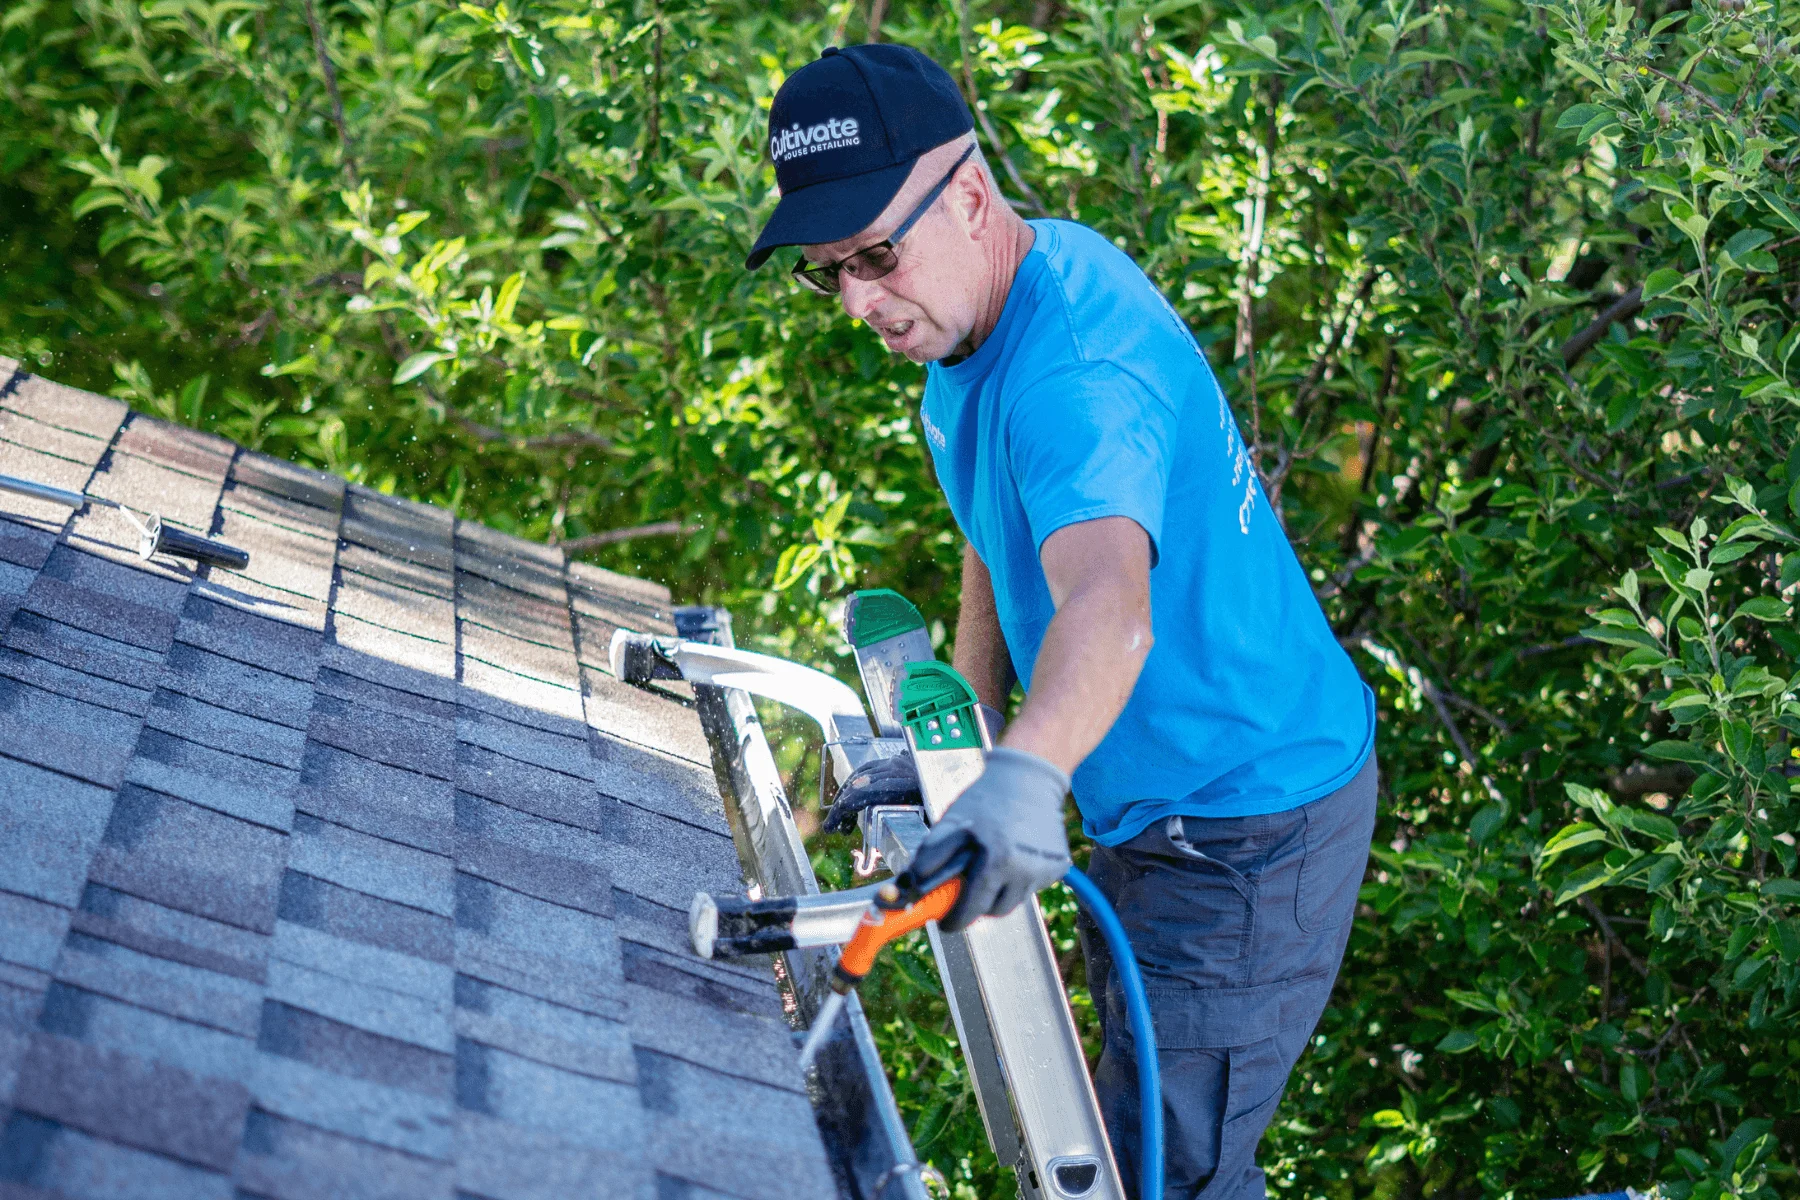
That is usually the trade-off. Build it yourself if you want the project. Call a local pro like Cultivate House Detailing if you want the windows working properly without the trial and error.
Gathering Your Screen Building Materials and Tools
A screen build usually starts going wrong before any cutting happens. I see it all the time in Colorado Springs. Homeowners buy a generic screen kit, grab whatever mesh is on the shelf, and find out later that the frame stock, spline, or hardware does not match the window they have. Our dry sun, spring wind, and older mixed housing stock make those mismatches show up fast.
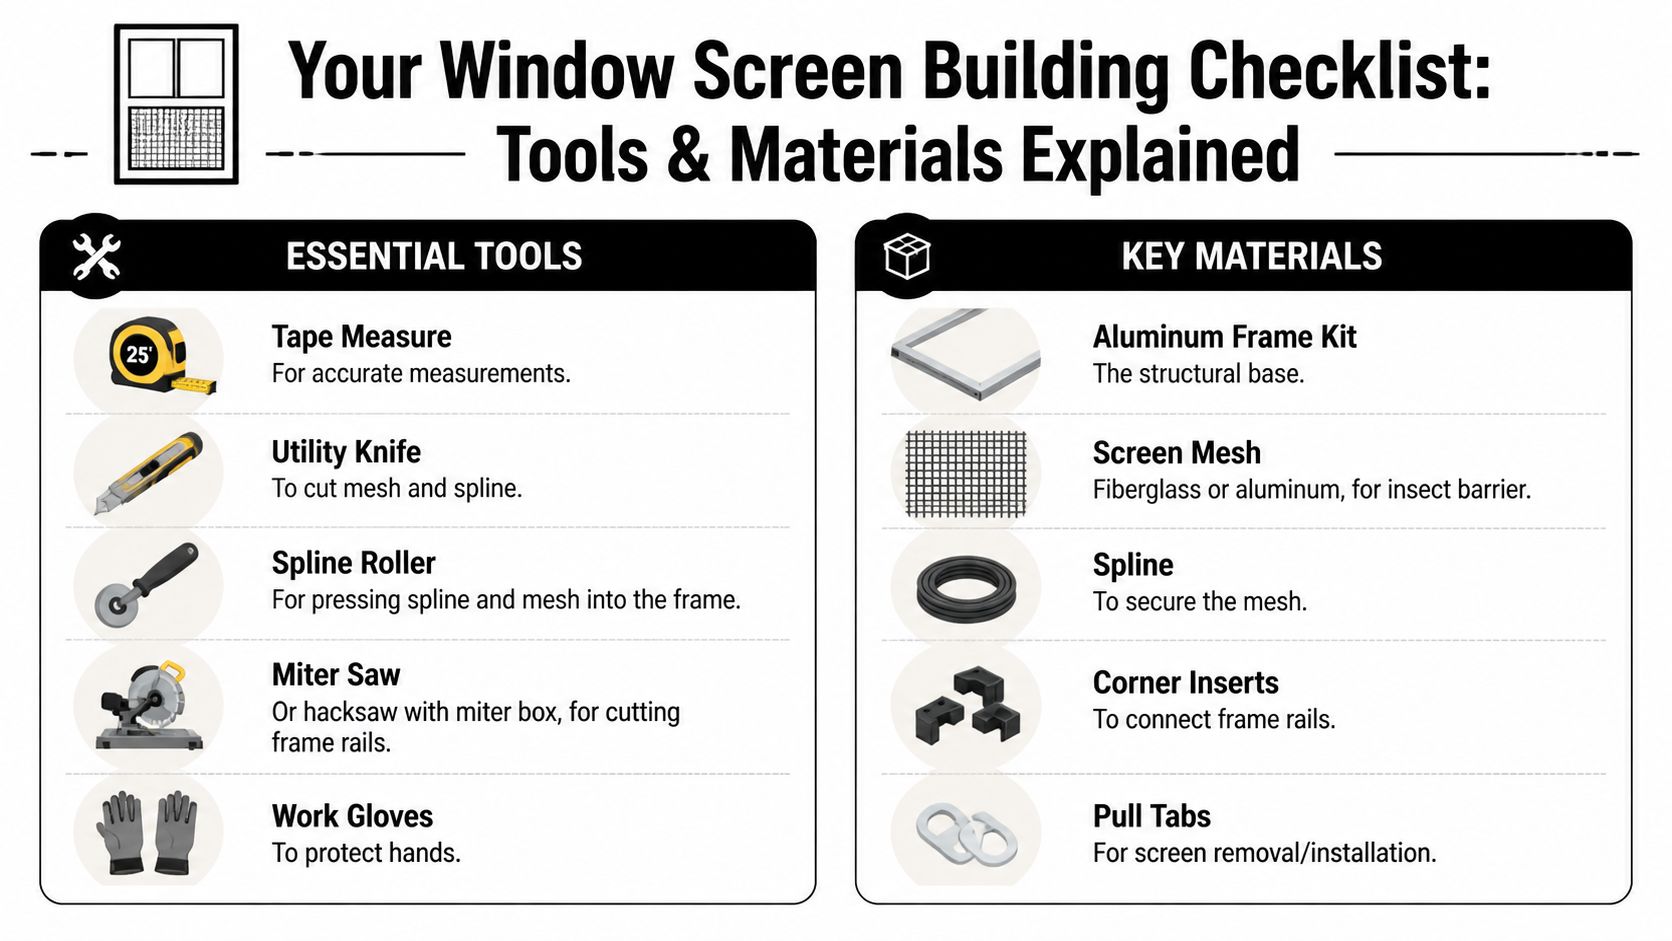
What you actually need on hand
Get all of your parts and tools together before you cut the first piece. Stopping mid-project to hunt down the right spline size or a missing corner insert is how frames get rushed, mesh gets creased, and one simple repair turns into a half-day job.
For a standard screen project, that usually means:
- Frame material. Aluminum is common on modern replacement screens. Wood still shows up on older homes and some custom builds.
- Corner inserts or joinery components. These control how square and rigid the finished frame stays.
- Screen mesh. Fiberglass, aluminum, pet-resistant mesh, or solar material, depending on the window’s use.
- Spline. The cord has to match the channel. Too small and it slips. Too large and it can distort the frame.
- Spline roller. A proper roller gives you much better control than improvised tools.
- Tape measure and straightedge. Small errors matter here.
- Saw or cutting setup. A miter saw works well. A hacksaw with a miter box can also do the job if you stay consistent.
- Utility knife. For trimming mesh cleanly.
- Gloves. Helpful with aluminum mesh and fresh-cut frame stock.
- Pull tabs or clips if your window style requires them.
If you’re fastening specialty hardware or modifying a mounting setup, it helps to understand choosing self-tapping fasteners so you don’t split a component or use the wrong screw profile.
Picking the right mesh
Mesh choice affects visibility, airflow, durability, and how forgiving the install will be. In Colorado, it also affects how the screen holds up against strong UV exposure, dust, hail, and repeated temperature swings.
| Mesh type | What it does well | Trade-off |
|---|---|---|
| Fiberglass | Flexible, easier to install, corrosion resistant, common for standard homes | Can loosen or wear sooner if the install is sloppy |
| Aluminum | Holds a crisp look, resists sagging better, good for higher-wear situations | Creases easily and needs more careful handling |
| Pet-resistant mesh | Better where claws, pushing, or impact are common | Harder to stretch evenly and heavier on the frame |
| Solar screen material | Cuts glare and reduces solar heat gain | Not a direct substitute for every insect screen application |
Fiberglass is still the material many homeowners start with because it is easier to work with. Aluminum gives a cleaner, firmer finish, but it is less forgiving if you over-tension a corner or drag the roller the wrong way. For homeowners sorting through those options, this guide to replacement screening material for different screen needs gives a solid side-by-side overview.
The tool people underestimate
The spline roller decides whether the mesh goes in clean or turns into a fight.
A standard roller has two wheels. One helps guide the spline into place, and the other seats it more firmly into the channel. That matters because uneven pressure is one of the quickest ways to ripple mesh or bow a light aluminum frame.
Use the correct tool. Do not substitute a screwdriver handle, putty knife, or anything else that happens to be rounded. Those shortcuts can tear mesh, scar the frame, and leave spline that starts backing out after a few hot afternoons.
This is usually the point where the DIY trade-off becomes clear. If you already have the right tools and only need one or two simple screens, building your own can make sense. If you are buying tools, sorting out material choices, and dealing with older Colorado Springs windows that also need cleaning or adjustment, having a local pro handle the screen repair often saves time, waste, and a second trip to the hardware store.
Executing the Perfect Fit Measuring and Assembling the Frame
A screen that misses by a hair can still miss by enough to bind, rattle, or leave a gap for insects. In Colorado Springs, that problem shows up fast because many homes have a little movement in the trim, a little paint buildup in the track, or an older frame that is no longer perfectly square.
Measure the opening, not the old screen
Use the window opening as your reference point. Old screens get bent, trimmed, and forced back into place for years, so they are a poor template on many houses.
Measure width in more than one spot. Measure height in more than one spot. On older wood windows, also check for paint ridges, swollen corners, and stops that are not sitting evenly. If the numbers vary, build to the smallest usable dimension and confirm how the screen is meant to sit in the opening before you cut anything.
That extra few minutes matters.
Leave room for real-world fit
A screen frame should fit with light clearance, not pressure. If you cut it to the exact opening size on paper, the finished frame can catch on paint, stick in one corner, or refuse to seat fully once the hardware is installed.
Dry judgment beats blind math here. On newer vinyl windows, the opening is often more consistent. On older Colorado Springs homes, especially ones that see strong sun exposure and seasonal dryness, one side of the opening may be slightly tighter than the other. I check both diagonals if the opening looks suspect, because a racked opening can make a square frame look wrong even when the cuts are accurate.
Choose the frame approach that matches the window
Homeowners usually go one of two directions. They either assemble an aluminum frame from screen stock and corner inserts, or they build a wood frame to match an older home.
Aluminum is usually the simpler path for modern replacement windows. It cuts quickly, goes together fast, and works well if the opening is reasonably standard. The downside is that light frame stock can bow if the cuts are rough or the corners are forced together out of square.
Wood makes more sense when the house already has wood screens or the opening is unusual. It gives you more flexibility, but it also adds finish work, more careful joinery, and a higher chance of fit issues if the window itself is not consistent from top to bottom.
Assemble it flat and check it before you go further
Cut all pieces cleanly and dry-fit the frame on a flat surface before locking anything in place. If one corner sits proud or one side has a slight bow, that flaw gets worse once the mesh goes in.
Check the frame like this:
| Check | What you want | Warning sign |
|---|---|---|
| Corners | Tight, even joints | Gaps, twist, or one corner sitting high |
| Frame shape | Flat on the work surface | Rocking or bowing |
| Overall fit | Fits the opening with light clearance | Has to be forced, scrapes, or leaves a visible gap |
| Rails and sides | Straight and consistent | One piece flexes more than the rest |
A quick test fit saves a lot of aggravation. Set the assembled frame in the opening before adding mesh. If it is already fighting you, fix that now. Mesh tension will not straighten a bad frame. It will make the problem easier to see.
Older Colorado Springs windows need a more careful check
A lot of Front Range homes look standard until the tape measure comes out. Stucco returns can be a little irregular. Painted wood windows can have decades of buildup. Some older openings are close enough to square to fool you on the first pass and far enough off to ruin a finished screen.
That is one reason DIY screen building can turn into a half-day project. The measuring is not hard, but it is fussy, and a bad cut means starting over with new material. If the windows also need track cleaning, stuck screen removal, or repair to bent frames, calling a local company like Cultivate House Detailing is often the more practical choice for homeowners who want the fit done right the first time.
Installing the Screen Mesh for a Taut Finish
A screen can fit the opening perfectly and still look wrong once the mesh goes in. This is the step where DIY builds usually go sideways, especially on larger Colorado Springs windows that catch strong afternoon sun and repeated wind.
Set the frame on a flat, clean surface with the spline channel facing up. Lay the mesh over the frame and leave enough extra material around every edge so you can keep it centered while you work. Do not trim anything yet. Early trimming is one of the fastest ways to lose control of tension.
Start with the mesh straight to the frame, not pulled tight. If the weave is already running crooked before the spline goes in, the finished screen will show it.
Install the mesh in a controlled order
The goal is even tension. Too loose, and the screen looks wavy. Too tight, and the frame can bow enough that it no longer sits right in the window.
Use this sequence:
- Center the mesh so you have even overhang on all sides.
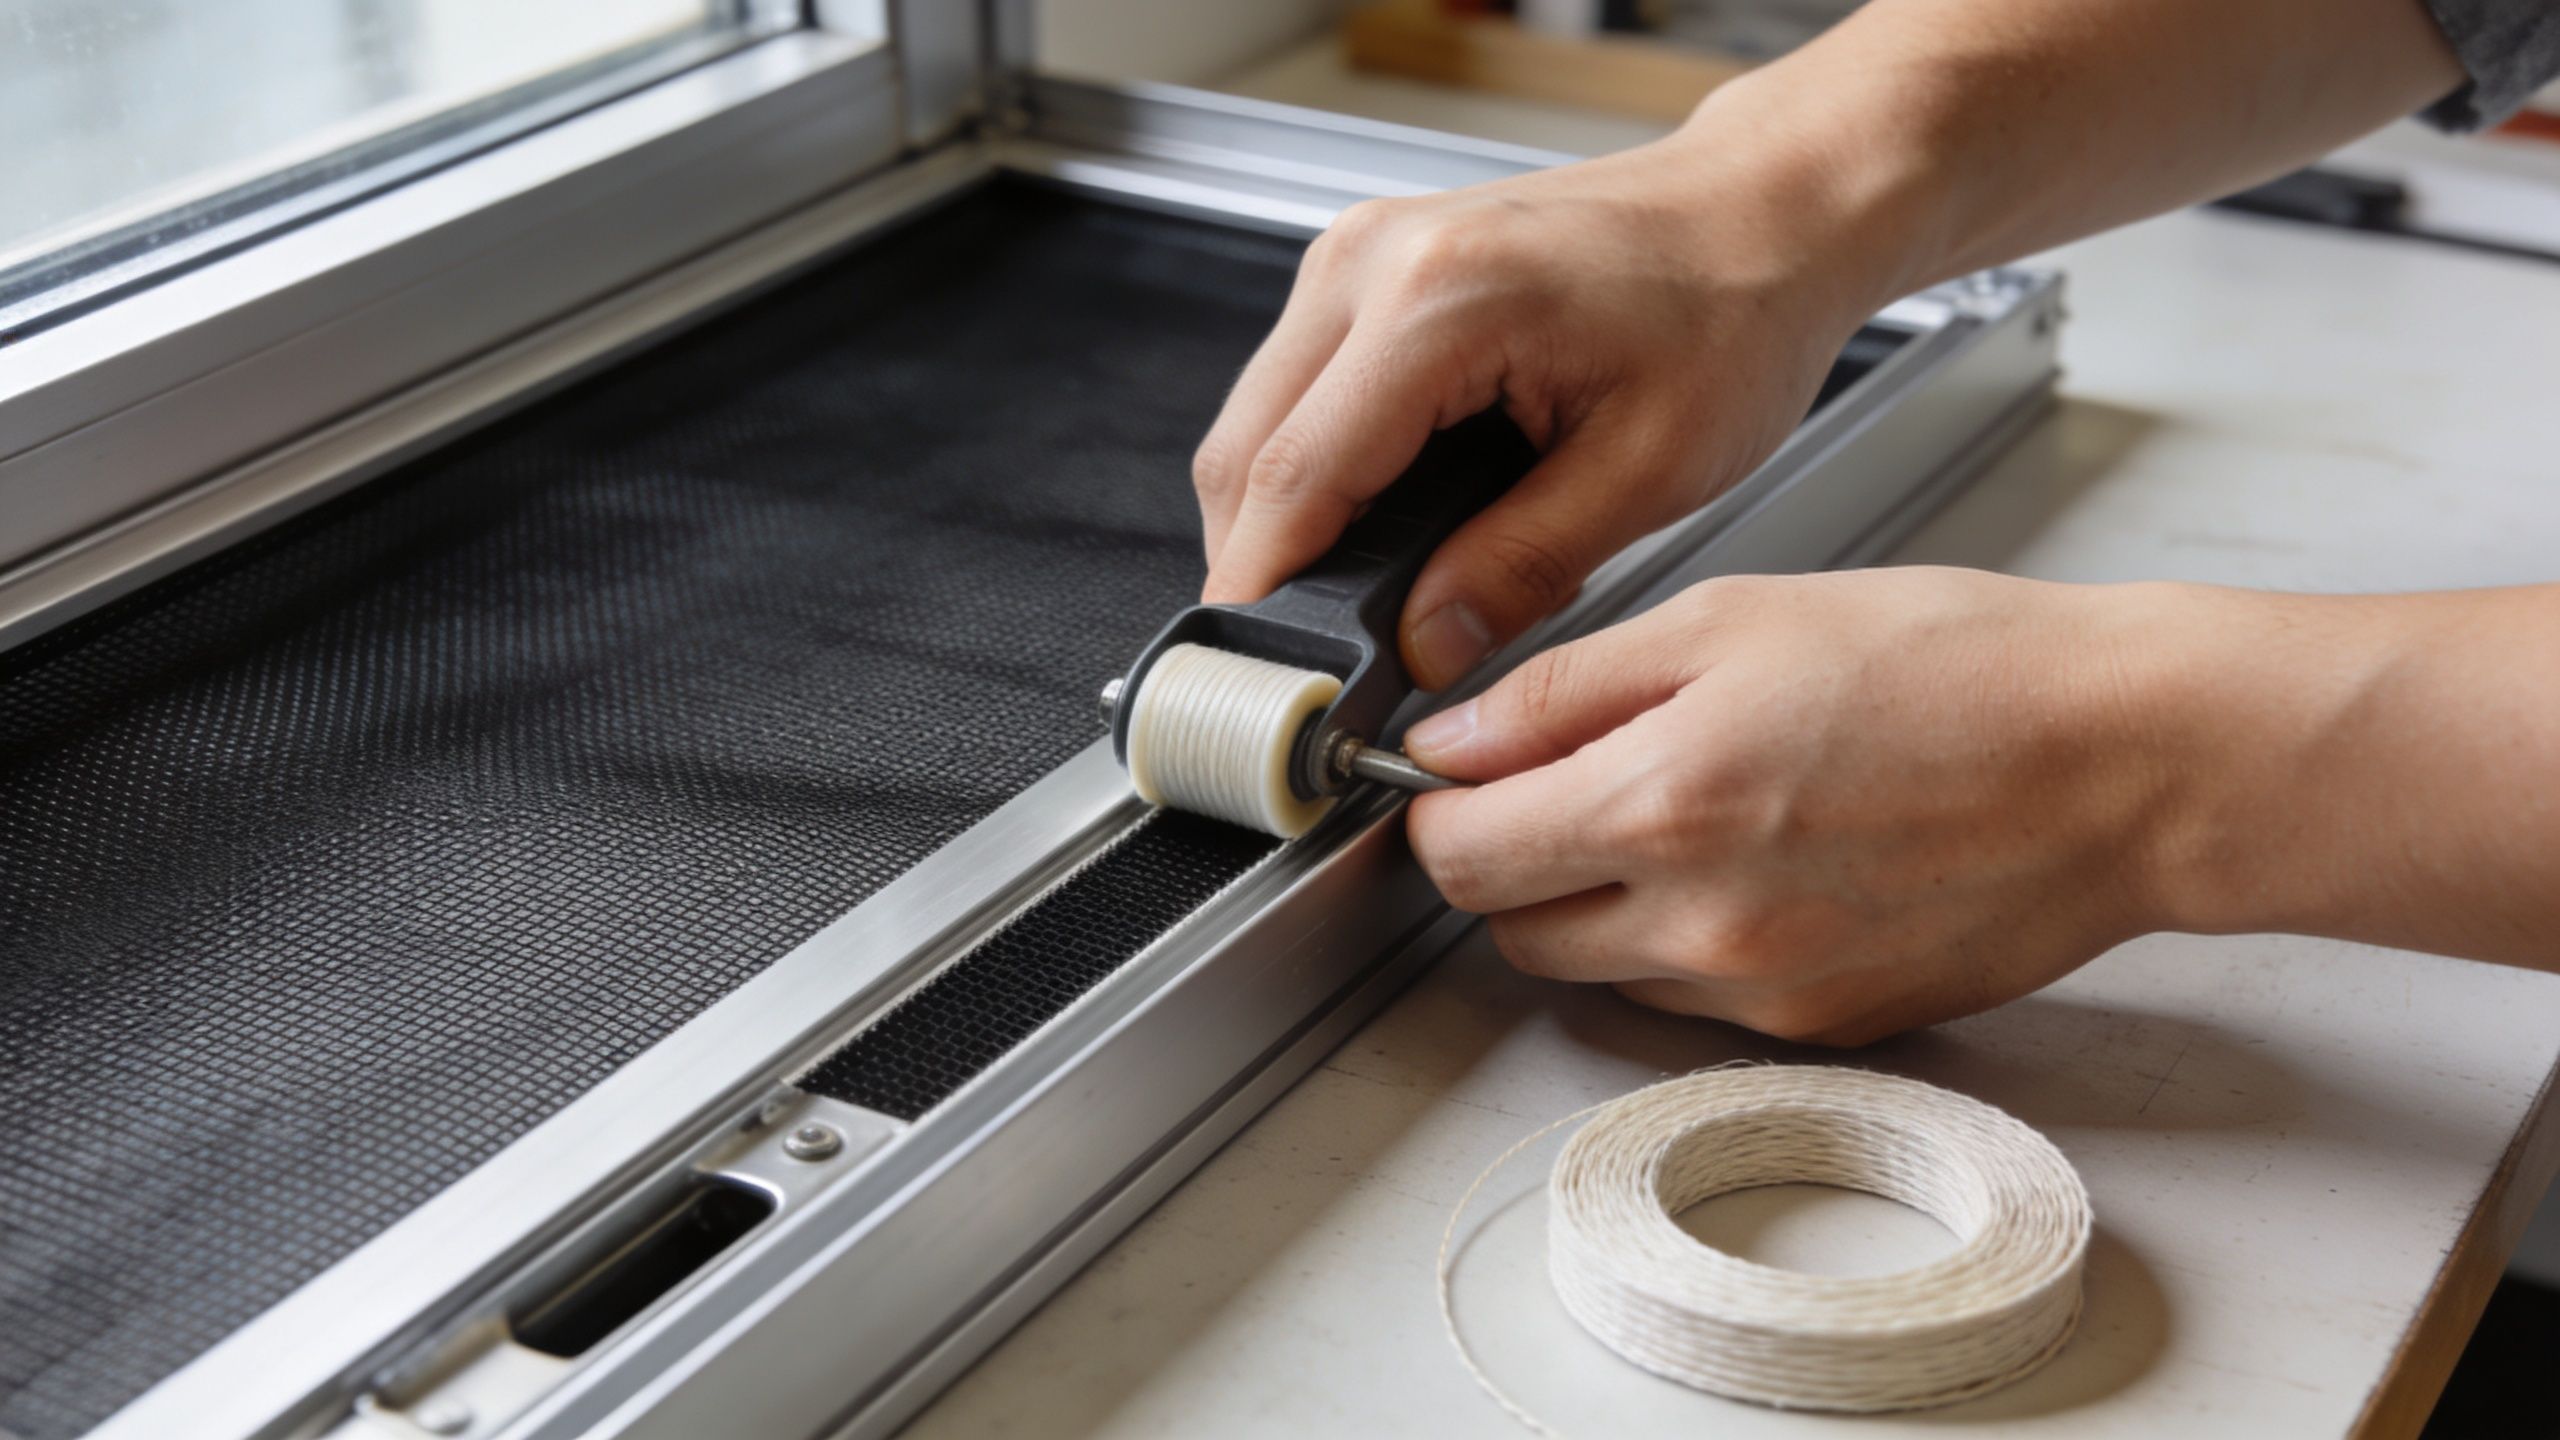
- Press the mesh lightly into one side of the channel with the convex wheel.
- Seat spline on that same side with the concave wheel.
- Move to the opposite side and pull only enough to remove visible slack.
- Repeat on the remaining two sides while checking that the frame stays flat.
- Trim the excess mesh after the spline is fully seated.
Corners deserve patience. If you rush them, the spline twists, the mesh bunches, and one corner ends up pulled inward.
Use the roller with steady pressure
A lot of first-time builders push too hard. The tool should guide the material into the channel, not force it like a putty knife. Keep the wheel aligned with the groove and roll through the corner in one smooth pass if possible.
Fiberglass gives you a little forgiveness. Aluminum mesh does not. Aluminum shows every kink, and once it creases, you usually start over with a new piece.
Here’s a video that gives a helpful visual of the hand motion and pace involved:
Watch for problems before you finish the last side
Stop and inspect the screen while one edge is still easy to adjust. Look for diagonal wrinkles, a weave pattern that drifts out of square, or a frame rail that starts to curve. Those are signs the tension is uneven.
In Colorado's dry climate, small install mistakes show up fast. Mesh and spline can settle after a hot day, and a screen that looked acceptable on the bench can loosen up once it is back in the window. Older homes here also tend to have bigger picture windows and sun-exposed elevations, which make tension mistakes more obvious.
For wide or custom screens, support the center of the frame so it stays flat while you roll in the spline. That extra support matters more than most DIY guides admit.
Trim cleanly and check the finished screen
Use a sharp utility knife and trim along the outside edge of the spline. Keep the blade angled away from the installed mesh so you do not nick the finished edge. One careless cut can turn a good install into a redo.
After trimming, lift the frame and look across it in the light. The mesh should appear even, flat, and firm without pulling the frame out of shape. If the screen still has ripples or the frame bows, redoing it now is faster than fighting it in the window later.
That is also the point where many homeowners decide their time is better spent elsewhere. If the screen is oversized, sun-damaged, bent, or part of an older window setup, professional window screen repair in Colorado Springs usually saves a trip for more material and a second round of trial and error. And if the goal is cutting down on flies while you sort out screen issues, BugMD's Barfly traps are a practical short-term backup inside the house.
Common DIY Mistakes and When to Call a Screen Repair Pro
Most failed screen projects don’t fail because the homeowner didn’t care. They fail because the small details stack up. A cut is slightly off. A frame is almost square. The mesh is almost tight. Then the screen goes into the window and the whole thing looks homemade in the wrong way.
The mistakes that show up most often
Some problems are obvious immediately. Others don’t show up until the first hot afternoon or the first time the screen is removed and reinstalled.
- Wrong final dimensions. The screen fits nowhere, or only if you force it.
- Bowed frame. Usually caused by too much mesh tension.
- Loose, wavy mesh. Common when the spline goes in unevenly.
- Popped spline. More likely when the material wasn’t fully seated.
- Damaged corners. Usually from rough assembly or frame twist.
- Ripped mesh near the edge. Often caused by trimming too aggressively or rolling too hard.
Colorado Springs adds another layer because temperature swings expose weak installs fast. A screen that barely held together on the bench may start shifting once it lives in a real window opening.
The hard category most DIY guides skip
Corner windows and other non-standard openings cause more trouble than standard rectangular screens. That’s one of the biggest gaps in typical DIY advice. In areas with varied architecture like Colorado Springs, searches for corner window screen gaps spike 25% seasonally, and the failure rate for DIY corner screens is estimated at 15 to 20% in high-altitude areas because materials respond differently to thermal expansion, according to this discussion of non-standard screen challenges.
That tracks with what happens on homes. A standard replacement mindset doesn’t work well when the opening isn’t standard.
Some screens are repair jobs. Some are fitting problems disguised as repair jobs.
When it makes sense to stop DIY and hand it off
Call a pro when any of these apply:
- The window opening is unusual. Corner windows, odd angles, or custom trim details raise the difficulty fast.
- You already rebuilt it once. A second round of materials often costs more than expected.
- The frame style is unclear. If you’re guessing on hardware or retention method, you’re likely wasting time.
- You want the screen cleaned and the windows serviced too. Combining tasks is often the smarter move.
For homeowners who want a direct local option, window screen repair in Colorado Springs is one way to deal with torn mesh, bent frames, and poor-fitting screens without turning it into a full weekend project.
If flies are the immediate problem while you’re waiting on repair, simple temporary control measures can help indoors. Products like BugMD's Barfly traps are a practical stopgap, but they don’t solve the root issue if the screen itself has gaps.
What a pro does differently
A professional usually identifies the actual failure point faster. Sometimes it’s the mesh. Sometimes it’s the frame. Sometimes the problem is the window opening itself, not the screen.
That matters because a lot of homeowners buy the wrong replacement parts. They assume every issue calls for new mesh when what they really need is a resized frame, different spline, or a full rebuild that fits the opening correctly.
Complete Your Home's Look with Professional Window Care
A repaired or newly built screen is only part of the result most homeowners want. The primary goal is a window that works properly, looks clean, and lets in fresh air and natural light without distraction.
That’s where screen work meets full window care. When screens are dirty, tracks are packed with debris, or the glass is streaked and spotted, the whole window feels neglected even if the mesh is brand new. Clean screens, clean glass, and clean tracks work together.
Why screens matter beyond appearance
Window screens have played an important role in public health. Their widespread use helped block disease-carrying insects while allowing homes to ventilate, contributing to the near-eradication of some parasitic diseases in the U.S. by the 1950s. During World War II, U.S. forces also used screens to protect troops from mosquitoes spreading malaria and dengue. Today, virtually all operable windows in the U.S. feature screens, according to the Smithsonian’s history of window screens.
That history still connects to routine maintenance. A screen that’s torn, filthy, or hanging loose isn’t doing its job well.
What full window service improves
For homeowners and property managers, the best outcome usually comes from treating the window as a system.
| Service | Why it matters |
|---|---|
| Screen cleaning or repair | Restores airflow, appearance, and insect protection |
| Exterior window cleaning | Improves curb appeal and view clarity |
| Interior window cleaning | Brings in more natural light and removes film or dust |
| Track cleaning | Helps windows open and close more cleanly |
| Hard water stain attention | Addresses buildup that basic washing won’t remove |
That’s especially relevant for people searching for window cleaning near me, window cleaning in Colorado Springs, CO, residential window cleaning, or commercial window cleaning because the visible issue is often bigger than one torn screen.
A practical approach for Colorado Springs homes
Homes in Colorado Springs, Monument, Black Forest, Manitou Springs, and nearby areas deal with windblown dust, seasonal debris, strong sun, and regular use of operable windows. A clean screen paired with streak-free glass makes the view feel sharper and the room brighter. That’s true whether you’re maintaining your own home, preparing a property for sale, or keeping a storefront presentable.
If you’re also trying to improve comfort around drafty windows, this guide on how to weatherize windows for free can help with low-cost ideas that complement routine window maintenance.
What to expect when hiring out the work
When homeowners choose professional window cleaning and screen service, they usually want three things. Clear communication, a clean result, and less hassle.
That can include:
- Exterior window cleaning for street-facing curb appeal and better views
- Interior window cleaning for bright rooms and cleaner light
- Screen cleaning and repair so the window works as intended
- Track and sill cleaning to remove dust and debris that collect over time
For many households, that’s the better value than building one screen at a time, especially when multiple windows need attention or upper-story access is involved.
If you’d rather skip the measuring, cutting, re-screening, and cleanup, Cultivate House Detailing provides window screen repair along with residential and commercial window cleaning in Colorado Springs and nearby communities. If your goal is cleaner glass, better airflow, and windows that look right from inside and out, request a quote and get the whole job handled at once.