
Open the window on a mild Colorado Springs afternoon and the problem shows up fast. The air feels great, the view is why you bought the place, and then you notice the torn corner in the screen, the sag in the mesh, or the rip that's been letting in every flying thing with wings. At that point, you either keep the window shut or deal with a screen that isn't doing its job.
That's where rescreening a screen makes sense. If the frame is still solid, replacing the mesh is often the fix that gets the window working again without swapping the whole unit. It's a practical DIY project, but it's also one of those jobs that looks easier than it feels once the frame starts sliding around, the mesh wrinkles, or the spline refuses to stay seated.
In homes around Colorado Springs, this comes up all the time after wind, sun exposure, pets, or plain old wear. The good news is that the process is straightforward when you use the right materials, work on a flat surface, and don't rush the tensioning.
Enjoying Your Colorado View Through a Torn Screen?
You crack the window for a little evening air, look out at Pikes Peak, and then spot the rip in the screen that has been letting bugs in all week. That is usually the moment Colorado Springs homeowners decide they are either fixing it that day or putting the window back down and living with it longer than they wanted.
If the frame is still straight, rescreening is usually the smarter fix. You keep the existing frame, remove the worn mesh and spline, and install new material in the original groove. That sounds simple because the concept is simple. The part that trips people up is getting the screen tight without warping the frame or cutting the mesh too short.
I see this a lot after spring wind, summer sun, and pet damage around the lower corners. A torn screen does not always mean you need a full replacement. It often means you need the right replacement screening material and a little patience.
When rescreening makes sense
Rescreening is a good call when the mesh failed but the frame still has some life left in it. Common examples include:
- Small tears or punctures: The hole is in the mesh, not in the frame corners.
- Sagging screen fabric: The material has stretched or loosened with age.
- Sun-brittle mesh: The screen looks faded, dry, or weak from Colorado exposure.
- Pet or kid damage: One section got pushed through, but the frame still fits the window correctly.
A simple rule works well here. If the frame sits flat and the spline channel is not cracked or crushed, the screen can often be rescreened instead of replaced.
Why homeowners get stuck on this job
The challenge is not figuring out the order of steps. The challenge is doing clean work under tension. Mesh wants to shift. Corners want to bunch. Old spline can come out in one piece on one screen and crumble into bits on the next.
That is why I tell people to be honest about their setup before they start. If you do not have a flat work surface, decent lighting, and the proper window screen repair tools, this small project can turn into a frustrating one fast.
DIY rescreening is absolutely doable. It just rewards careful hands and enough time to do it twice if the first pass comes out loose or crooked.
Gathering Your Tools and Materials for the Job
Set your materials out before you pull the old spline. On a kitchen table or garage bench, that one habit saves a lot of avoidable frustration. I see DIY jobs stall in Colorado Springs all the time because the frame is ready, the mesh is half-cut, and someone realizes they never checked the spline size.
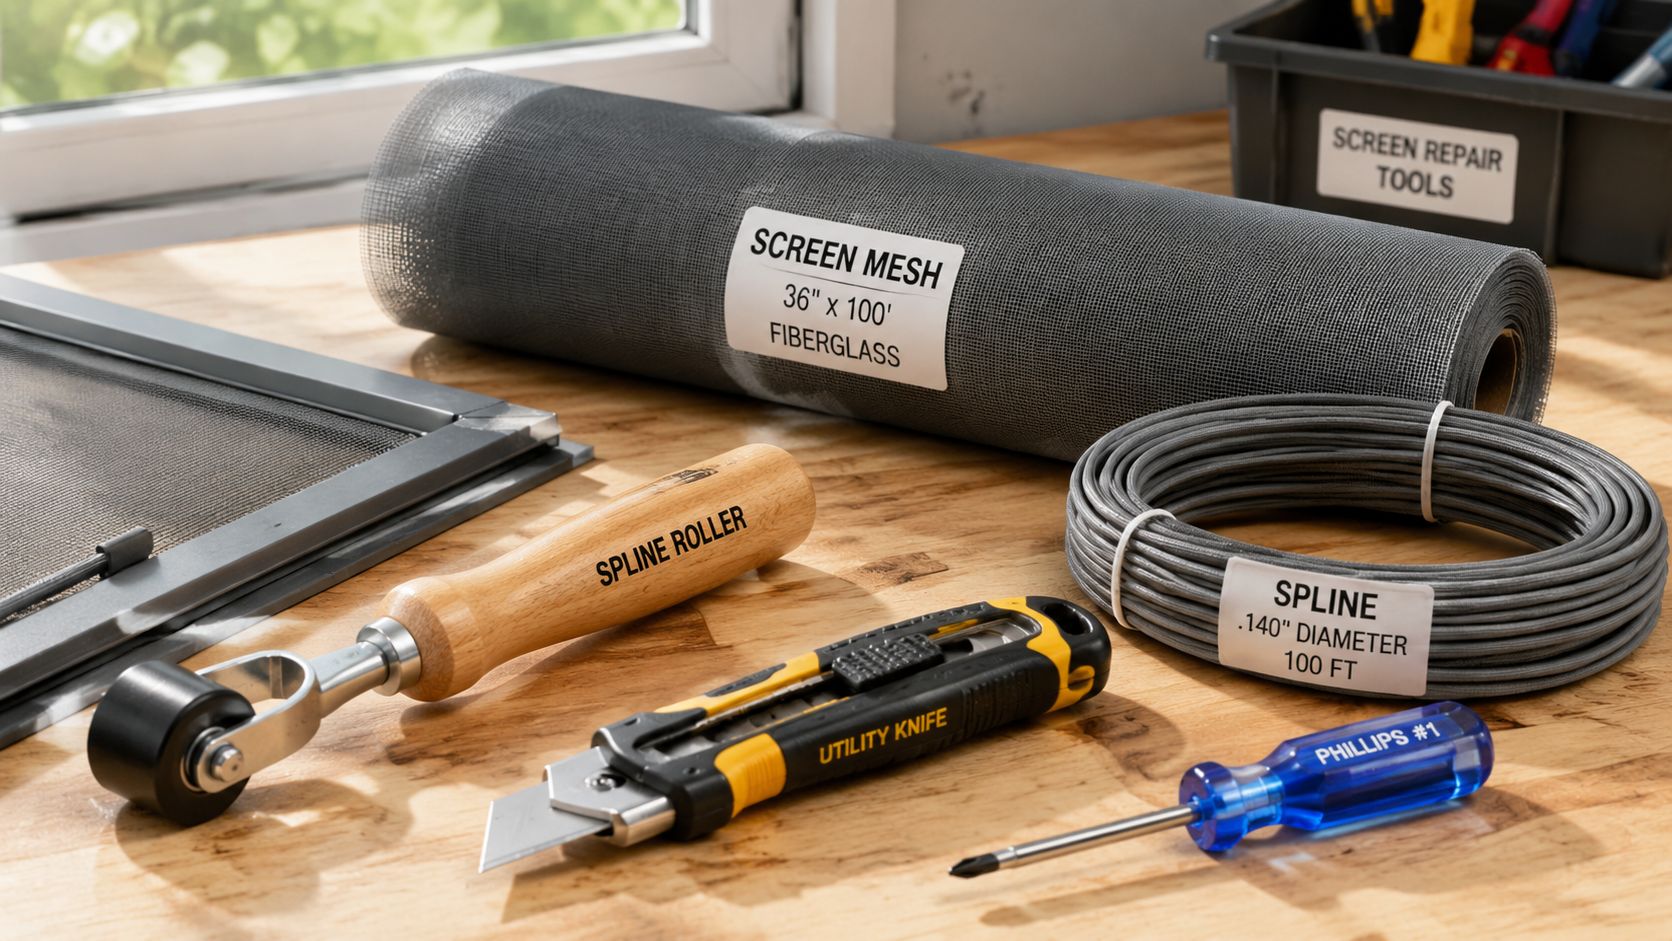
The basic kit you actually need
You do not need a truck full of gear. You do need the right few items.
- Replacement mesh: Fiberglass is the easiest for most homeowners to handle because it has some give. Aluminum stays straighter, but it also kinks faster and shows every handling mistake. Pet-resistant mesh holds up better to claws and pressure, but it is thicker and takes more effort to roll in cleanly.
- New spline: Old spline often shrinks, hardens, or cracks when you remove it. Reusing it is one of the fastest ways to end up with loose corners.
- Spline roller: Use the proper wheel, not a screwdriver, putty knife, or anything else from the junk drawer. A real roller keeps pressure even and lowers the chance of tearing the screen.
- Utility knife: Start with a fresh blade. Clean trimming depends more on blade sharpness than hand strength.
- Flat work surface: A bench, table, or clean floor section works if the frame sits flat without rocking.
- Painter's tape or light tape: Handy for keeping the frame from shifting while you work.
- Clean rag or small brush: Use it to clear dirt and old spline crumbs out of the groove.
If you want a quick buying reference, this guide to window screen repair tools covers the basic setup well.
The material choice that causes trouble
A common DIY mistake is rushing the mesh choice, then fighting the material for the rest of the job. Fiberglass is usually the safest pick for a first rescreen because it lays down easier and forgives small hand-position errors. Aluminum can look crisp, but it punishes uneven tension. Heavier mesh has its place, especially on lower screens that take abuse, yet it also makes the spline harder to seat.
If you are comparing options, this overview of replacement screening material gives a useful breakdown of what fits different situations.
Leave enough excess mesh around every side of the frame before you install spline. A couple inches of overhang gives you room to keep the screen straight and centered while you work. Cutting it too close at the start is a rookie error, and it usually means starting over with a fresh piece.
What works and what doesn't
A few choices at this stage decide whether the job feels manageable or irritating.
| Tool or material | What works | What usually goes wrong |
|---|---|---|
| Spline roller | A dedicated roller with a comfortable grip | Improvised tools that slip or gouge the frame |
| Utility knife | Fresh blade, controlled trimming | Dull blade that snags and pulls the mesh |
| Work surface | Flat and steady | Uneven setup that twists the frame |
| Mesh cut size | Extra overhang on all sides | Cutting too tight before the spline is in |
The trade-off is simple. Buying the right materials costs a little more up front, but it is still cheaper than wasting screen, redoing loose corners, or cracking a frame that was fine to begin with.
The Step-by-Step Screen Installation Process
A good rescreen job is mostly about control. On a workbench in Colorado Springs, where dry air can make mesh hold a little curl and older frames tend to be brittle from sun exposure, the cleanest results come from slowing down and keeping the frame flat from start to finish.
Removing the old screen and spline
Set the frame on a solid table first. Use a small flathead screwdriver or pick to lift one end of the old spline, then pull it out in one steady pass if it will cooperate. If the spline is dry, cracked, or breaks into pieces, pull out what you can and work around the frame a few inches at a time instead of forcing it.
Once the old mesh is off, clean the groove completely. Brush out grit, old spline fragments, and anything stuck in the corners. If debris stays in that channel, the new spline will fight you the whole way and may not sit evenly.
Take a minute to inspect the bare frame.
Look for bent corners, hairline cracks, or a side rail that bows when you press it lightly. If the frame already has a twist, fresh mesh will not fix it. It usually makes the flaw easier to see.
Positioning the new mesh correctly
Lay the new mesh over the frame with extra material hanging past every side. Keep the pattern square to the frame. If the weave starts off crooked, you will chase wrinkles all the way around.
Use your hand to smooth it flat, but keep the pressure light. The goal is to position the mesh, not stretch it. A lot of DIY jobs go wrong here because the installer pulls too hard at the start and ends up with a frame that bows inward once the spline is seated.
A short visual reference can help if this is your first time handling the roller.
Rolling the spline without warping the frame
Start on one long side. Use the convex wheel first if your roller has two ends, pressing the mesh gently into the groove before seating the spline. After that, roll the spline in with firm, even pressure. Then move to the opposite side so the tension stays balanced.
Finish the remaining two sides one at a time, checking the screen surface as you go. If you spot a ripple halfway through, stop and pull that section of spline back out before continuing. It is much easier to correct a small problem now than after all four sides are locked in.
Support the frame with your free hand near the corner you are working on. Thin aluminum frames can flex more than people expect, especially on larger window screens and sliding screen doors. If your door also drags or sits out of alignment, this DIY patio door adjustment guide covers the same kind of careful, incremental adjustment that keeps parts from getting forced out of shape.
Trimming the excess cleanly
Trim only after the spline is fully seated and the screen looks even. Hold a fresh utility blade at a slight outward angle and run it along the outside edge of the groove. Keep the cut shallow and controlled so you do not nick the new screen or slice into the spline.
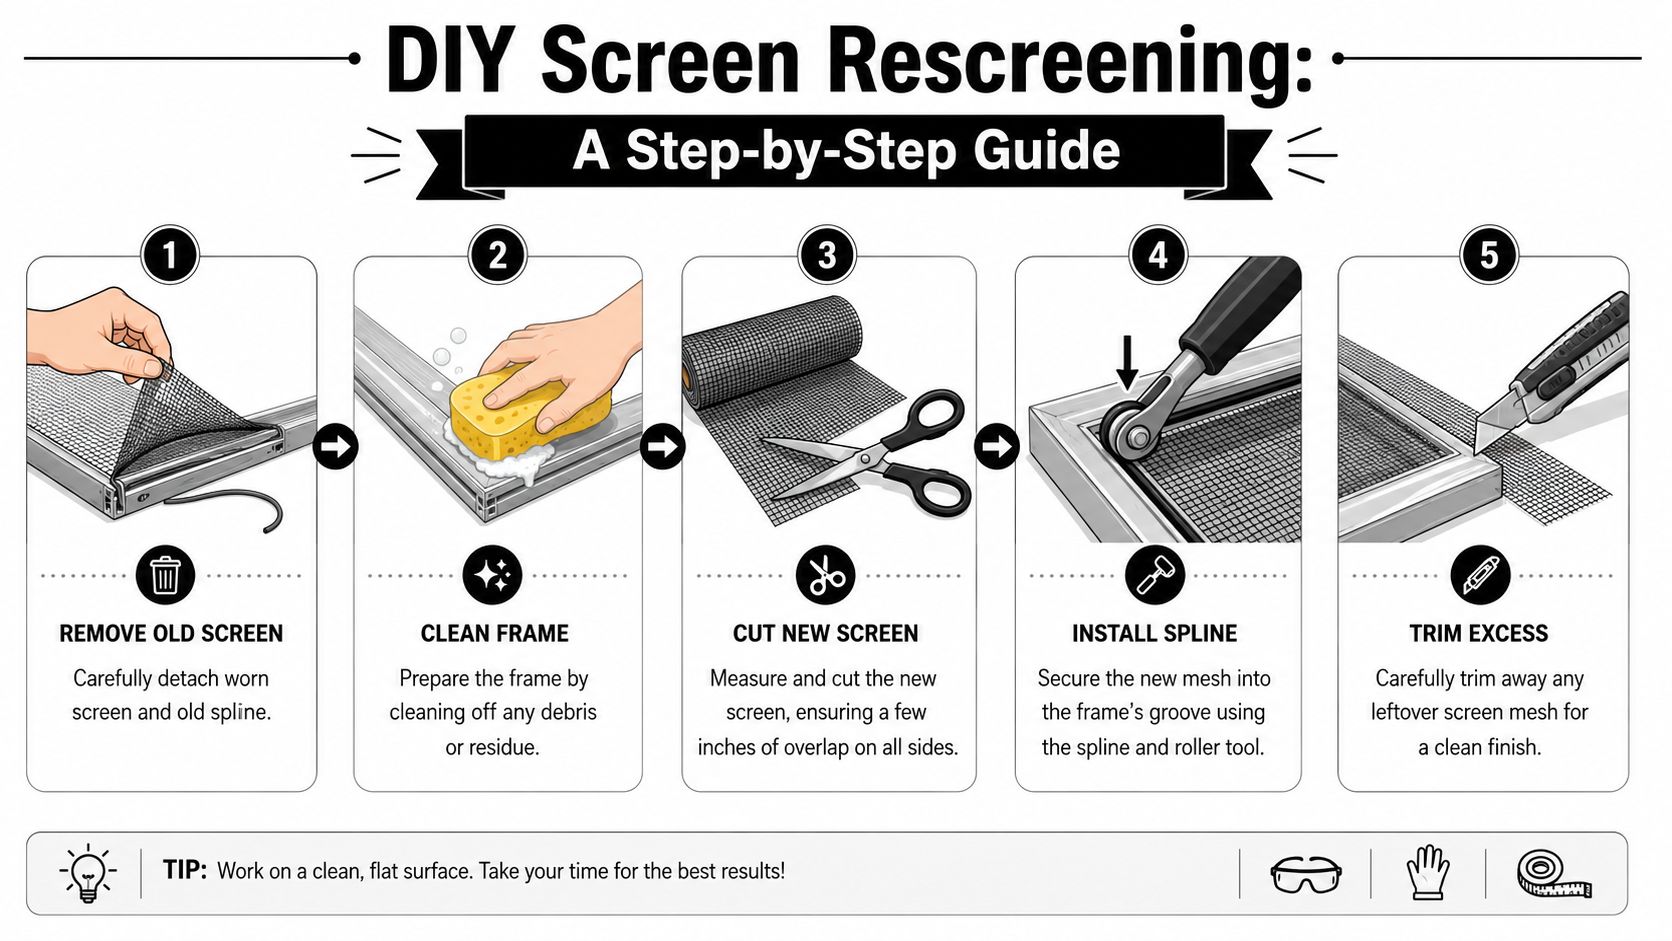
Here is the order I recommend on a standard rescreen:
- Remove the old spline and mesh without prying against the frame more than necessary.
- Clean the groove so the new spline can seat fully.
- Center the new mesh with overhang on all sides.
- Install spline on one side, then the opposite side to keep tension even.
- Finish the last two sides while watching for shifting or ripples.
- Trim the excess mesh along the outer edge of the groove with a sharp blade.
The finished screen should sit flat, look straight in the light, and stay firm without making the frame bow. If you cannot get that result after one reset, the problem is often the frame, the spline size, or uneven pressure. That is usually the point where a local screen shop saves time, material, and frustration.
How to Avoid Common DIY Rescreening Mistakes
You get the new mesh in, step back, and the screen still looks sloppy in the sunlight. That usually comes down to technique, not effort. Around Colorado Springs, I see plenty of DIY rescreen jobs that would have turned out fine if the installer had caught one small problem earlier.
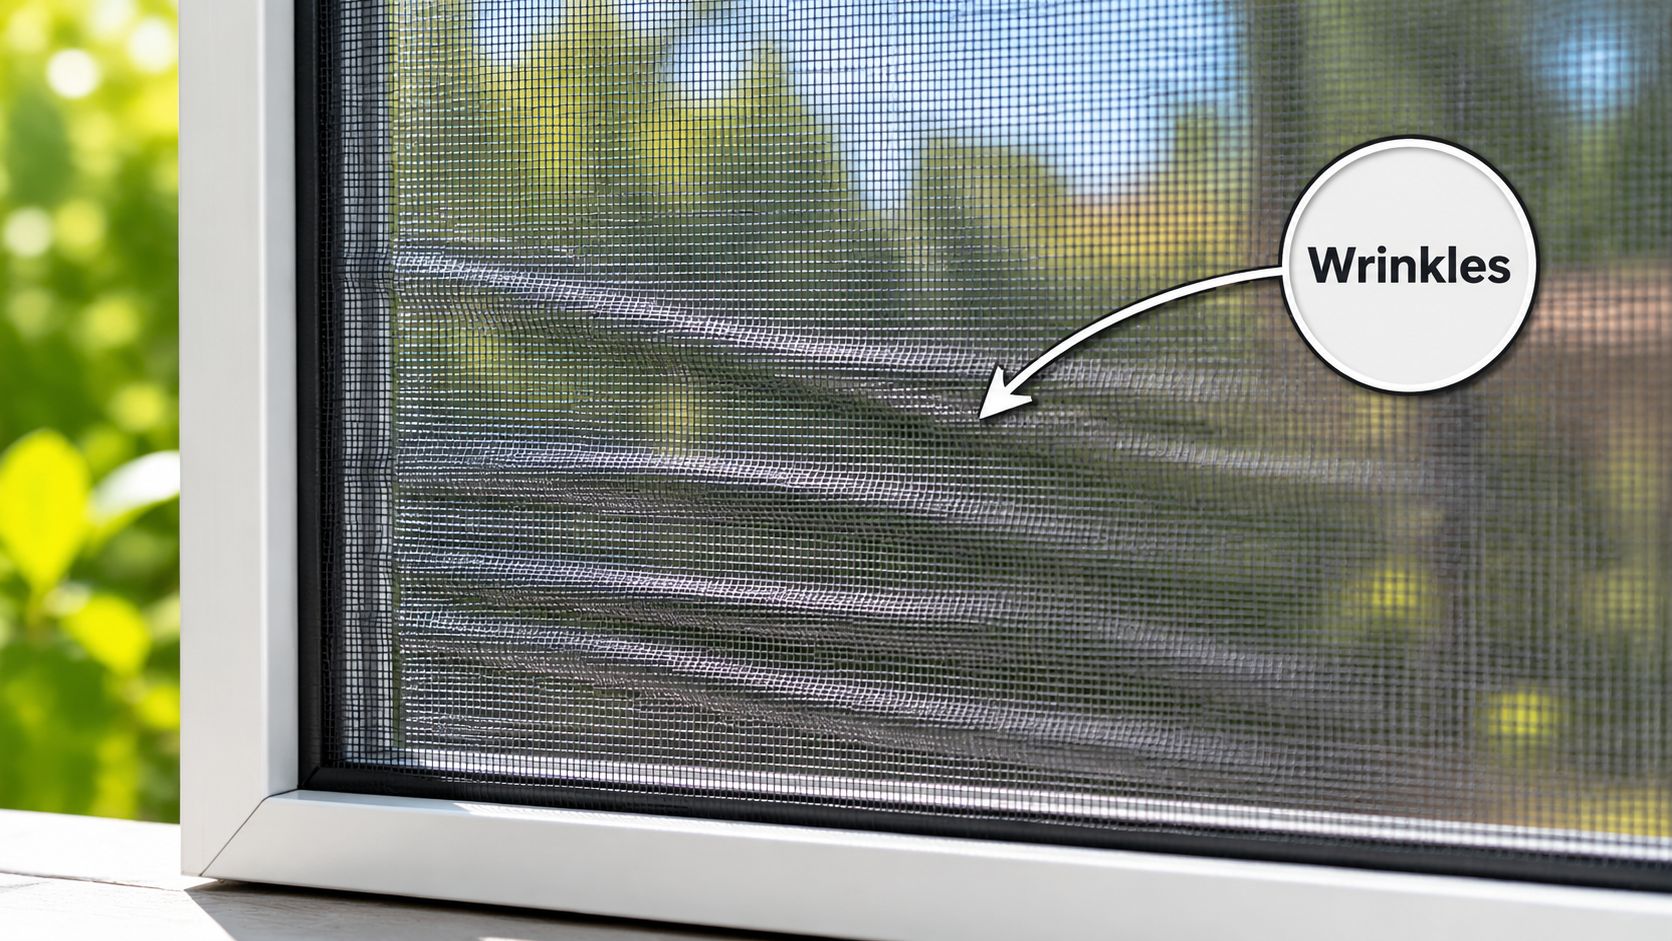
Wrinkles usually start before you notice them
A wavy screen rarely starts at the end. It starts when the mesh goes into the groove slightly off-square, or when one side gets locked in with more tension than the opposite side. By the time all four sides are rolled, the problem is already built in.
Stop early if you see the material walking to one corner. Pull that section of spline back out and reset it while you still have room to correct the tension. Finishing the whole screen and hoping it flattens out wastes time and usually wastes mesh too.
Early trimming causes a lot of avoidable rework
I see this one all the time. A homeowner gets two sides seated, trims the excess to clean things up, then finds out the mesh still needs to shift. At that point, there is nothing left to work with.
Leave the overhang in place until the entire perimeter is installed and the screen looks even in the light. Then trim along the outside edge of the groove with a sharp blade and a steady hand.
Field note: If the knife drifts toward the spline, you can cut the new mesh or nick the spline itself. One bad pass can send you back to the start.
A few bad assumptions cause most DIY trouble
Some mistakes come from rushing. Others come from trying to save a few dollars on the wrong part of the job. If you are already comparing repair costs, this guide to window screen replacement cost helps put the material cost versus labor trade-off in context.
| Assumption | What usually happens |
|---|---|
| Pull the mesh as tight as possible | The frame bows or the pattern distorts |
| Reuse old spline | The screen does not hold evenly in the groove |
| Trim as you go | The mesh shifts and cannot be reset cleanly |
| Work on the floor or a rough surface | The frame twists and wrinkles show up fast |
Watch the frame as much as the mesh
This is the part many first-time DIYers miss. The mesh gets the attention, but the frame tells you whether the job is going right. If the frame starts bowing outward while you roll spline, back off and reset before you finish the side.
That same principle shows up in other home projects too. Whether you are rescreening or choosing quality Fresno window contractors, the result depends on straight, stable components before the finish work starts.
Know when to stop and reset
A second attempt is normal. A third attempt on the same frame usually means something else is wrong, often the spline size, frame condition, or your work surface.
That is where DIY starts costing more in time than it saves in money. The job can be done well at home, but it does not forgive rushed cuts, uneven pressure, or a bent frame.
When to Call a Professional Screen Service in Colorado Springs
Some screens are good DIY candidates. Some aren't.

The screens that usually need expert help
Bent frames are the biggest one. If the frame won't sit flat before the mesh goes in, no amount of careful spline work will make it look right. Large patio screens can also be frustrating because the wider frame has more room to flex while you work.
Second-story and third-story screens are another category where caution matters. Even if the repair itself happens on the ground, removing and reinstalling screens from higher windows can turn into more hassle than most homeowners expect.
A pro is also the smarter call when:
- You have multiple damaged screens: Batch work is easier with the right setup.
- You want consistent appearance across the house: Matching material and tension takes practice.
- You're already scheduling exterior work: It makes sense to bundle screen repair with window care.
- You don't want trial and error: Some people prefer the finished result.
Why homeowners often outsource this job
Rescreening a screen is a good example of a repair that sits right in the middle. It's not highly technical, but it does reward technique. The difference between acceptable and clean-looking usually comes down to flat setup, controlled tension, and careful trimming.
That same thinking applies to other window-related decisions. If you're comparing repair quality and workmanship standards in a broader sense, this article on choosing quality Fresno window contractors is a useful reminder that fit, finish, and reliability matter as much as materials.
If you're trying to decide whether repair or replacement makes more sense for your own screens, this guide to the cost of window screen replacement can help you weigh the trade-offs before you commit.
Get a Perfect Screen and a Clear View Today
If you like hands-on home projects, rescreening a screen is absolutely something you can do yourself. With a flat work surface, the right roller, fresh spline, and patience, you can get a clean result. The catch is that screen repair doesn't hide mistakes well. Wrinkles, crooked weave, bad trimming, and bent frames show up immediately.
For a lot of Colorado Springs homeowners, the primary question isn't whether the repair is possible. It's whether they want to spend the time doing it twice.
If you'd rather skip the trial and error and get a clean, reliable result the first time, professional help is often the better value.
If you need window screen repair, screen replacement, or professional window cleaning in Colorado Springs and nearby communities, contact Cultivate House Detailing for a fast quote and clear scheduling.